

What you’ll achieve: By the end of this hands-on guide you’ll be able to select, install (or supervise installation of), and maintain a commercial-grade metal building door matched to a steel building. Realistic time: planning 2–8 hours, simple replacement/install steps 4–12 hours with a two-person crew; complex custom installs 1–3 days. Skill level: intermediate DIY (mechanical aptitude, basic power tools) to professional contractor.
Before you start
- Prerequisites: approved building opening, structural purlin/column layout, clear threshold, and local permit checks if commercial access changes are planned.
- Tools and materials: tape measure, 3m magnetic level, impact driver, torque wrench, 2 ladders, power drill with metal bits, rivet gun, silicone caulk (neutral cure), 1/4″, 3/8″, 1/2″ fasteners rated for steel, weather seal kit, insulation panels (if applicable).
- Safety gear: safety glasses, gloves, hearing protection, fall harness for overhead work, lockout kit for electric operators.
Before we dive into procedure steps, here’s a clear overview of what metal building door solutions provide and why they differ when integrated with steel buildings.
Overview of Metal Building Doors for Steel Garage Door Solutions
Metal building doors are purpose-built closures designed to fit metal and steel structures, where frame attachment, wind-load performance, and corrosion resistance are priorities. These doors are commonly used in warehouses, agricultural buildings, vehicle service bays, and multi-tenant commercial units where repeated heavy use, security, and weather resistance are required. Typical commercial uses emphasize long service life, minimal maintenance, and predictable performance under cyclic loading.
Steel buildings impose unique constraints: the structural frame is typically an integrated system of columns and purlins, which affects mounting options, header depth, and anchor choices. For that reason, steel-compatible door systems prioritize mounting plates, Z-flashing adapters, and through-bolted connections to columns or pre-drilled base angles. Integration between door hardware and the building’s envelope is critical for weather resistance and energy performance.
Key benefits of selecting steel-compatible doors include improved durability, easier maintenance, and stronger security options. When you select a door system for a commercial steel building, consider the door type, material and insulation, operator and hardware compatibility, and warranty and service network. In the sections below you’ll get trade-level comparisons, a materials/insulation matrix, and a detailed installation walkthrough tailored to steel framework.
Transition: With that context in mind, next we’ll map the common door types you’ll encounter and how they compare for steel building applications.
Types of Metal Building Doors Used for Steel Buildings
-
Roll-up doors (coiling) — A single-sheet curtain of horizontal slats that roll into an overhead coil. Best for narrow-to-medium openings (up to ~30′ wide standard), high-cycle commercial use, and when headroom is limited. Roll-up doors mount to an end-plate or back-hang bracket that bolts to the steel column or fascia. They are available in galvanized steel, aluminum, and insulated slat options.
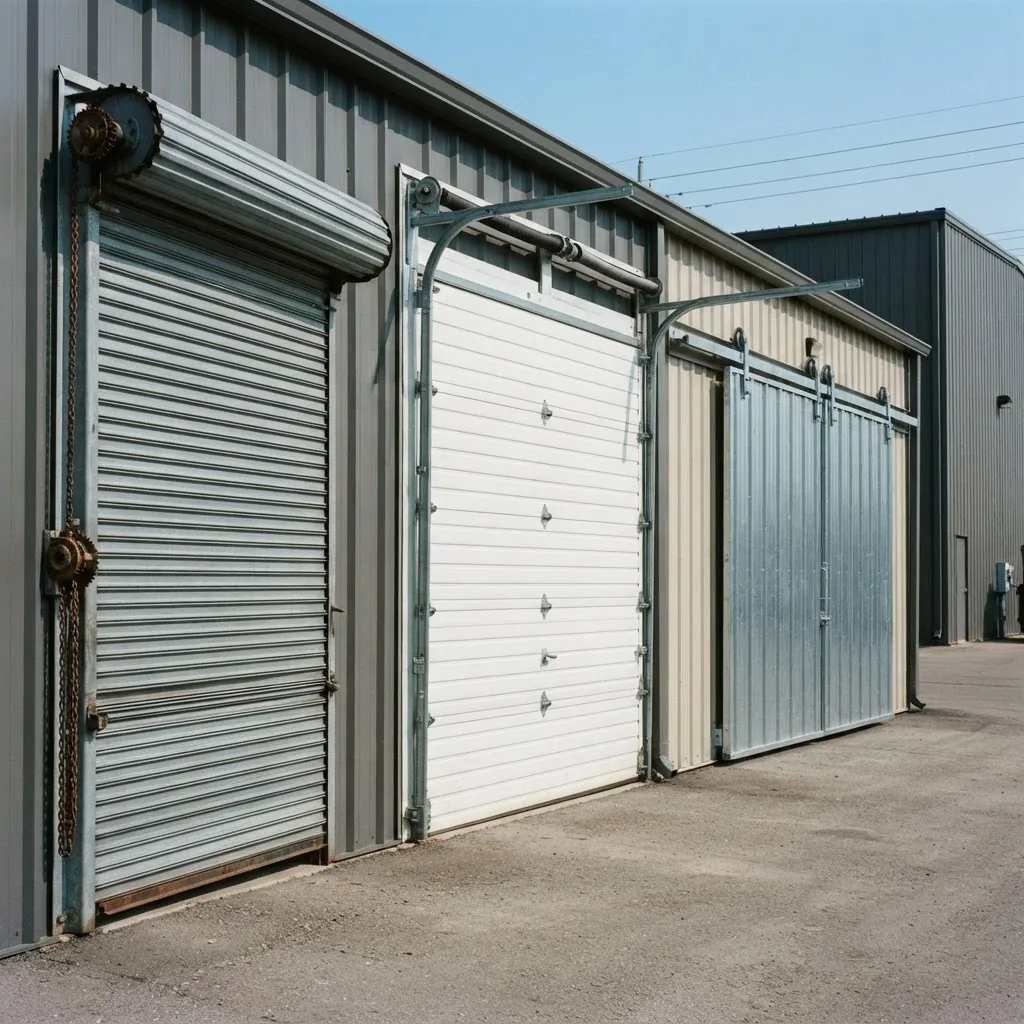
Pros: high cycle life, compact coil, minimal internal obstruction. Cons: thermal bridging at slat joints unless insulated, limited full-width glazing options.
-
Sectional overhead doors — Panels hinged horizontally forming an overhead track system. Suitable for larger vehicle bays and where R-value and aesthetic options (windows, finishes) are desired. Sectional doors require sufficient headroom and a secure header attachment to the building’s frame.
Pros: excellent insulation (multi-layer with polyurethane), tight seals, large glazing options. Cons: higher initial cost, more complex track geometry in low-roof buildings.
-
Sliding and cantilever doors — Horizontal sliding doors that run on rails alongside the opening. Often used in large-span industrial openings or where overhead clearance is restricted by cranes or mezzanines. Cantilevered sliding doors avoid ground tracks and attach to a guide system bolted to columns.
Pros: large clear opening, minimal header loads. Cons: requires sidewall space for the door to travel; sealing can be more complex.
-
High-speed fabric doors — Flexible fabric or PVC curtains on a roll or looped system designed for very high cycle counts and thermal separation within facilities. They are typically not primary security doors but excellent for internal separation and climate control.
Pros: fastest operation (1–3 sec cycle), excellent for internal climate zones. Cons: not secure for exterior openings; fabric replacement intervals are shorter.
-
Insulated metal panel doors — Full-width steel or aluminum panel doors with factory-applied insulation (polystyrene or polyurethane cores). Often used in refrigerated or air-controlled facilities where energy efficiency and airtight seals matter.
Pros: high R-values, strong weather sealing. Cons: heavier (requires stronger operators and reinforced mounting).
-
Specialty doors (blast-rated, fire-rated, and personnel access) — Custom-engineered doors for special hazards or code compliance. Typically heavier, often requiring engineered anchorage to steel columns and specialized hardware.
Pros: meets code and insurance requirements. Cons: higher cost and longer lead times.
Short comparison: Roll-up is the go-to for high-cycle and limited headroom; sectional doors are best for thermal efficiency and large glazed openings; sliding suits very wide spans where overhead obstructions exist. For security-critical or code-limited sites, specialty doors are the right investment.
Transition: After choosing a type, the next major decision is material and insulation, which dictate durability, thermal performance, and lifecycle cost.
Material Options and Insulation for Metal Building Garage Doors
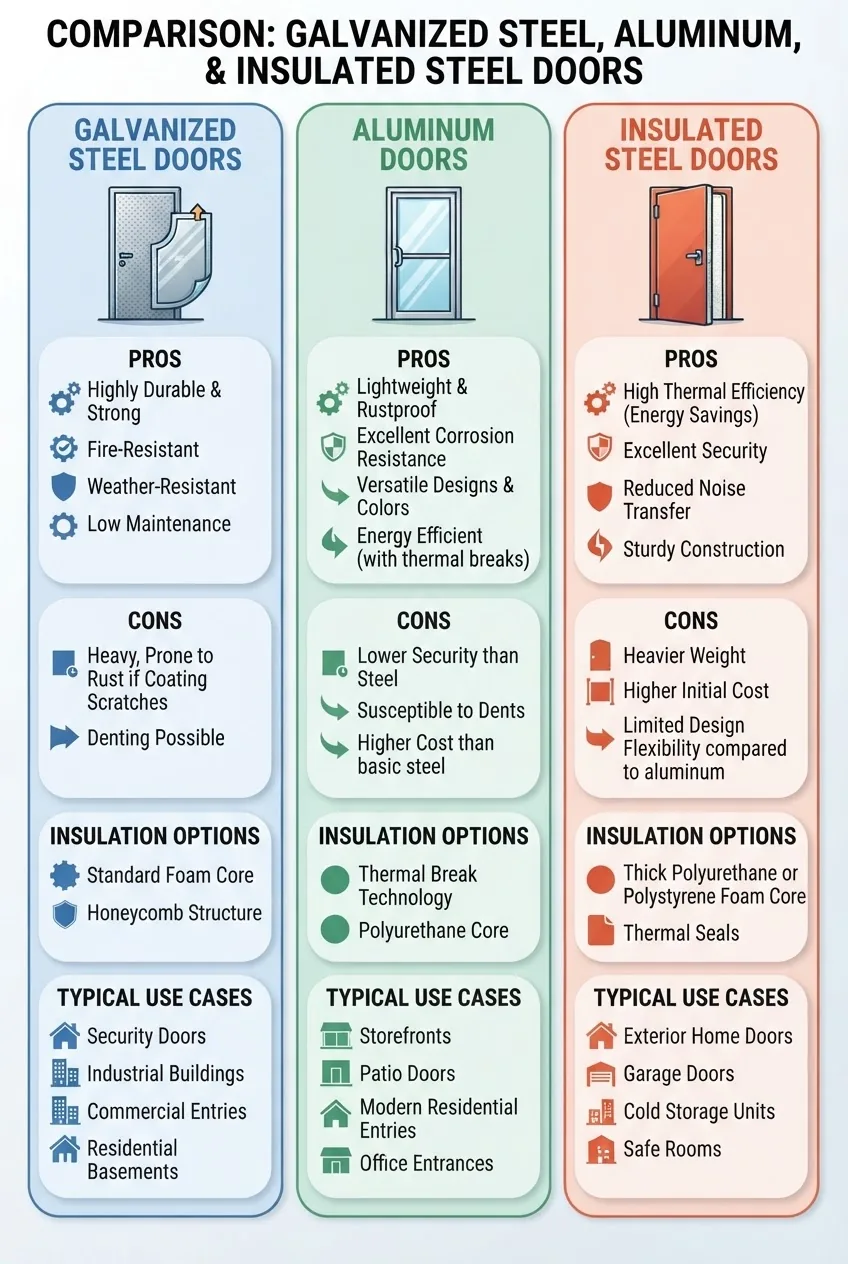
Materials determine corrosion resistance, weight, and compatibility with steel building fasteners. Insulation type impacts R-value, condensation control, and structural stiffness. Below is a practical comparison table mapping material vs insulation with pros and cons for steel building applications.
| Material / Insulation | Typical Insulation | Pros | Cons | Common Use Cases |
|---|---|---|---|---|
| Galvanized steel | None / Polystyrene / Polyurethane | High strength, excellent impact resistance, widely available, easier to weld/fasten to steel frames. | Prone to corrosion if plating damaged; heavier than aluminum. | Service bays, warehouses, loading docks. |
| Aluminum | None / Thermal break with polyurethane available | Lighter weight (easier to operate), natural corrosion resistance, good for coastal or humid environments. | Lower impact resistance, higher cost for heavy-duty sections. | Coastal units, service doors where weight matters, glazed facades. |
| Insulated steel panels | Polyurethane (high R), Polystyrene (mid R) | High R-values (polyurethane can reach R-17–R-20 per 2” panel), stiffer panels reduce rattles and vibration. | Heavier; requires reinforced frames and stronger operators; higher price. | Refrigerated spaces, conditioned workshops, energy-sensitive facilities. |
Key insulation types explained:
- Polystyrene insulation — Closed-cell foam board inserted into door cavities. Lower R-value per inch (R-3.5–R-4.5/in), economical, moderate condensation control. Good for moderate climates and unconditioned buildings.
- Polyurethane insulation — Injected foam with better adhesion and higher R-values (R-6–R-7/in typical). Provides structural reinforcement of panels and superior thermal performance; recommended for conditioned spaces and cold storage.
Trade-offs: choose galvanized steel with polyurethane core for the best mix of structural strength and thermal efficiency. In corrosive sites, aluminum with thermal break is preferable despite higher upfront cost. For applications where weight and cycle speed matter (e.g., high-frequency service doors), consider roll-up slats with foam fill but add end caps and thermal seals to reduce heat loss.
Transition: Material and insulation choices inform how you will anchor and install the door to the steel building frame—next we walk through installation considerations and a step-by-step example tailored to steel structures.
Installation Considerations for Garage Doors on Steel Buildings
Installing garage doors on steel buildings requires matching hardware to the steel frame, addressing thermal bridging, and ensuring wind-load and anchorage ratings meet local code. Below is a step-by-step installation workflow with notes for when to call a professional. An example installation follows the steps.
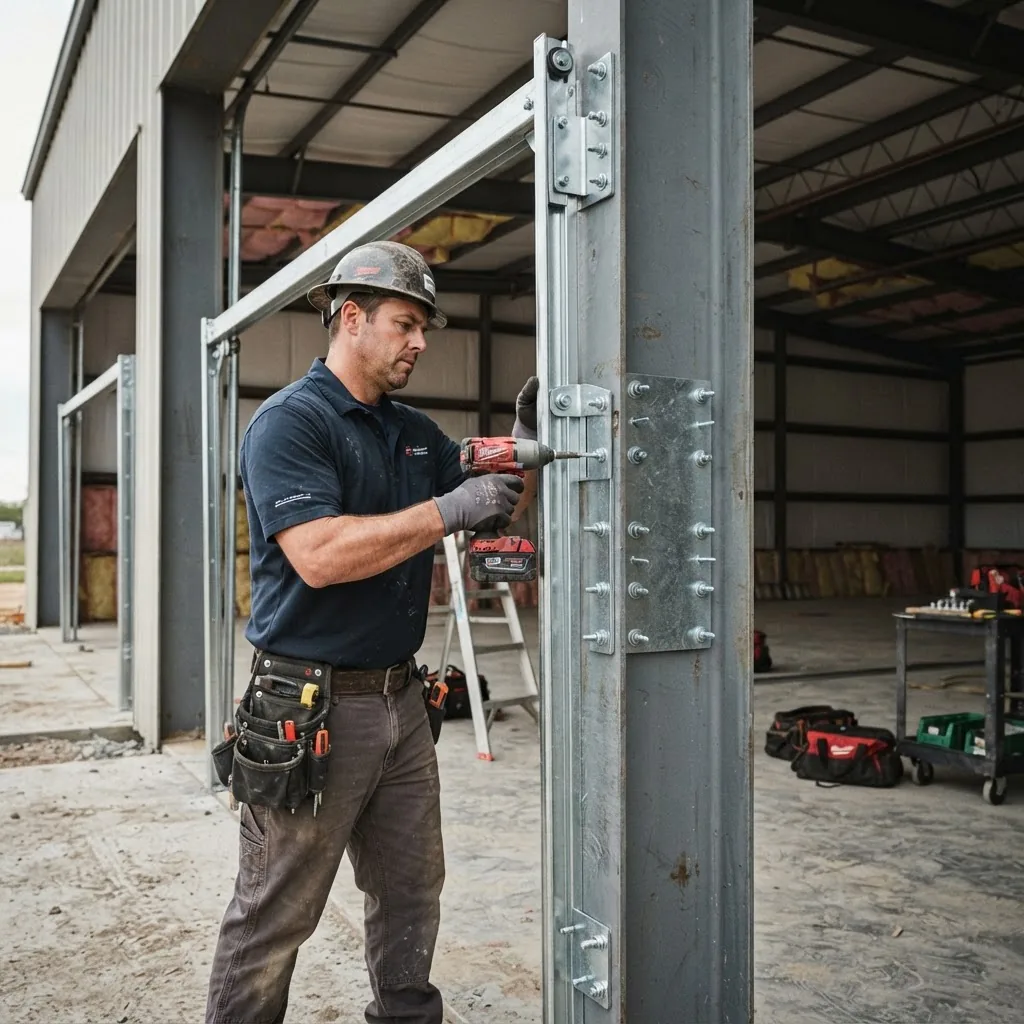
- Verify opening and structural capacity: Measure width and height at three locations (top, middle, bottom). Confirm header depth and column spacing. Check for blockouts or predrilled anchor plates. For retrofit, record distortion: twist must be under 3/16″ across frame or you will need shim plates.
- Select mounting method: Choose between direct-to-column through-bolting, angle mounting to an installed jamb, or use of a manufacturer-supplied adapter kit. For pre-engineered steel buildings, through-bolting into the column web with grade-5 or better fasteners is preferred—use washers and lock nuts per manufacturer torque spec (commonly 90–120 ft-lb for 1/2″ bolts).
- Prepare header and jambs: Clean mill scale or paint where anchors will seat to ensure full bearing. Install continuous jambs if supplied. If using structural angle, tack-fit with 3–4 fasteners per side before full tightening.
- Set the door frame: Lift and align the frame level and plumb. Use shims under the sill where necessary (stainless steel shims for corrosion control). Maintain 1/8″–3/16″ reveal between frame and steel building panel edges for sealant and thermal expansion.
- Anchor and torque: Tighten fasteners in an alternating pattern to the manufacturer’s torque. For structural bolts, re-torque after the first week of operation (metal creep can loosen fasteners). Use paint or corrosion-resistant thread coating on exposed fasteners.
- Install operator and balance spring system: If sectional doors, fit springs and test balance with door halfway closed; torque settings vary—use manufacturer-specified cycles (example: 1,000-cycle spring requires X coils—follow supplied chart). For roll-up doors, set drum tension per slat manufacturer instructions; test coast-down time to avoid uncontrolled descent.
- Seal and flash: Apply a continuous closed-cell compression seal at sides and head. Install Z-flashing between building panel and frame to prevent water intrusion; use a neutral cure silicone bead (do not use acetic cure near galvanized surfaces). Provide threshold weatherstrip rated for vehicular traffic.
- Test operation and safety devices: For electric operators, set force and travel limits per UL 325. Install edge sensors, photo-eyes at 6″–8″ off the floor, and emergency release mechanisms. Operate door for at least 25 cycles to seat springs and check for binding.
- Document and handover: Record torque values, spring settings, operator model and serial number, and provide the client with maintenance instructions and spare parts list. Photograph key fasteners and document any frame deviations.
Installation example (hands-on): upgrading a 12′ x 14′ bay on a pre-engineered steel building with a sectional insulated door.
- Remove old door and inspect frame: Two technicians—1.5 hours. Found header sag of 1/8″. Shimmed with two 1/16″ stainless shims spread across header and fastened with 1/2″ bolts.
- Mount new header plate: Pre-drilled 1/2″ holes to align with column holes; bolted at 6″ spacing across a 12′ header—18 bolts. Torque to 95 ft-lb.
- Hang sectional tracks: Level and set at 1/8″ offset for thermal expansion; used carriage bolts rated for exterior use and anti-seize on threads.
- Balance and adjust: Installed springs sized per door weight (door weight measured 240 lbs; used spring set rated for 260–320 lbs to allow for eventual sag). Adjusted until door remained stationary at half-travel.
- Final checklist and testing: Operated 30 cycles; checked seal compression at sides (approx 1/8″ compression) and verified photo-eye reversal.
Notes on professional vs DIY: If your door weight exceeds 200–250 lbs, or if the building header is part of a certified structural system, hire a licensed door contractor. Many warranties are voided by DIY installations that do not meet manufacturer torque and anchorage specifications.
Transition: Proper installation reduces weather and security risks, but you’ll also need a maintenance plan and weatherproofing features for long life—covered in the next section.
Weatherproofing, Security, and Maintenance of Steel Building Doors
Weatherproofing and security form the baseline of long-term value for steel building doors. Poor seals or weak anchorage are common failure points; fix them early. Below are practical strategies and a maintenance schedule geared to commercial users.
Weather resistance measures:
- Continuous head and jamb compression seals (EPDM or closed-cell rubber) sized to compress 1/8″–3/16″ at rest to allow drainage and thermal expansion.
- Z-flashing over frame-to-panel gaps with a backer bead of neutral-cure silicone to stop capillary wicking into the building cavity.
- Paint or coil coating on exterior steel — use zinc-rich primer for cut edges and fastener heads to maintain galvanic protection.
- Insulation and thermal breaks to reduce condensation risk; polyurethane cores with an interior thermal break and sealed panel joints minimize interior dew point issues.
Security features for commercial doors:
- Heavy-duty deadbolts or slide locks engaging a steel astragal or floor-mounted receiver.
- Tamper-resistant roller and hinge pins; use security covers over exposed operators and drive assemblies.
- Keyed disconnects for electric operators and monitored position sensors tied into building access controls or alarm systems.
- For high-risk facilities, consider doors with integrated steel plates for padlock protection and reinforced bottom bars.
Maintenance tips (routine schedule and actions):
- Monthly: Visual inspection of seals, fasteners, and operator cabling; test auto-reverse (photo-eyes) and lubrication points. Wipe down and remove debris from tracks and sills.
- Quarterly: Lubricate bearings, rollers, and torsion springs with manufacturer-recommended lubricant; check and re-torque accessible anchor bolts to spec if loosened.
- Annually: Full spring and cable inspection; check panel alignment, re-seal as needed, and perform a cycle test of 50–100 operations to surface-check premature wear. Replace weather seals every 3–5 years or when compression drops below 50%.
- After severe weather: Inspect for damage, address bent tracks and loose fasteners immediately. Document and photograph damage for insurance claims.
Case study (practical experience): In 2022 a municipal fleet facility replaced eight roll-up doors with insulated sectional doors to reduce HVAC load. According to a 2023 industry report, measured savings were a 12% reduction in annual heating costs for the affected bays (source type: industry performance study, 2023). The retrofit also reduced premature slat replacement by 60% over three years due to improved seals.
For additional advice on replacement exterior doors and detailed replacement workflows, consult the following resource before final decisions:
exterior doors for replacements
Transition: With weatherproofing and security covered, you’ll next evaluate customization and sizing concerns to ensure the door fits the building’s operational needs.
Customization and Sizing Options for Metal Building Garage Doors
Customization options let you balance performance and aesthetics. For commercial steel buildings, customization focuses on functional upgrades: insulated cores, motorized operators, vision panels (windows), and reinforcement for heavy traffic. Sizing must consider the building’s structural openings and clearances—if you need exact cut dimensions see the detailed sizing guide.
Common customization features:
- Frame adapters and sill ramps to accommodate sloped thresholds or concrete washouts.
- Window inserts: choose sealed double-pane vision panels for conditioned spaces; limit glazing to no more than 25% of total door area to preserve R-value.
- Color and finish: factory powder coat finishes on aluminum, high-performance PVDF coatings on steel for color retention; match building envelope RAL codes when possible.
- Hardware upgrades: stainless steel hinges and hardware in coastal environments, reinforced bottom bars where forklifts contact the door, and panic release for occupied buildings.
- Operator selection: chain-driven, belt-driven, or direct-drive; for doors >350 lbs choose commercial operators with continuous-duty rated motors and service brakes.
Sizing considerations brief overview (not a substitute for measurement): ensure headroom is at least the manufacturer’s minimum (commonly 12–18″ for sectional doors, though low-headroom kits exist). Sill flatness tolerance should be less than 1/8″ across the width to prevent seal gaps. For precise cut and fabrication dimensions, cross-reference with the project’s architectural opening and the manufacturer’s template.
Transition: Budget drives many choices—materials, insulation, and customization have direct cost impacts, which are covered next with a buying checklist.
Cost Factors and Buying Guide for Metal Building Doors
Cost depends on door type, material, insulation, operator, hardware, and installation complexity. Expect a wide range: a basic small roll-up door may cost $800–$2,000 for the door only, while a large insulated sectional with a commercial operator and installation can exceed $5,000–$12,000. According to a 2024 industry report, average installed costs for commercial insulated sectional doors fell between $6,200 and $9,800 depending on R-value and accessories (source type: industry market survey, 2024).
Primary cost drivers:
- Door type (roll-up < sectional with high R-value < specialty fire/blast door).
- Material and finish (galvanized steel typically cheaper than aluminum with high-end coatings).
- Insulation type (polyurethane cores cost ~20–40% more than polystyrene for similar panel thicknesses).
- Operator and controls (commercial operators add $800–$3,000 installed depending on features and duty cycle).
- Installation complexity (retrofit with poor framing or heavy reinforcement adds labor and materials).
- Permits, crane rental, and engineered anchorage can add several hundred to several thousand dollars.
Buying checklist (numbered):
- Confirm opening dimensions and structural capacity; order templates from the manufacturer where available.
- Select material and insulation matching the facility climate and use-case.
- Specify wind-load and fire-rating requirements; obtain stamped engineering where the local code requires it.
- Choose an operator sized for door weight and expected cycle counts; require UL 325 compliance for entrapment protection.
- Request manufacturer warranty details in writing (panel finish, structural, and mechanical components), and confirm service network for spare parts.
- Get three competitive quotes and compare line-item pricing for door, operator, hardware, anchors, electrical, and disposal/haul-away.
- Plan life-cycle cost: include maintenance intervals, expected replacement cycle, and energy savings for insulated doors.
For detailed pricing ranges and national brand/installation cost comparisons, consult the full pricing resource:
Garage Door Prices Guide for Brands and Installation Cost
Supplier selection tips: prefer manufacturers with documented wind-load ratings and an authorized installer network. Industry association guidance — for example, standards and testing information from the Steel Door Institute — can verify product claims.
External resources: check current safety and installation guidelines from government and energy programs before procurement:
- OSHA for safety standards and operator safety guidance (see overhead door safety sections; refer to 2024 OSHA guidelines for powered door safety).
- Steel Door Institute for material and testing standards.
- ENERGY STAR for energy efficiency best practices and recommended insulation thresholds for commercial doors.
Transition: Finally, here are concise best-practice recommendations and a summary to guide your project plan and finalize decisions.
Summary and Best Practices for Selecting Metal Building Doors
Choose doors that align with your facility’s operational profile: prioritize high-cycle roll-up doors in service yards, select insulated sectional doors for conditioned spaces, and use sliding or cantilever doors where overhead obstructions exist. When integrating doors with steel buildings, focus on anchorage details, corrosion control, and seal continuity to prevent leaks and energy loss.
Best practice checklist:
- Specify materials and finish for the environment (galvanized or aluminum with appropriate coatings).
- Match insulation type to energy goals—polyurethane for highest R-values, polystyrene for cost-sensitive projects.
- Ensure operator sizing accounts for door weight and cycle rate; choose commercial-rated operators for frequent use.
- Require manufacturer installation templates and torque specifications; document torque values at handover.
- Implement a maintenance schedule (monthly, quarterly, annual) and keep a spare-parts list for critical components like springs and rollers.
When properly specified and installed, metal building doors can deliver decades of reliable service; investing in correct anchorage, seals, and insulation pays back through reduced downtime and lower HVAC loads. If you’re ready to move from planning to procurement, use the buying checklist above and request stamped engineering when your local code requires wind or fire certification.
Hands-On Installation Steps
The following section is the hands-on core presented as numbered installation actions and checks. Each step begins with a bold, actionable phrase and contains precise quantities, settings, or timing where appropriate.
- Measure and record the opening precisely: Take width at three points: bottom, mid, top. Record the smallest measurement as the nominal width. Measure height at both jambs and center; accept a max variance of 1/8″ before plan for shimming. Measure headroom in inches; document in the job file.
- Select the door and hardware: Choose a door rated for the measured opening with at least the following: wind-load rating for local code, manufacturer’s recommended operator for door weight, and thermal option if R-value greater than R-12 is required. Order two spare springs and one spare bottom seal per opening.
- Prepare anchor pattern and fasteners: For through-bolting into H- or C-columns use 1/2″ hex-head structural bolts (grade 5 or better) spaced no more than 12″ on-center across the header; use galvanic-isolated washers for dissimilar metal contact. For panel screws use #14 self-drilling metal screws with EPDM washers.
- Set the frame plumb and level: Use two 6′ levels and shims under the sill to adjust; target plumb within 1/8″ across the height. Temporarily fasten with 3–4 bolts, re-check squareness by measuring diagonals—difference should be within 1/8″.
- Install tracks and test clearances: Secure tracks per manufacturer; verify a minimum 1/2″ clearance between moving hardware and building panels. For sectional doors maintain minimum headroom per spec (commonly 12″).
- Install springs and balance the door: Use calibrated spring winding bars and follow the manufacturer’s winding chart. Example: for a 240 lb door with 96″ spring length you may wind 6 turns on each torsion spring—verify with balance test (door remains static at mid-position).
- Mount the operator and set controls: Align drive properly; set travel cams so the door stops exactly on the sill with seal compression ~1/8″. Set force limits low enough to stop on a 20-lb obstruction for reversing, per UL 325. Test photo-eyes and edge sensors for reliable reversal.
- Seal all joints and flash: Apply 3/8″ continuous bead of neutral-cure silicone in the frame-to-panel gap, install head Z-flash, and compressible sill seal. Allow sealant cure per product (typically 24–48 hours) before exposing to severe weather.
- Commission with cycles and record settings: Run 50 cycles and inspect for loose fasteners, oil leakage, abnormal wear. Re-torque structural bolts after 25 cycles. Document final spring turns, operator model, and torque values.
Common mistakes and how to avoid them
I’ve installed dozens of doors and seen recurring errors: I once failed to torque header bolts to spec and the frame shifted 3/16″ under wind load—re-torquing and adding back-up plates fixed the issue. I’ve also seen installers neglect the Z-flashing step, causing capillary water entry during freeze-thaw cycles; always flash and seal. Finally, I’ve observed undersized operators on insulated panels—operator motors overheated under frequent cycles; match operator duty cycle to expected use (continuous vs intermittent duty).
Finish checklist
- Door sits plumb and level within 1/8″.
- Seals compress at 1/8″–3/16″ across head and jambs.
- Operator travel and force settings comply with UL 325 and local code.
- All fasteners torqued to spec and documented.
- Maintenance schedule and spare-part list handed to building owner.
When to call a professional
Call a licensed door contractor or structural engineer if: the door weight is over 250 lbs, the building header is load-bearing with visible deformation, wind-load certification or fire-rating documentation is required, or if local building code demands stamped installation drawings. For any electrical operator work tying into building controls or alarms, hire a licensed electrician.


