

By the end of this guide you will be able to identify every major part on a residential garage door and its opener, read a full parts diagram, diagnose common wear items, and select appropriate replacement parts. Realistic time: 1.5–3 hours for a full inspection and parts list. Skill level: intermediate DIY (basic hand tools, multimeter, ladder comfort).
Before you start
- Safety glasses, work gloves (cut-resistant), and ladder rated for your garage height
- Socket set (1/4″, 3/8″, 1/2″), adjustable wrench, pliers, pry bar
- Multimeter, torque wrench (optional), spring winding bars (if you have spring experience; otherwise call pro)
- Flashlight, masking tape and marker for labeling parts, camera or smartphone for reference photos
- Paper, pen, and a ruler or tape measure for noting section widths and track rises
- Map the door visually and photograph it. Walk the perimeter, photographing each hinge, roller, spring origin, drum, cable anchor and the opener unit. Label photos with tape and notes—this creates your working parts diagram before you touch anything.
- Check balance and spring tension (static test). With the opener disconnected, lift the door manually halfway; a properly balanced door stays in place. If it pulls up or falls, note whether balance is biased up or down—this indicates torsion or cable issues needing spring or cable attention.
- Inspect rollers, tracks and hinges for wear. Rotate rollers by hand: smooth, noisy, or rough rollers are candidates for replacement. Measure roller width (1″, 2″) and note material (nylon vs steel) for ordering parts.
- Assess cables, drums and bottom brackets. Look for frayed strands, kinks, or bird-caging in cables. Check drum grooves for even winding. If cable damage is visible, mark replacement and avoid operating the door until fixed.
- Examine springs and anchors. Identify torsion vs extension springs and measure wire diameter, coil count, and length to confirm part numbers later. Do not attempt to adjust torsion springs unless you have spring bars and experience.
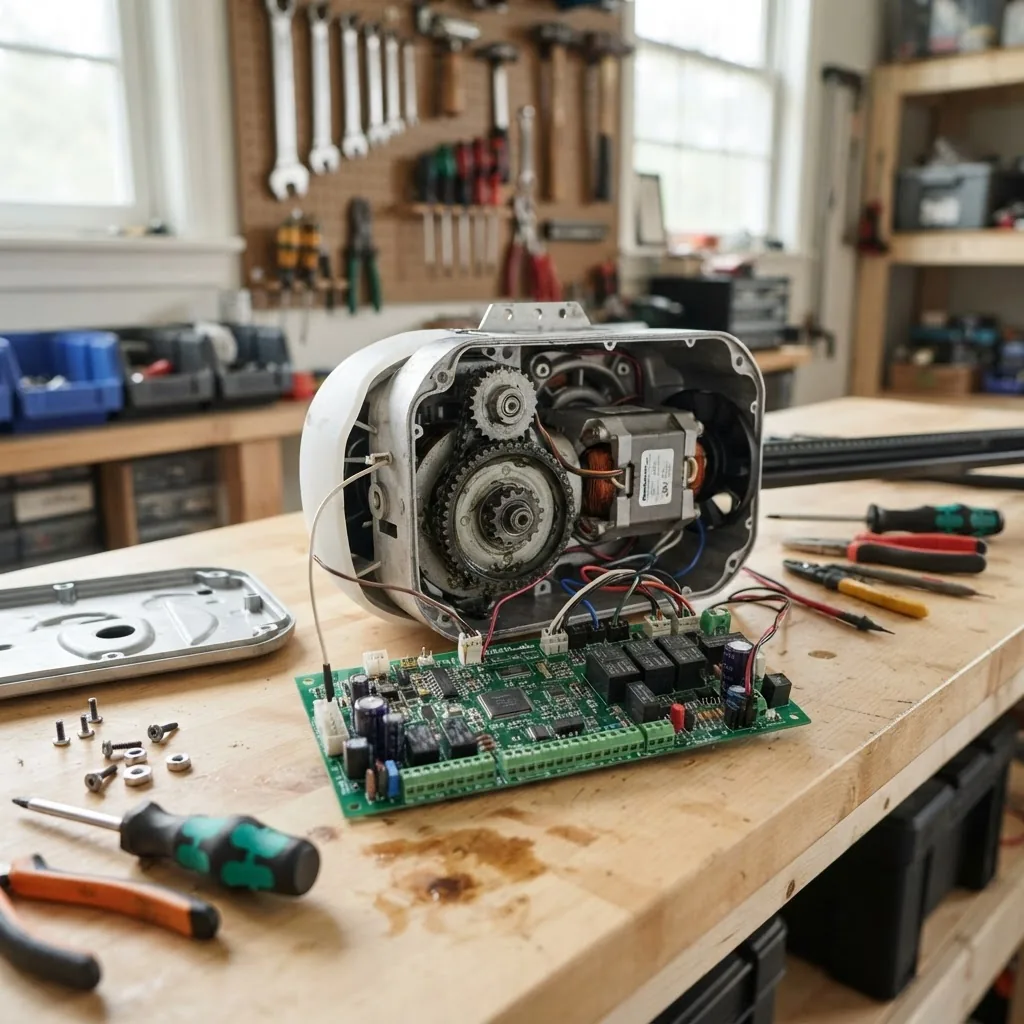
- Open and inspect the opener unit carefully. Listen for grinding, metal-on-metal noise, or clutch slipping in chain/belt/screw drives. Open the cover (power off and unplug first) and inspect the circuit board for burnt components or bulging capacitors.
- Test safety sensors and travel limits. Use the door opener remote to close the door and pass an obstruction under the path—sensors must reverse the door within 1–2 seconds of contact. Verify travel limit settings by observing where the door stops and adjusting if needed later.
- Create a parts list and order with exact names and measurements. Use your photos and measurements to list panel section numbers, roller diameters, cable lengths, spring specs, opener model and gearbox/gear count. Cross-check with manufacturer manuals for part compatibility.
Quick tip: label every detached part (drum, bracket, set screws) with masking tape and a photo reference—this eliminates mix-ups when reassembling or ordering parts.
Overview of Garage Door Parts Diagram
This garage door parts diagram overview describes the visible anatomy of a typical sectional residential door and links that anatomy to the opener components. Think of the assembly in three zones: the door panels and hardware, the lifting system (springs, cables, drums, pulleys), and the opener drive (motor, rail, trolley).
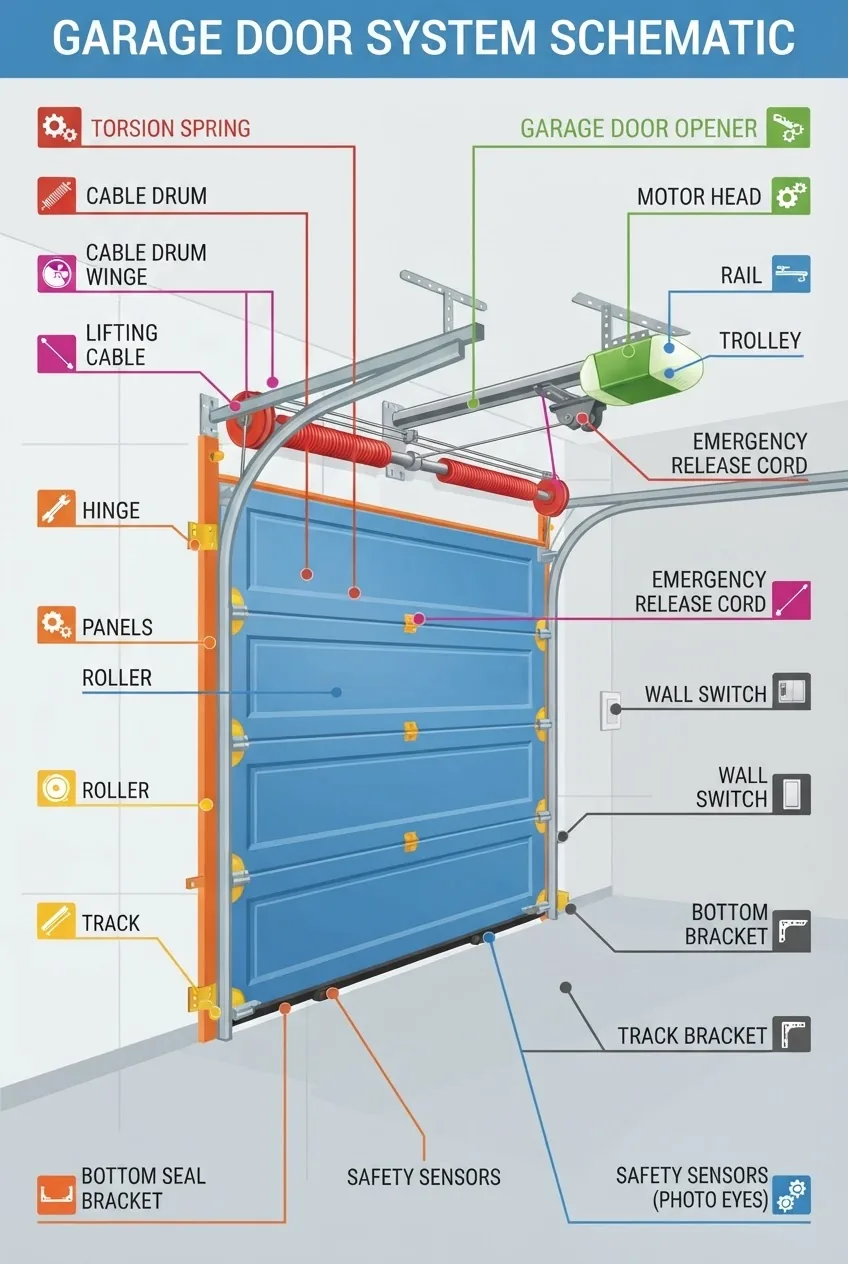
The text-based diagram below annotates the same schematic so you can use it while photographing your door:
- Door panels/sections: Horizontal metal or composite sections (finger-joint or stamped metal) joined by hinges.
- Bottom bracket: Metal plate at the door base, anchors cable to the door.
- Rollers: Mounted in hinges, ride inside the tracks; common materials: nylon (quieter) or steel (durable).
- Tracks: Vertical and horizontal steel channels guiding rollers; track rise and alignment affect binding.
- Torsion spring assembly: Bar and springs mounted above the door (higher torque, compact).
- Extension springs: Mounted along the horizontal tracks on older doors (extend to provide lift).
- Drums and cables: Cables attach to drums at the torsion shaft or bottom bracket; they convert spring torque to vertical lift.
- Opener rail, trolley and carriage: Connect the opener motor to the door for powered travel.
- Photo-eye sensors: Mounted ~6 inches above floor to detect obstructions and reverse the door.
- Control panel/keypad and remotes: User interface and remote controls for opener operation.
Transition: With a mapped diagram in hand, you can inspect each component in detail—next we break down every component, its material, function and common failure clues.
Detailed Breakdown of Garage Door Components
Below is a numbered list explaining the function, typical materials, and repair-relevant notes for each major garage door part. Use this as your inspection checklist.
- Door panels / sections: Steel, aluminum, or composite panels joined by hinges. Check for dents, rust, or delamination; measure the height and width of a section for replacement (standard: 18″, 21″, 24″).
- Hinges: Usually stamped steel or cast ball-bearing; transfer load between panels. Worn hinge pins create slop—replace hinges in matched sets to avoid alignment issues.
- Rollers: Nylon (quiet, low-friction) or steel (durable). Typical sizes: 1″, 2″ or 3-1/2″ diameter. Noisy or wobbling rollers mean replacement; upgrade to sealed-bearing nylon rollers for quieter operation.
- Tracks: Galvanized steel tracks (vertical and horizontal). Look for dents, gaps, or misalignment; a 1/8″ gap between roller and track lip is acceptable; more indicates bending.
- Springs — torsion vs. extension: Torsion springs sit on a shaft above the door and provide controlled torque via wound coils; measure wire diameter, inside diameter and length for replacement. Extension springs stretch along the horizontal rails; count coils and measure free length. Torsion springs are preferred for higher cycles and safer behavior. (Definition: a torsion spring stores rotational energy; an extension spring stores linear tension.)
- Cables: Aircraft-grade galvanized steel in multi-strand constructions. Fraying or broken strands require immediate replacement; never operate a door with damaged cables.
- Drums and pulleys: Cast metal or nylon drums guide cable onto the torsion shaft; pulleys may be ball-bearing or plain. Uneven grooves or seized pulleys generate uneven lift.
- Bottom brackets: Heavy stamped metal mounts attaching cables to the door bottom. Bent brackets alter door travel and should be replaced in pairs.
- Locks and handles: Latch mechanisms vary by model—note the side and orientation when ordering replacements.
- Weatherstripping and thresholds: PVC or rubber seals that prevent drafts. Replace when cracked or compressed—typically every 5–10 years.
- Fasteners and set screws: Use thread-lock on high-vibration screws. Keep a record of original bolt lengths and grades; mixing metric and SAE leads to stripped threads.
- Auxiliary hardware (springs containment, safety cables): Safety cables run through extension springs to contain them if they break, reducing projectile risk.
garage door diagram for parts and cable systems
Transition: After identifying mechanical parts, the opener is the electrical/mechanical heart—understanding its components is the next step.
Garage Door Opener Components and Functions
The opener converts electrical energy to motion and coordinates safety systems. Below are the main garage door opener components and what each one does; this will help you identify noisy or failed components during diagnostics.
- Motor assembly — Provides torque; motor types vary by horsepower (1/3 HP, 1/2 HP, 3/4 HP). Brush motors are common in consumer units; brushless motors last longer but cost more.
- Drive mechanism (belt, chain, screw) — Chain drive: robust but noisy; belt drive: quiet with a reinforced rubber belt; screw drive: fewer moving parts, requires periodic lubrication. Choose based on noise tolerance and travel speed.
- Gearbox and gears — Reduces motor RPM to trolley movement; plastic or metal gears can wear—gear tooth damage causes slipping and irregular travel.
- Trolley and carriage — Connects the drive to the arm on the door; worn trolley rollers cause jerky motion.
- Rail and rail supports — Houses the drive; misaligned rails create binding.
- Logic board / circuit board — The opener brain controlling limits, travel, sensors and remotes. Burnt traces or swollen capacitors usually mean board replacement.
- Photo-eye sensors — Infrared safety sensors mounted near the floor; they must align and be clean to detect obstructions. Wiring faults here commonly cause non-closure.
- Limit switches / travel sensors — Tell the opener when the door is fully open or closed. Incorrect settings cause the door to reverse or fail to latch.
- Remote receiver and keypad — Wireless modules and keypads; RF interference or programming mismatches cause inconsistent response.
- Clutch or overload mechanism — Prevents motor burnout by slipping under excessive load (often adjustable).
- Capacitor and start/run components — Motor start capacitor failure manifests as humming and no rotation.
Useful links for control and installation troubleshooting:
garage door opener button replacement guide
garage door opener installation guide
LiftMaster garage door opener installation guide
how to program LiftMaster remote control
types of garage door openers guide
Transition: Knowing opener parts helps you read symptoms—next, see how all parts combine to move and control the door safely.
How Garage Door Parts Work Together as a System
A garage door is an integrated mechanical and electrical system where balance, friction, and control signals determine operation. The torsion/extension springs supply potential energy; cables and drums translate that energy into vertical force; rollers and tracks guide movement; the opener provides controlled motion and safety logic.
Mechanically, springs create torque that the drums convert to linear lift via cables. The opener supplies supplemental force to move the door at controlled speed; travel limits and sensors ensure safe endpoints. If rollers bind, the opener experiences higher load, causing gear wear or motor overheating—common troubleshooting linkage.
Analogy: springs are like the stored energy in a bicycle’s coiled brake return spring; cables and drums act like brake cables routing force precisely; the opener motor is the cyclist pedaling the system forward. Misaligned or damaged components in any link change the load distribution and reveal themselves as noise, vibration, or inconsistent stops.
Transition: With system-level understanding you can pinpoint which parts fail first and which replacement kits typically resolve common issues.
Common Garage Door Opener Repair Parts and Kits
This section explains how to identify worn opener components and choose a repair kit. Follow the stepwise checks below to diagnose common opener faults.
- Listen and localize the noise. Grinding from the opener usually points to gearbox or gear wear; clicking suggests relay or capacitor issues. If noise is near the rail, suspect trolley/roller wear.
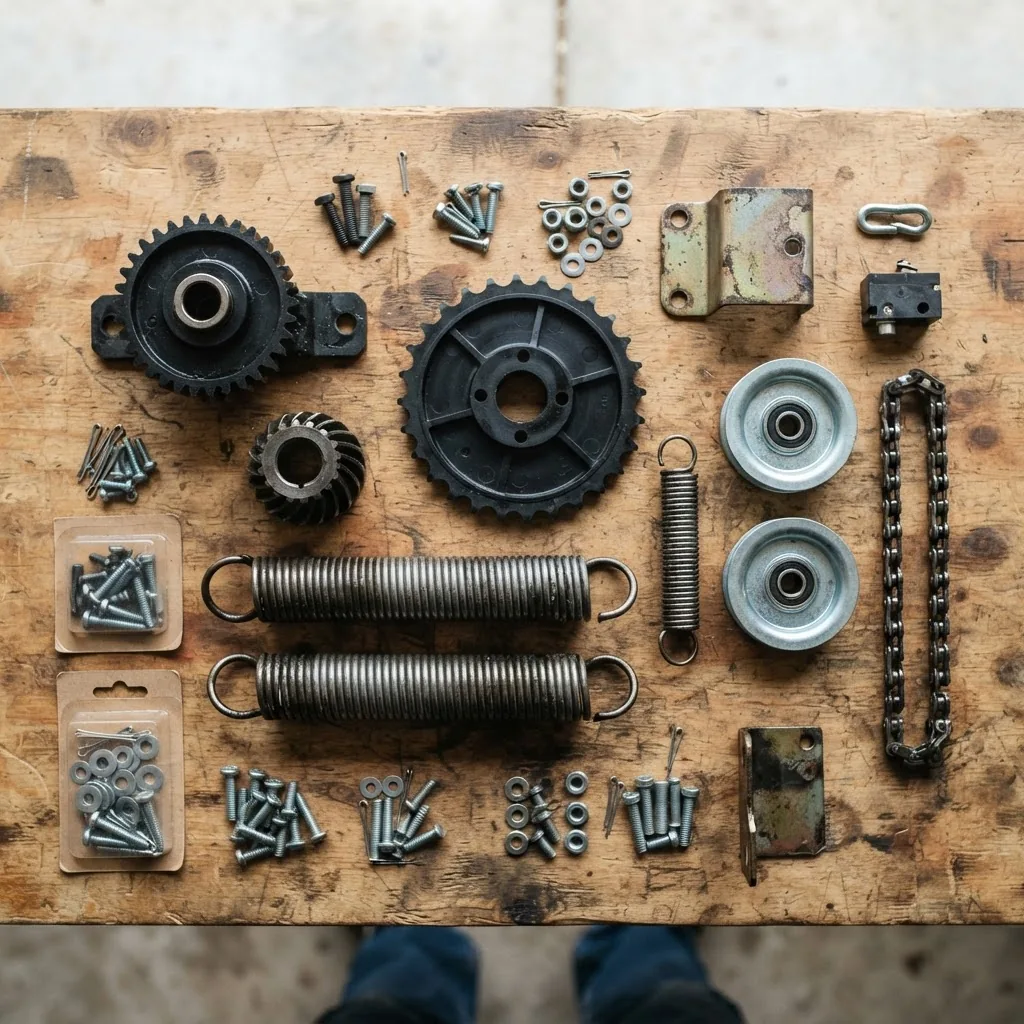
- Inspect gears and clutch assembly. Open the housing (unplug first). Plastic gear teeth will show shaving or missing teeth; metal gears will show pitting. Measure sling wear and match gear tooth count when ordering a replacement.
- Check belt or chain tension and wear. Belt should have no frayed fibers; chain should not have loose master links. For chain drives, measure sag—typically 1/2″–1″ at midpoint is acceptable at rest.
- Examine the circuit board and capacitors. Bulging capacitors or burnt traces require board replacement. Note the opener model number and board part number for compatibility with repair kits.
- Verify sensor alignment and wiring. Misaligned photo-eyes cause non-closure. Use a level to ensure sensor faces are parallel and clean lenses—remove cobwebs and wipe with alcohol.
Experience example: I diagnosed an opener that hummed but did not turn—the capacitor (start capacitor) was visibly bulged and the motor stalled under load. Diagnosis steps: measure motor current with a clamp meter, swap with a known-good capacitor following manufacturer voltage ratings, then retest. This saved replacing a working motor.
Stepwise walkthrough — identifying a worn opener gear:
- Unplug the opener and remove cover. Count and photograph the gear teeth from multiple angles.
- Compare gear tooth profile to OEM part. Record module/pitch if listed in manual; if not available, order by opener model and part number.
- Install replacement gear using the supplied shims and torque settings. Typical torque for gearbox bolts: 25–35 in-lb (follow manufacturer manual).
opener gear replacement kit guide
garage door opener replacement guide
Manufacturer guidelines: always confirm part numbers against the official opener manual and follow rated torque and wiring polarity. Manufacturer manuals supply exact capacitor microfarad ratings, gear counts, and replacement part numbers.
Transition: Ordering the right part requires correct names and variant awareness—see the next section for naming conventions and a concise glossary.
Tips for Identifying Garage Door Parts Names for Ordering and Repair
Names vary by manufacturer; always cross-check photos, measurements and model numbers. Below is a short glossary and table of common part name variants to help you order the correct items.
| Common Name | Aliases / Variants | What to measure |
|---|---|---|
| Torsion spring | Shaft spring, overhead spring | Wire dia, inner dia, length, right/left wound |
| Extension spring | Side spring | Free length and coil count |
| Roller | Door wheel | Diameter, stem length, material |
| Drum | Cable drum | Inside diameter, flange width |
| Opener circuit board | Logic board, PCB | Opener model and board part number |
Ordering tips: include photos, serial/model numbers, and the measurements listed above. If in doubt, choose OEM parts for critical load-bearing items (springs, cables, drums) and verify by model number.
Transition: Proper maintenance and adherence to safety standards reduces the chance of catastrophic failures—read the safety checklist next.
Safety and Maintenance Notes on Garage Door Parts and Opener Components
Regular maintenance prevents failures that cause injuries or property damage. Follow these safety and maintenance practices derived from industry recommendations and standards.
- According to a 2024 industry report, mechanical failures account for a significant share of homeowner garage door incidents—inspect springs and cables every 6 months (source: industry report).
- Wear protective gloves and eye protection; always unplug the opener before opening the motor cover or working on electrical components.
- Do not attempt to disassemble or adjust torsion springs without proper spring winding bars and experience; these springs store lethal energy.
- Verify photo-eyes alignment monthly and clean lenses with isopropyl alcohol—dirty sensors are the cause of most false reversals.
- Keep moving parts lubricated: rollers (if metal), hinges and bearings with light garage-specific lubricant every 6–12 months; do not lubricate nylon rollers unless manufacturer specifies it.
Standards and authoritative resources:
- OSHA — consult general workplace and mechanical safety guidelines for handling tensioned springs and electrical equipment.
- ANSI — reference ANSI safety standards for powered garage doors and openers.
- CPSC — consumer safety bulletins and recall information for household garage door components.
Maintenance checklist (verify these after repairs):
- Door is balanced: holds at halfway when disconnected from opener.
- Springs show no rust or gaps in coils, and anchors are secure.
- Cables show no frayed strands and drums wind evenly.
- Rollers move smoothly and tracks are free of dents and debris.
- Photo-eye sensors align and reverse the door when obstructed.
- Opener operates smoothly, with no unusual grinding or humming after repair.
When to call a professional: if springs need winding/replacement, cables are broken, drums are significantly grooved, or you lack spring winding tools and experience. These are high-risk tasks with potential for severe injury.
Common mistakes and how to avoid them
I once underestimated the required torsion spring wire diameter by 0.02″ and ordered a spring that lifted the door aggressively—door slammed open. I now always measure wire diameter with calipers and record right/left wound orientation before ordering.
I previously removed an opener cover without unplugging power and shorted the logic board. Now I always disconnect power first and photograph connectors to ensure correct reassembly.
Another frequent error is mixing part names—ordering a “roller” without specifying diameter and stem length. I now include photos and exact measurements for every part request.
Final checklist before you finish
- All fasteners torqued per manufacturer (where specified); take photos of torque markings.
- Balance test passed with opener disconnected (door holds at halfway).
- Sensors aligned and tested with obstruction test—door reverses reliably.
- Wiring routed away from moving parts and secured with clips every 12–18″.
- Replacement parts match OEM numbers or approved equivalent.
When to call a professional
Call a licensed garage door technician immediately for torsion spring work, broken cables, major track realignment, or when electrical diagnostics indicate motor failure. If your repair involves stored spring energy or structural changes, hire pros; insurance and safety considerations often require professional service.
Conclusion
Key takeaways: use a labeled parts diagram and photos to track what you remove, measure critical dimensions for springs, drums and rollers, and match opener part numbers for circuit boards and gears. Follow safety checklists and standards from OSHA and ANSI when handling tensioned hardware. Ready to get the exact parts and cost estimates? Review the garage door prices guide to see how part selection affects installation and budget.


