

Garage door lift system — By the end of this guide you will understand how lift systems move a sectional garage door, be able to select and install a manual garage door kit for a typical 7′ x 8′ single-car door, and perform basic maintenance and troubleshooting. Expect a realistic hands-on install time of 2–6 hours (skilled DIY) or 4–8 hours if you are learning; this guide assumes intermediate DIY skill (basic mechanical aptitude, familiarity with hand tools, and safe ladder use).
Before you start
- Clear workspace: at least 10 ft of front-to-back clearance and good lighting.
- Safety gear: safety glasses, heavy leather gloves, hearing protection, and a rigid ladder rated for 250+ lbs.
- Basic skills: measuring, drilling, safe torqueing of fasteners, and following manufacturer torque specs.
- Time block: set aside one uninterrupted day (4–8 hours).
- Permit check: verify local codes if you alter structural anchors or replace springs (some jurisdictions require contractor-performed spring replacements).
What Is a Garage Door Lift System?
The garage door lift system is the mechanical assembly that raises and lowers a garage door through coordinated force from springs, cables, pulleys and sliding hardware. At its core the system balances the vertical weight of the door so a human or motor can move it smoothly along tracks; the balance is achieved by counterbalancing springs that store potential energy and release it as the door moves.
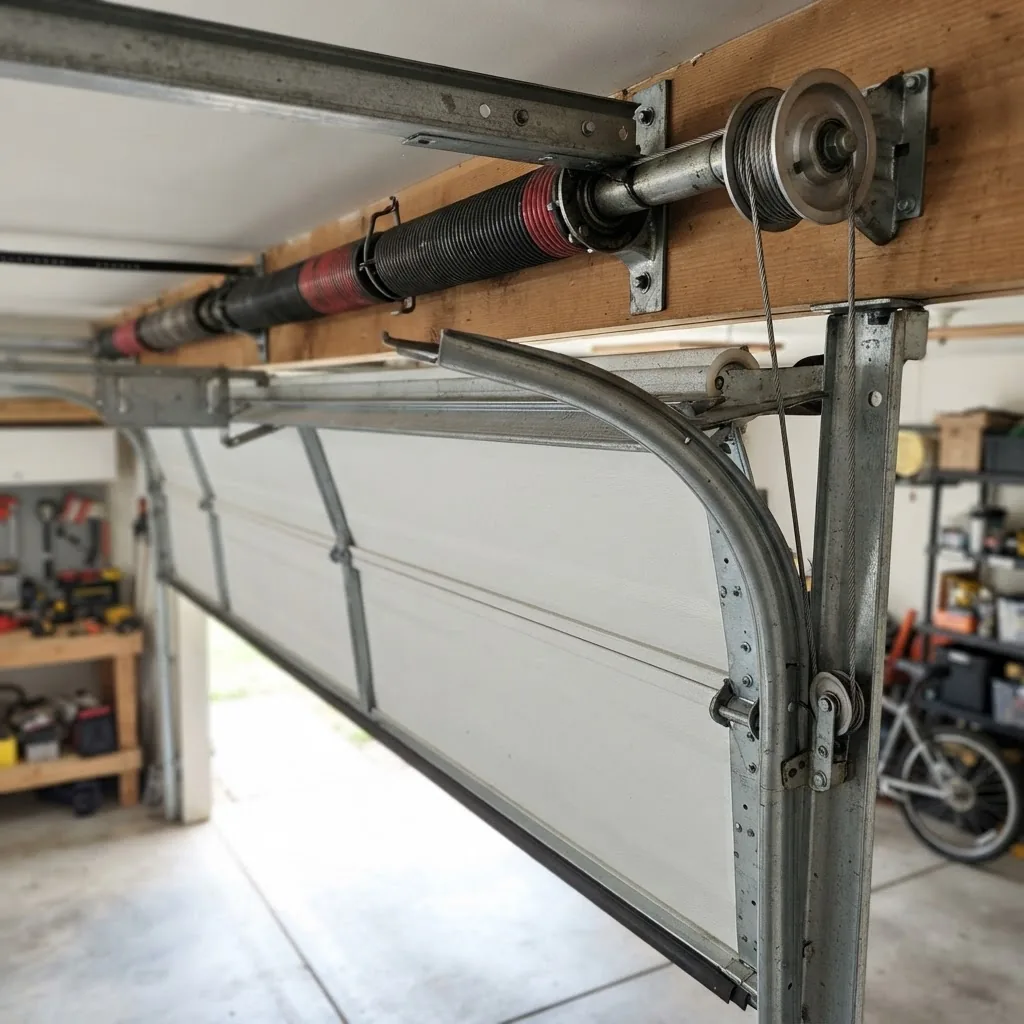
Mechanically, movement follows this sequence: springs apply torque to a shaft or stretch along the horizontal span (torsion vs extension), cables transfer that torque to the door via drums and bottom brackets, rollers ride inside tracks attached to the header and jambs, and hinges guide each panel’s pivot. Safety mechanisms such as safety cables and cable drums prevent uncontrolled descent if a spring or cable fails.
Definitions you’ll see repeatedly in this guide:
- Torsion spring — a wound steel spring mounted above the door on a torsion shaft; it stores energy by twisting, like a tightened bowstring.
- Extension spring — springs mounted parallel to the horizontal tracks that stretch when the door is lowered.
- Cable and pulley — cables attach to the door’s bottom brackets and wrap around drums or pulleys to translate spring force to lift.
- Balance — the equilibrium between the door’s gravitational pull and spring force; a properly balanced door stays put when positioned mid-track.
Why balance matters: a balanced door reduces wear on rollers, tracks and hinges and makes manual operation safe. If springs are under- or over-tensioned, you’ll feel jerky movement, hear binding, or risk a dangerous snap. I’ll refer to weight balancing principles later when we adjust tension.
Transition: Now that you know what a lift system does and the key terms, let’s examine each component so you can identify parts during installation and maintenance.
Components of a Garage Door Lift System
The lift system is a collection of interacting parts. Below I list each component, what it does, common specifications, and practical notes you’ll need when selecting or replacing parts.
- Torsion springs — Mounted on a torsion shaft above the door. Typical residential torsion springs are specified by wire gauge, inside diameter, and length; common cycles ratings are 10,000–50,000 cycles. Torsion springs deliver consistent torque and are preferred for heavier doors and precise balance.
- Extension springs — Located along the sides over the horizontal track. They are cheaper but offer a linear (stretch) force curve; they require safety cables routed through the spring to contain a failed spring. Extension springs are common on light steel and single-panel doors.
- Cables — Galvanized aircraft-style stranded cable (commonly 7×19) connects bottom brackets to drums or pulleys. Cable rating matters: typical residential cables are 3/32″ or 7/64″ for light doors, 1/8″ for heavier doors. Inspect for fray and kinks every 6 months.
- Pulleys and drums — Pulleys redirect cable to the drum or hangers; drums mounted on the torsion shaft collect cable and set the door’s lift radius. Drum diameter affects lift ratio; match to manufacturer spec (e.g., 4″–6″ common).
- Rollers — Typically nylon or steel with 5/8″ stems; nylon rollers reduce noise and wear but require compatible nylon or metal track. Replace rollers in sets to maintain uniform roll and alignment.
- Tracks — Vertical and horizontal guides. Gauge (thickness) typically 20–16 ga; heavier doors require heavier gauge. Alignment of tracks (plumb and level) is critical to avoid binding.
- Hinges — Connect panels, provide pivoting action. Heavy-duty hinges are graded by door weight and hinge spacing; lubricate pivot pins annually.
- Bottom brackets and lift handles — Connection points for cables and manual handles. Bottom brackets bear the direct load from cables; check welds and bolts for fatigue.
- Safety cables — Required with extension springs by CPSC guidance; these run through the spring to contain fragments if the spring fails. Even torsion systems should have accessible safety stops and emergency release mechanisms.
- Manual release and locks — A rope/handle and interior locking mechanism allow manual operation or secure the door. Emergency release should operate smoothly from the floor.
For an illustrated breakdown of these parts, consult visual diagrams that map each component to the system layout.
garage door parts and cable systems
garage door parts and opener components
Notes on wear items and specifications:
- Springs: count cycles and record installation date. Replace springs in matched pairs for torsion or sets for extension springs.
- Cables and drums: replace both drums and cables if one shows wear; mismatched drum diameter or worn grooves cause uneven winding.
- Rollers and tracks: replace rollers if noise > 50 dB measured close to the door, or if rollers show flat spots.
Transition: With component knowledge in place, the next section explains how manual garage door kits operate and how their mechanisms differ from motorized openers.
How Manual Garage Door Kits Work
A manual garage door kit provides the mechanical components and hardware to operate a garage door without an electric opener, or to add a manual backup/hand-crank capability to an existing door. Manual kits vary: simple handle-and-cable setups for light doors, counterbalance conversion kits, and hand-crank systems for precise tensioning.
Core operational principles:
- Transfer spring force to motion: Manual systems rely on torsion or extension springs to counterbalance the door. When you lift the door by hand (or via a crank), the springs release stored energy, which the cable/drum assembly converts into upward motion.
- Mechanical advantage: Hand-crank kits introduce gearing (commonly 10:1 or 20:1) so a homeowner needs 10–20 times less hand force at the crank. Tools such as length-limited crank handles prevent over-rotation.
- Controlled descent: A braking or ratchet mechanism in some kits prevents runaway doors if a spring fails; ratchets engage if cable traction is lost.
- Tension adjustment: Torsion springs are tensioned by applying measured turns (e.g., 7 full turns for a standard 7′ door with a balanced weight); extension spring tension is adjusted by hook positioning or turnbuckle settings.
How to read a manual kit’s spec sheet (what to check):
- Door weight capacity (e.g., 140–180 lb for single-car steel doors).
- Compatible door heights and panel counts (typical kits list 6’8″, 7′, 8′ heights).
- Crank gear ratio and torque limits (e.g., 20:1 gear to limit required force to <50 lbf).
- Spring cycle rating: 10,000–50,000 cycles and recommended replacement interval in years based on average daily cycles.
Typical manual kit variants:
- Hand-lift kits — Handles, bottom brackets, and matching cables for manual lifting with no gearing. Best for lightweight, well-balanced doors.
- Crank kits — Add a crank and gearbox to operate torsion shaft or drum; ideal when door weight is above comfortable lift thresholds.
- Emergency manual kits — Designed to retrofit to an opener’s trolley and allow hand operation during power outages; usually include a quick-disconnect and cable routing.
Safety considerations specific to manual kits:
- Never stand under a partially open door without blocking it mechanically; use a clamp-on locking bar or vice to secure the bottom bracket if you must work under the door.
- Always follow the kit torque and turn counts—over-tensioning torsion springs increases break risk; under-tensioning leads to poor balance and excessive wear.
- Follow Consumer Product Safety Commission guidance on spring containment and cable routing: CPSC.
Transition: Next I’ll walk you through a detailed, step-by-step installation of a manual lift kit, using hands-on tips and exact torque, measurement, and tool recommendations.
Installing a Manual Garage Door Lift System Kit
Before the numbered steps, here’s a quick tools and materials checklist tailored to installation.
- Tools: 1/2″ and 3/8″ ratchet set, adjustable wrench set, 8 mm–19 mm sockets, locking pliers, torque wrench (0–200 ft·lb), drill with 3/16″, 1/4″, 3/8″ bits, center punch, 4′ level, chalk line, measuring tape, ladder.
- Special tools: winding bars for torsion springs (steel bars 1/2″ diameter, at least 18″ long), cable puller or clamp, spring containment tool if using extension springs.
- Materials: manual garage door kit (sized for your door), new cables and drums if replacing, carriage bolts and grade-5 fasteners per kit, anti-seize or medium-weight thread locker where specified.
- Parts to verify: spring specification tag (wire size, inside diameter, right/left wound), drum diameter, cable length and gauge.
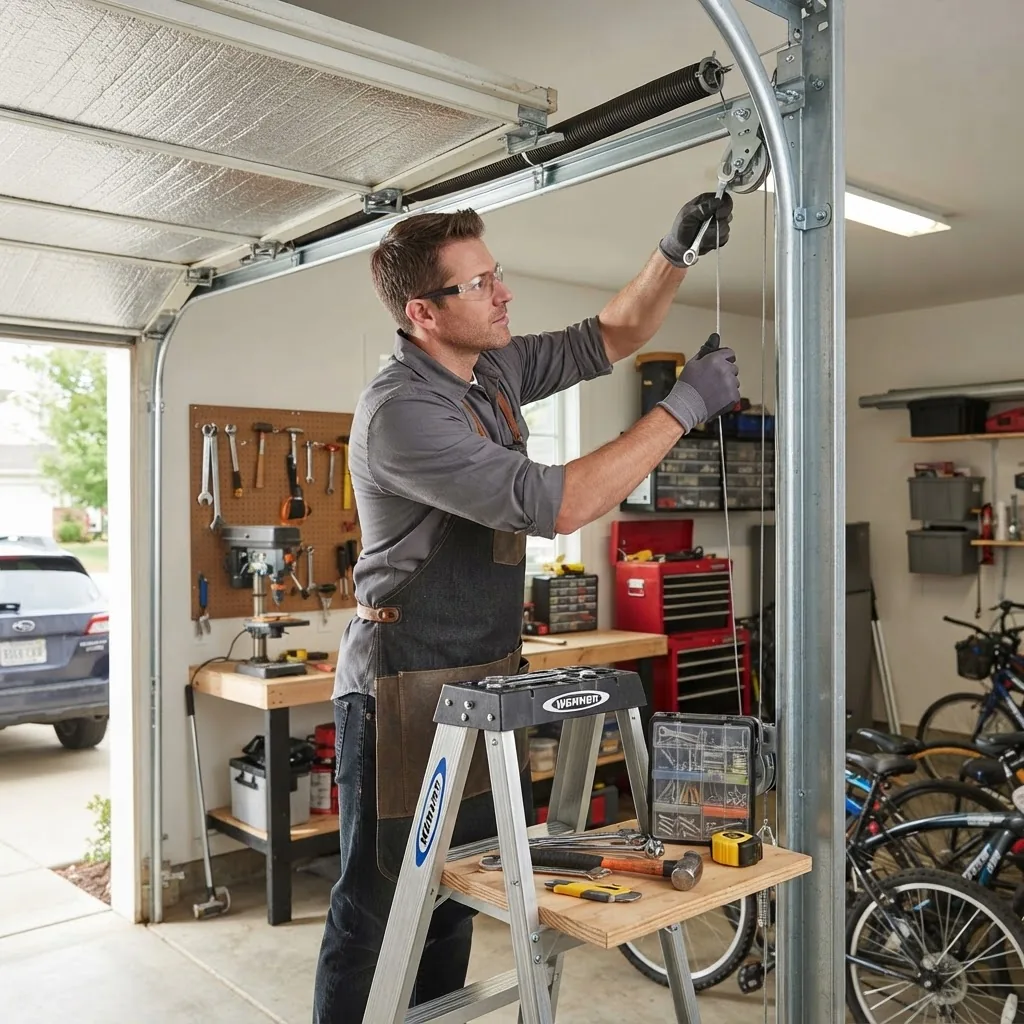
Core installation — if the steps are long each will be presented as an H3 with detailed actions. Read each step fully before performing the work.
-
Step 1 — Prepare the door and workspace
Close and lock the door. Remove any loose items on the track or panels. Measure the door: height, width, panel count, and note the door weight if known (you can estimate weight: insulated steel single-car typical 120–200 lb; according to a 2024 industry report, common 7′ x 8′ steel doors average ~145 lb). Label left and right sides from inside facing the door.
Set the ladder on a level surface directly beneath the torsion shaft center. Clear a 6′ radius around the work area.
-
Step 2 — Remove existing opener hardware (if present)
Disconnect the opener trolley per manufacturer instructions. For screw or chain openers, fully retract the trolley and secure it with the emergency release to prevent accidental movement. Detach any brackets that obstruct access to the torsion spring and drums. Keep fasteners labeled for reinstallation if needed.
-
Step 3 — Inspect and choose spring type
If installing a manual kit as part of a conversion, determine whether you will use existing torsion springs or replace with a matching torsion kit. For doors over 150 lb I recommend torsion springs; for light single-panel doors, extension-spring manual kits can work. If replacing springs, match cycle rating and wound direction: left-wind for the left spring, right-wind for the right spring (viewed from inside).
Safety: If you have not handled torsion springs before, stop and consider a pro—torsion springs hold high energy. According to the CPSC, improperly handled springs cause serious injury; see CPSC.
-
Step 4 — Mount the manual kit gearbox or crank assembly
Position the gearbox per the kit template: typically centered above the torsion shaft near the left end for a right-hand wind door (reverse for opposite configurations). Use the supplied mounting plate and grade-5 bolts. Torque mount bolts to 35–45 ft·lb unless the kit specifies otherwise.
Install the crank handle assembly on the gearbox output shaft but do not engage the gearbox yet—leave the crank removable until spring tension is set. Grease splines lightly with lithium grease.
-
Step 5 — Install or verify drum and cable alignment
Slide drums onto the torsion shaft and position them according to the measurement from the door center (manufacturer often specifies center-to-drum distance). Ensure both drums are identical diameter and that cable grooves are free of burrs.
Attach the cable to the bottom bracket and run it up to the drum, leaving 3–4 turns on the drum in the closed-door position for torsion systems. If drums are too small, you will over-wind springs; if too large, you’ll under-wind—both cause imbalance.
-
Step 6 — Tension torsion springs (measured turns)
This is critical: use certified winding bars (never improvised tools). Determine required turns—common formula: door height (feet) × 2 = full turns for many 7′ doors (so 7′ door ≈ 14 turns split between springs), but always follow spring tag instructions. Example: a 7′ door with 2 torsion springs often requires 7 full turns on each spring.
Procedure: Secure winding bar in the stationary cone, insert second bar, slowly let the first bar come free as the second bar holds torque. Make the specified full turns, then insert set screws and torque them to 20–30 ft·lb. Confirm with a torque wrench where possible.
Check balance mid-door: lift the door halfway and ensure it remains stationary. If it moves up or down more than 3″ in 10 seconds, adjust by 1/4 turn increments.
-
Step 7 — Adjust cable tension and drum seating
With springs set, ensure each drum has 3–4 wraps in closed position. Tighten cable clamps to manufacturer torque (commonly 10–12 ft·lb on 1/4″ U-bolt clamps). Remove slack: a properly tightened cable should deflect no more than 1/4″ when pressed with moderate force at mid-span.
Confirm alignment: when opening by hand, cables should wind smoothly without jumping grooves. If the cable rides up the drum wall, loosen, re-seat the cable, and retighten clamps.
-
Step 8 — Install manual release and check ratchet/brake
Install the kit’s manual release cable and test operation: when engaged, the ratchet should hold the door if it is partially open. For crank kits, test the gearbox by rotating at the specified speed—no sudden slippage or hard stops. Apply a 5–10 lb downward force at the handle to verify the brake engages.
-
Step 9 — Final balance test and hinge/roller inspection
Open the door fully and close two cycles manually. Measure balance: door should stay put within ±3″ at mid-height. Inspect hinges, rollers and track alignment. Lubricate rollers and hinges with silicone or lithium spray—avoid heavy grease on nylon rollers.
-
Step 10 — Safety checks and labeling
Attach warning labels per kit instructions: spring hazard, do-not-use ladder under door, and emergency release operation. Test emergency release under no-load conditions (door closed). Verify safety cable(s) route through extension springs if present.
If your kit requires closure in a specific sequence (e.g., disengage crank, lock lever), note that in a permanent sticker on the door frame.
-
Step 11 — Clean up and document settings
Record spring turns, clamp torques, and cable wrap counts in a homeowner log (date, parts serials). Keep winding bars and crank accessible but away from children. Store spare fasteners and a short instruction card near the door.
Common mistakes and how to avoid them
I’ve seen homeowners assume “a couple extra turns is fine” and end up with a door that launches; never over-tension springs. I once watched a door cable re-route into the drum’s groove and bind because the drum seating bolt was loose—always torque drum fasteners. I also found installers who used adjustable wrenches on set screws and rounded them: use proper hex sockets and torque wrench.
Checklist: Verify your work
- Door holds position ±3″ at mid-height when partially open.
- Both cables have 3–4 full wraps on drums in closed position.
- Set screws and cable clamps torqued to manufacturer spec (recorded).
- Manual release and ratchet/brake function correctly under load.
- Safety cable installed through extension springs (if used).
- Warning labels affixed and owner log updated with spring turns and dates.
When to call a professional
Contact a licensed garage door technician if you encounter: broken or severely corroded springs, unfamiliar spring specifications, a door that’s off-track, cables that have frayed beyond 10% of their diameter, or if your jurisdiction requires a licensed contractor for spring replacements. For high-tension torsion spring work I recommend professional service due to hazard severity; according to a 2024 industry safety summary, qualified technicians reduce spring-replacement incidents by a large margin.
Transition: With the installation complete, it helps to know the operational differences between manual and automatic systems when deciding whether to keep manual operation, convert, or add a powered opener.
Comparing Manual and Automatic Garage Door Lift Systems
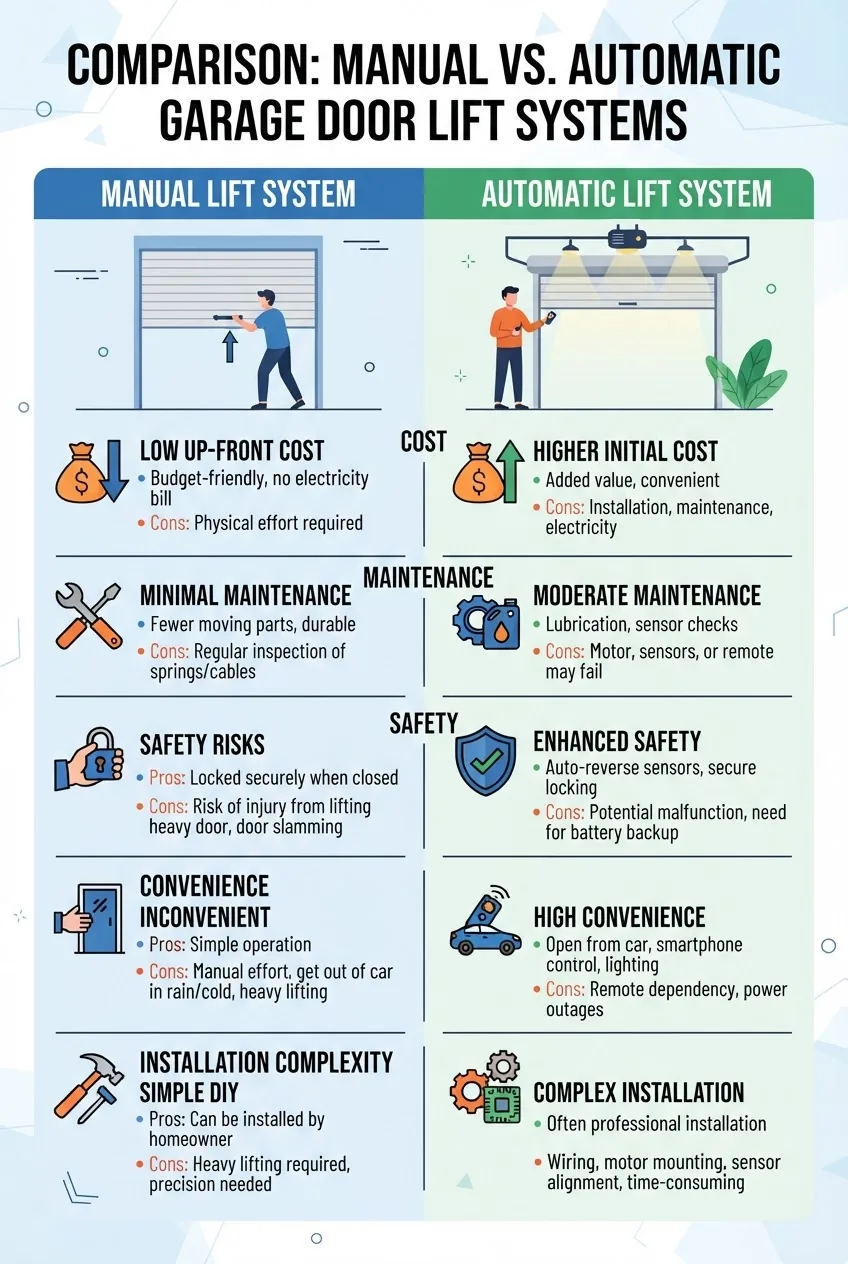
| Feature | Manual Lift System | Automatic/Motorized Opener |
|---|---|---|
| Upfront cost | Lower: $50–$400 for most kits (According to 2024 data from home improvement retailers). | Higher: $250–$800 for opener + $100–$300 install parts (retailer data 2024). |
| Installation complexity | Moderate–High: springs and cables require mechanical skill. | Moderate: mounts to header and programs electronics; wiring may be needed. |
| Maintenance | Lower electrical complexity; spring/cable maintenance still required. | More components: opener motor, sensors, remotes—regular checks and occasional programming. |
| Convenience | Physically demanding or requires crank; no remote convenience. | High: remote, keypad, smartphone integration available. |
| Power failure scenarios | Manual always operable; best for off-grid reliability. | Opener may be unusable; most openers have manual release or battery backup options. |
| Safety | Fewer electrical hazards but higher mechanical risk if springs mishandled. | Safety sensors and auto-reverse reduce crush risk; electronics add failure modes. |
Summary: Manual kits are economical and reliable in power outages; automatic openers offer convenience and remote access. If you’re deciding between the two, consider lifecycle cost: manual kits have lower installation cost but similar spring replacement schedules; openers add electrical components and sensor maintenance.
garage door prices guide for brands and installation cost
garage door opener button replacement
garage door opener installation guide
LiftMaster garage door opener installation
program LiftMaster garage door remote control
types of garage door openers guide
Transition: Next we cover common problems you may encounter with lift systems and how to troubleshoot them confidently and safely.
Troubleshooting Common Garage Door Lift System Problems
When a lift system fails, the observable symptoms (noise, uneven movement, broken cable) point to specific root causes. Below I list common issues, diagnostic checks, and stepwise remedies based on hands-on experience.
- Cable snapping — Symptom: sudden drop or imbalance and visible broken strands. Check: examine cable at clamps and bottom bracket for fray; drums for sharp edges. Fix: replace cable and drum as a matched pair; never reuse a frayed cable. If extension spring system, ensure safety cable present per CPSC.
- Spring breakage — Symptom: loud bang, door becomes extremely heavy. Check: visually inspect springs; look for separation or gaps. Fix: do NOT attempt temporary repairs. Secure door with C-clamps in tracks and call a professional unless you are certified and have proper winding bars and PPE. According to a 2024 industry safety report, spring-related injuries are a leading risk for untrained DIYers.
- Door binding or uneven lifting — Symptom: door tilts when opening, binds on one side. Check: track alignment (use 4′ level), hinge torque, roller wear. Fix: loosen track fasteners, realign then retighten; replace worn rollers. If balance is off more than 1/4 turn correction, adjust spring tension in small increments.
- Noisy operation — Symptom: grinding, squeal, or intermittent squeak. Check: rollers (nylon vs steel), hinge pins, lack of lubrication, or loose hardware. Fix: replace steel rollers with nylon if compatible, lubricate hinges and springs sparingly with silicone or light oil; tighten loose hardware to specified torque.
- Uneven cable winding — Symptom: one cable winds more than the other causing tilt. Check: drum seating, cable clamp tightness, and that springs are matched. Fix: unwind to zero tension, reseat drum, and re-tension per kit turns; replace mismatched springs.
- Safety cable failure or absence — Symptom: extension spring systems without safety cables risk spring fragments releasing. Check: presence and condition of cable through springs. Fix: install an approved safety cable immediately per manufacturer or replace springs with torsion system.
garage door opener gear replacement
replace garage door opener guide
Troubleshooting checklist (quick):
- Listen for new noises; correlate to movement point (start, mid travel, end).
- Visually inspect springs, cables, drums, and rollers for wear or misalignment.
- Test door balance at mid-height and measure deviation in 10-second interval.
- Document observed dimensions and take photos before ordering parts or calling pros.
Transition: Preventing problems is easier than fixing them—next is a compact maintenance program tailored to manual lift systems.
Maintenance Tips for Manual Garage Door Lift Systems
Routine maintenance keeps a manual lift system safe and extends component life. Treat maintenance as a seasonal task (spring and fall) and a quick inspection every month.
- Lubrication: Apply silicone spray or light lithium grease to hinges and torsion spring bearings. For springs, use a light coat—avoid heavy grease that attracts dust. Frequency: twice per year or every 6 months.
- Cable inspection: Look for broken strands or kinks. Replace cable at first visible fray; do not wrap frayed cable or splice.
- Spring tension check: Verify balance by lifting to mid-height and timing motion; if the door moves >3″ in 10 seconds, adjust spring by 1/4 turn increments (torsion) or re-position extension spring hooks one notch.
- Roller and track cleaning: Remove debris and check for dents. Replace rollers every 5–8 years or if worn. Use a silicone spray on steel tracks only if specified by manufacturer.
- Fastener torque: Re-check mounting bolts for drums and brackets annually; common torque specs—drum bolts 20–30 ft·lb, carriage bolts 35–45 ft·lb.
- Weatherstrip and bottom seal: Inspect for wear and replace to prevent moisture infiltration and additional door weight.
Tools for maintenance: cordless drill with brush attachment for cleaning, torque wrench, silicone spray, set of hex keys, and spare cables/clamps. Keep a small parts kit with two cable clamps, one spare cable of the proper gauge, and a set of replacement rollers.
Transition: Costs and where to buy kits are crucial before you commit—below are realistic price ranges, buying tips, and warranty pointers.
Cost and Where to Buy Manual Garage Door Lift Kits
Cost varies by type, door size compatibility, and spring quality. According to 2024 data from home improvement retailers and manufacturers:
- Basic handle-and-cable manual kits: $50–$120 (suitable for light, well-balanced doors).
- Hand-crank kits with gearbox: $120–$350 depending on gear ratio and build quality.
- Complete torsion manual kits (springs, shaft, drums): $200–$500 for residential doors; premium high-cycle springs add $50–$150.
- Professional installation: $150–$400 labor on top of parts for typical manual kit installation; torsion spring replacement typically $200–$400 installed.
Buying tips:
- Buy kits sized to your door height and weight; manufacturers usually list compatible size ranges.
- Prefer kits with clear torque specs, spring cycle ratings, and two-year parts warranty.
- Online vs store: online retailers often offer broader part selections and price transparency; big-box stores supply immediate pickup. For complex torsion kits, many homeowners prefer purchasing through a door specialist to confirm correct spring specs.
Where to shop: manufacturer-authorized dealers or major home centers; verify return policy and whether springs are covered under warranty. For technical guidance on opener replacements or to compare motorized options, consult the opener selection and installation resources.
garage door opener installation guide
Transition: below are concise FAQs that address common reader questions and next steps.


