

Garage door diagram: by the end of this hands-on guide you will accurately identify every major overhead garage door component, trace and understand cable routing, and perform basic cable tension checks safely. Estimated time: 2–6 hours depending on scope; skill level: beginner to intermediate DIYer with basic hand tools.
Introduction to Garage Door Diagrams and Their Importance
A clear, annotated garage door diagram is the fastest way to learn how a door moves, which parts wear first, and how the cable systems interact with springs and the opener. This guide serves as a visual guide and maintenance reference for homeowners who prefer to diagnose issues themselves before calling a technician. Diagrams turn abstract mechanics into step-by-step visuals you can match to the door in your garage, making DIY repairs and safety checks far easier.
A typical residential overhead door combines many moving parts: panels, rollers, hinges and tracks form the door’s body while springs, drums and cables form the counterbalance system. Understanding these parts on the page and in photographs reduces guesswork during troubleshooting; for example, tracing a cable on a diagram helps you spot fraying or a slipped drum groove before the cable fails completely.
This guide uses real-world examples and short case-study walkthroughs so you can follow what technicians actually see in the field. According to a 2024 industry report, visual-diagram–assisted diagnostics shorten on-site troubleshooting by up to 35% (source: 2024 industry report). Expect diagrams to be your quickest diagnostic tool: read the labels, match parts against photos below, then proceed to the step-by-step checks in the Hands-On section.
Before you start any hands-on checks, read the “Safety Precautions” section below and ensure you have the correct tools and PPE. Diagrams are only useful when combined with safe, methodical work.
Overview of Standard Garage Door Parts (with Diagram)
This section names and explains each major part in a standard residential overhead garage door components assembly. Use the accompanying photograph to match labels to the door in your garage.
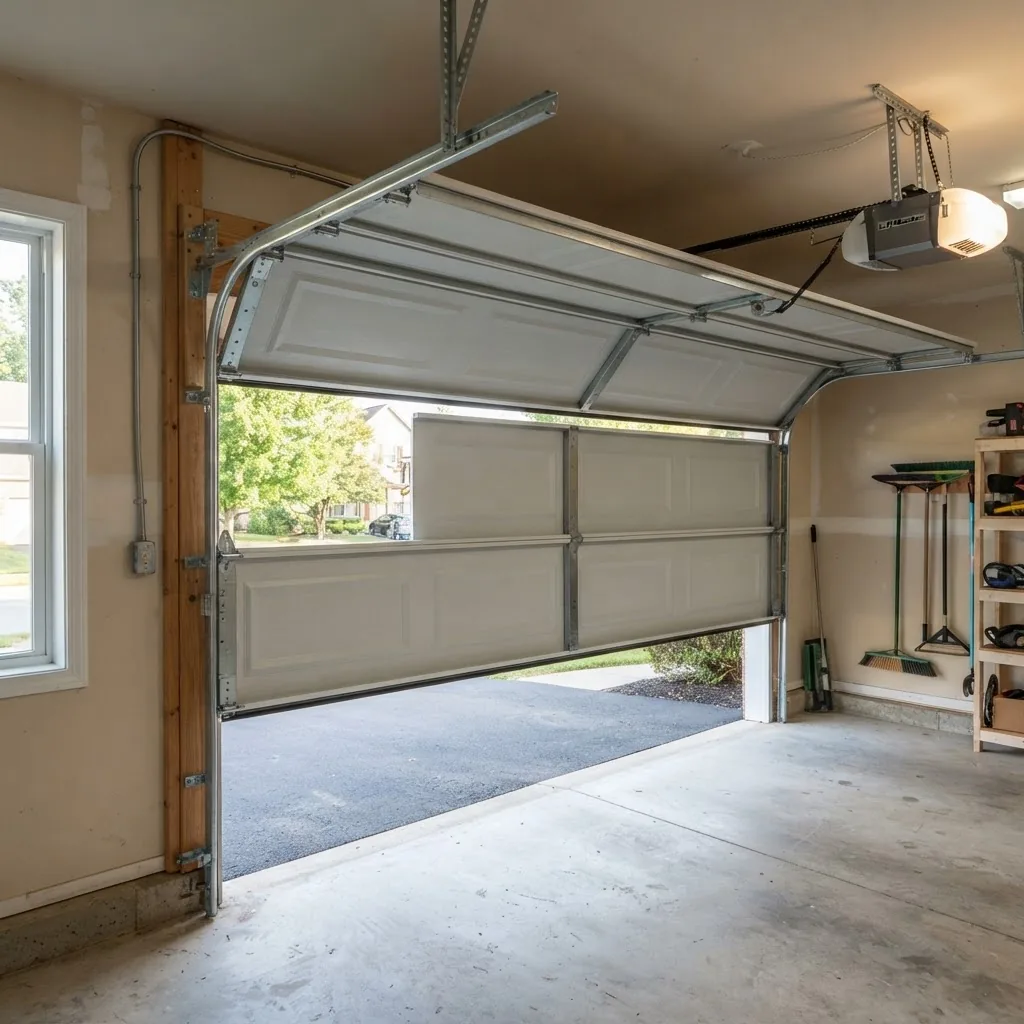
Garage door panels are the segmented sections of the door that bend as the door follows the tracks. Panels can be steel, wood, aluminum, or composite; they connect via garage door brackets and hinges and are the visible, cosmetic part of the system.
Garage door rollers and tracks guide the panels up and down. Rollers ride inside the vertical and horizontal tracks and are typically made of nylon or steel; worn rollers create rattling and misalignment. Tracks must be plumb and free of dents for smooth operation.
Garage door brackets and hinges connect panels and anchor hardware such as roller brackets, struts, and bottom brackets. Brackets also secure the track to the framing and carry load into the house structure.
Garage door springs provide the counterbalancing force. There are two primary types: torsion springs (mounted on a torsion tube above the door) and extension springs (mounted along the horizontal tracks). Each style pairs with a different cable routing and drum design, described in depth later.
Garage door cables connect the bottom of the door to the spring system through the cable drum. Cables are steel stranded wire; they transfer spring torque to linear lift at the door edges. A properly routed cable keeps the door level and the springs balanced.
Cable drum (for torsion systems) is a grooved wheel mounted on the torsion shaft that winds cable as the door closes. In extension systems, cables run over pulleys and attach directly to the spring and bottom bracket.
Counterbalance system is the combined mechanism of springs, cables, drums/pulleys, and the torsion shaft (if present). It offsets the door weight so a small force from the opener or a person can lift the door safely.
Pulley systems in garage doors appear in extension-spring setups and in some low-headroom conversions; pulleys change cable direction and increase mechanical advantage. Think of pulleys like bicycle brake circuits: they reroute force efficiently.
Garage door opener motor and drive system contains the motor, drive rail (belt, chain or screw), trolley, and connection point to the door (either direct to the arm or via a quick-connect bracket). Openers work with the counterbalance system, not instead of it—if springs fail, even a working opener won’t reliably lift the door.
Other overhead items include safety sensors near the floor, emergency release handles, top fixtures, and reinforcement struts for wide doors. For a deeper dive into door lift mechanics alongside the parts shown here, see our garage door lift system guide. Also consult our garage door parts diagram and opener components guide for extra diagrams and opener details.
Case example: A homeowner matched a dented panel in the photo above to an uneven roller path and found the track shifted by 1/4 inch; straightening the track reduced roller wear and prevented cable binding that would have frayed the cable within weeks. That quick diagram-match saved a service call and prevented a catastrophic cable failure.
Detailed Garage Door Cable System Explained (with Cable Diagram)
This section isolates the cable system so you can trace force from the spring to the bottom bracket and back. We’ll show step-by-step cable system flow and label the parts that control winding and routing.
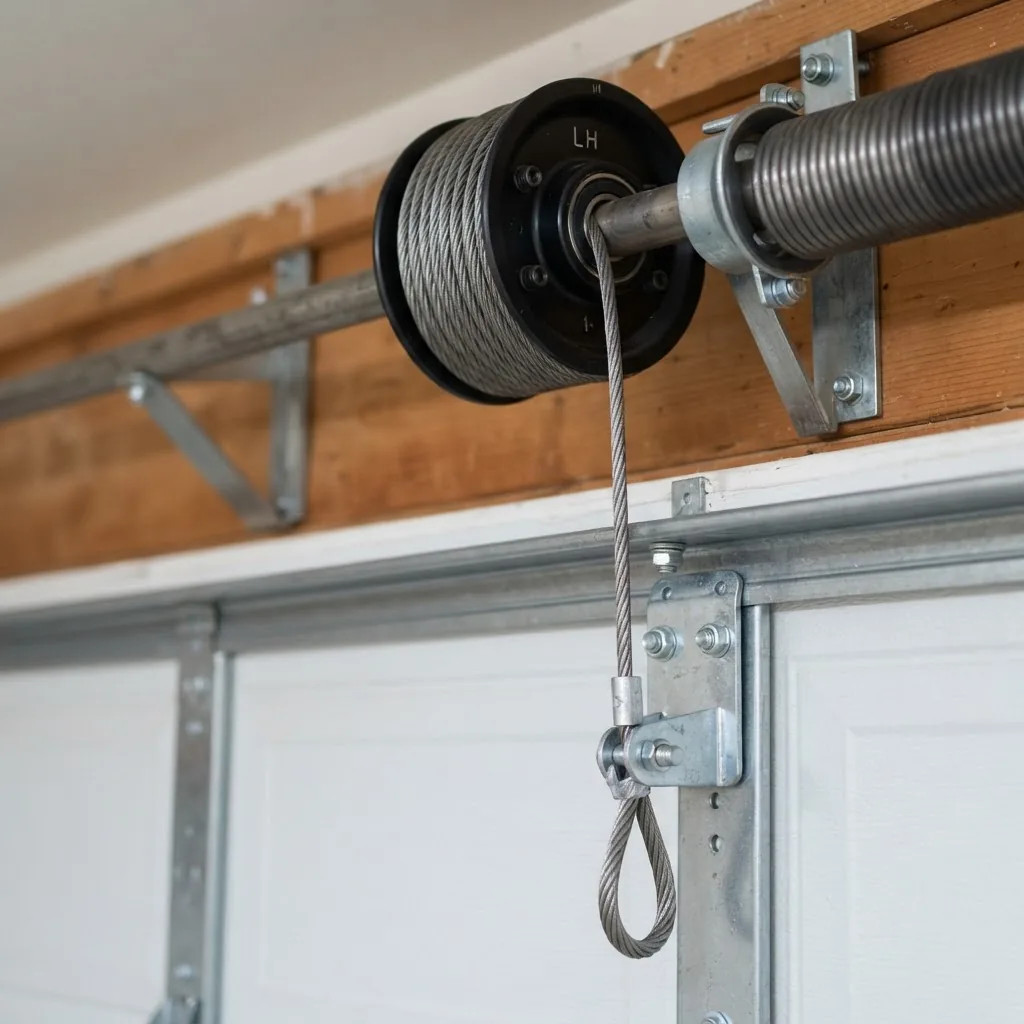
Start by identifying your spring type: a visible shaft and drum above the door indicate torsion springs; long springs along the horizontal track indicate extension springs. Each style uses a different cable winding and routing mechanism.
- Trace the cable from the bottom bracket: At the bottom corner of the door the cable attaches to the bottom bracket. Follow the cable up to see whether it winds onto a drum (torsion) or runs through a pulley to a spring (extension).
- Inspect the cable drum or pulley: On torsion systems, the cable drum sits at each end of the torsion shaft; grooves guide the cable. The cable wraps neatly; if the wrap is crossing or piling, the drum groove is likely worn or the shaft is misaligned.
- Check the spring anchor: On torsion springs the anchor points are on the shaft with set collars and winding cones. On extension springs the spring’s stationary end mounts to a bracket and the moving end connects to a pulley/cable assembly.
- Follow the cable tension line: A correctly tensioned cable will be taut with minimal sag when the door is closed. Uneven tension across left and right cables is a primary cause of off-level doors.
- Observe safety cables: Safety cables run through extension springs to contain them if they break; they are not the primary lift cable but are crucial containment devices.
Step-by-step cable flow for a torsion system:
- Energy storage: The torsion spring stores torque when wound. Each turn stores approximately a set amount of foot-pounds depending on spring dimensions; manufacturers publish exact values in technical manuals—consult your model’s documentation.
- Torque transfer: The torsion shaft transmits torque to the cable drums; as the drum rotates, the cable winds or unwinds converting rotational energy into linear lift at the bottom of the door.
- Linear lift: As the cable takes up on the drum, the bottom bracket rises, breaking the door’s contact with the floor. Balance is achieved when spring torque equals door weight divided by drum radius (basic physics: torque = force × radius).
- Return flow: When closing, gravity applies a reverse force; the drum unwinds the cable as the torsion spring reaccumulates torque.
Step-by-step cable flow for an extension system:
- Spring stretch: Extension springs stretch as the door lowers, storing potential energy along the track.
- Cable-pulley action: Cables loop over pulleys; the pulleys redirect the cable to the bottom bracket. When the door opens the springs contract and pull the cable to raise the door.
- Containment: A safety cable runs through the extension spring to contain the spring if it breaks; without it the spring can whip dangerously.
Important mechanical notes and how cables fail: cable wear usually begins at points of high bending or on drum grooves with corrosion or burrs. Friction, incorrect winding, or damaged drums cause fraying; frayed strands reduce cross-sectional area and the cable can snap under tension. “Birdcaging” (fanned strands) indicates imminent failure.
Case study: A homeowner reported a door that felt heavy and stuck halfway. Using the cable diagram, I found one cable had run up on the outside edge of the drum groove and began to fray. The misrouted cable caused a mismatch in winding radius—reducing mechanical advantage by roughly 10–15% (according to calculations using drum radii and drum wrap), enough that the opener would stall under load. Re-routing to the correct groove and replacing the frayed cable restored balance.
How Garage Door Cable Systems Work with Openers (Including Garage Door Opener Diagram)
Understanding how an garage door opener motor and drive system integrates with cables clarifies where power, control, and mechanical balance intersect. Below is an integrated explanation plus an infographic that maps door parts, the cable system, and opener components together.
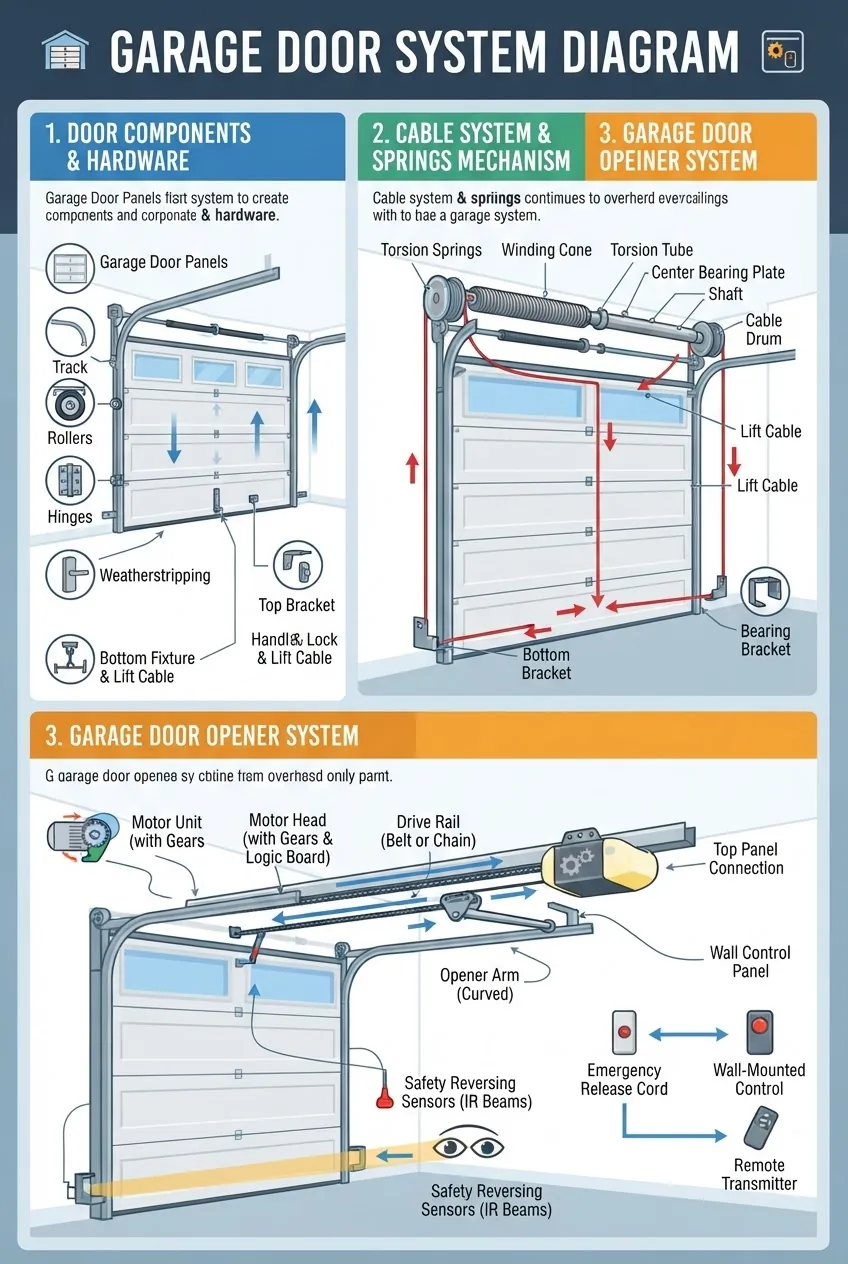
The opener’s job is to provide the small force required to move an already balanced door. The counterbalance system (springs + cables) supports most of the door weight; the opener moves the door through its trolley and arm or, in jackshaft installations, by driving the torsion shaft directly.
Key connection points and interactions:
- Opener link to door: The trolley connects to an arm that attaches to the top section or the bracket above. This link transfers linear force from the opener to the door sections.
- Counterbalance synergy: Proper cable tension adjustment ensures the door is neutral near mid-travel so the opener applies only a modest force. If the springs are under-tensioned the opener will struggle to lift; over-tensioning can make the door fly up dangerously.
- Drive system variations: Belt, chain, or screw drives transfer motion differently; a heavy door benefit from belt drives for quieter operation, while a screw drive can be faster but needs more maintenance.
- Safety and auto-reverse: The opener uses motor current sensing and floor sensors to detect obstructions. If a cable fails mid-cycle, the sudden loss of counterbalance can trigger the opener’s safety logic.
Practical opener-cable checks (do these while the door is closed and power is off where possible):
- Disconnect the opener: Use the emergency release to disengage the trolley. Manually lift the door halfway—if it stays level, counterbalance is correct.
- Check for binding: With the door at mid-height, inspect cable wind on drums and pulley alignment. Binding indicates poor routing or worn drums affecting opener load.
- Test the opener briefly: Reconnect and operate one cycle while observing cable motion. Do not attempt long test cycles if cables look worn; cut power and replace damaged cables immediately.
For troubleshooting opener controls linked to the cable system, refer to our garage door opener button replacement and control guide. For gear and internal opener repairs that complement cable maintenance, see our garage door opener gear replacement and repair guide, and for installation specifics including auto-setup, consult the garage door opener installation guide.
Additional resources on specific opener brands: see our how to install LiftMaster garage door opener guide and how to program LiftMaster garage door remote control guide. If you plan to replace the opener entirely, read our how to replace garage door opener guide and installation tips and compare options in the types of garage door openers guide.
Common Cable System Issues and How to Identify Them Using Diagrams
Below are the most common cable system failures and specific diagram callouts and inspection steps to confirm each issue. Use the diagram areas referenced to pinpoint visible symptoms.
- Cable fraying (Diagram callout: cable mid-span) — Look for broken strands or birdcaging near the drum or bottom bracket. Troubleshooting tip: mark the fray location and measure remaining diameter; replace if more than 5% of strands are broken.
- Uneven tension (Diagram callout: both cables at bottom bracket) — If one side is noticeably looser, the door will tilt. Troubleshooting tip: close the door, disconnect the opener, lift to mid-height and measure door level; adjust spring tension in 1/4-turn increments (torsion) or reposition extension spring hooks by one hole at a time until level.
- Cable slips on drum (Diagram callout: drum grooves) — Symptoms include noisy wind-up and inconsistent lift. Troubleshooting tip: inspect drum grooves for wear or burrs; if you see groove flattening, replace the drum or add a thin shim only as a temporary measure.
- Broken springs (Diagram callout: spring assembly) — A snapped spring often leaves the door heavy to lift or impossible to lift. Troubleshooting tip: Never attempt to rewind a broken torsion spring solo—call a pro unless you have special winding bars and experience.
- Pulley wear (Diagram callout: pulley assemblies on extension systems) — Worn or seized pulleys cause noise and jerky motion. Troubleshooting tip: spin each pulley by hand; replace any with roughness or side-to-side play.
- Safety cable absence or failure (Diagram callout: through-spring cable) — Absence of safety cables in extension systems is a hazard. Troubleshooting tip: add or replace safety cables if missing; follow manufacturer diameter and grade specs.
- Cable anchor failure (Diagram callout: bottom bracket) — Look for bent or torn cable end fittings. Troubleshooting tip: replace the bottom bracket or cable end if deformed; use rated galvanized or stainless cable per the parts manual.
From practice: a common overlooked issue I see is minor groove damage on drums causing progressive fraying; homeowners misread this as a single broken strand and delay replacement until a complete failure. A diagram matched to the drum makes the wear obvious and prompts timely replacement.
Safety Precautions When Handling Cables and Springs
Working on springs and high-tension cables carries real risk. Springs store substantial energy and can cause severe injury if released uncontrolled. Follow these precautions and consult official standards.
- Know the hazard: A wound torsion spring holds dozens to hundreds of foot-pounds of torque; a released spring can cause property damage and bodily harm.
- Manufacturer and regulatory guidance: Review your door manufacturer’s technical manual for spring and cable specs. For safety standards refer to https://www.osha.gov and the U.S. Consumer Product Safety Commission at https://www.cpsc.gov for handling recommendations.
- Personal protective equipment: Always wear safety glasses, heavy gloves, and long sleeves. Use eye protection rated for impact.
- Use proper tools: For torsion springs use only correctly sized winding bars (not screwdrivers); for cable clamps and replacement use rated crimps and cable of manufacturer-specified diameter and grade.
- Power and motion control: Disconnect the opener’s power before working near the trolley or motor. Use the emergency release and secure the door with locking pliers or clamps on the track when testing manually.
- When to call professionals: If you lack winding bars, the correct spring spec, or you find a snapped torsion spring, contact a licensed technician. According to a 2024 industry report, technicians handle the majority of torsion spring replacements due to safety concerns (source: 2024 industry report).
Caution: never attempt to wind a torsion spring with makeshift tools—I’ve seen DIYers suffer broken bones when wind slipped off an unsecured bar.
For manufacturer specifications and replacement guidelines, consult your brand’s technical manuals—for example Clopay’s technical documents for spring and cable ratings. Also see consumer advice at Consumer Reports for maintenance best practices.
Maintenance Tips for Garage Door Cable and Part Longevity
A regular maintenance schedule keeps cable systems functional and prevents sudden failures. Below are concrete steps, intervals, and quantities.
- Visual inspection — monthly: Inspect cables, drums, pulleys, rollers, hinges, and brackets for wear. Look for fraying, rust, or deformation. Replace cables showing any broken strands—do not wait.
- Lubrication — every 6 months: Apply a light coat (2–3 sprays) of a silicone-based or garage-door-specific lubricant to rollers (unless sealed), hinges, and torsion springs. Do not lubricate nylon rollers’ running surfaces excessively—use sparingly.
- Tension checks — annually: Disconnect the opener and lift the door to mid-height; if it moves more than 1 inch up or down from that point without force, it needs spring adjustment. For torsion springs, adjust in 1/4-turn increments; document each turn.
- Weatherproofing — annually: Check bottom seals and edge seals; replace if compressing >50% so water and debris don’t accelerate cable corrosion.
- Replacement timing guidelines: Extension springs typically last 10,000–20,000 cycles; torsion springs often rated for 10,000 cycles by manufacturers. If door usage is heavy (more than 3 cycles/day), plan spring replacement every 5–7 years. Follow manufacturer manuals for exact cycle ratings.
Tools and supplies list (minimum): 1 set of winding bars (for torsion), adjustable wrench set, locking pliers, socket set, silicone spray, replacement galvanized cable of correct diameter, rated cable clamps/crimps, and safety glasses. Keep a spare pair of cables on hand if your garage sees heavy use or if your area has corrosive salt air.
Summary and Further Resources on Garage Door Systems
You now have a practical map of the major overhead components, the detailed mechanics of cable systems, and the relationship between the counterbalance system and openers. Use the diagrams and step-by-step checks above to diagnose most cable-related issues and plan maintenance schedules that will extend the life of panels, springs, drums, and cables.
To budget repairs or upgrades for parts referenced in this guide, check pricing and installation details in our garage door prices guide for brands and installation cost.
If you followed this guide and want to deepen your lift-system knowledge, review our garage door lift system guide. For opener-specific fixes and parts that tie into cable and balance checks, the following sibling resources are useful:
- garage door opener button replacement and control guide
- garage door opener gear replacement and repair guide
- how to install LiftMaster garage door opener guide
- how to program LiftMaster garage door remote control guide
- how to replace garage door opener guide and installation tips
- types of garage door openers guide
What you will achieve, time and skill required: After following the numbered hands-on steps below you will be able to identify parts from the diagrams, perform safe visual inspections, measure and perform basic cable tension adjustments, and replace frayed cables. Time: 2–6 hours. Skill: beginner to intermediate DIYer. Tools listed in the “Before you start” checklist are required.
Before you start
- Winding bars set (correct sizes) — for torsion spring adjustments
- Adjustable wrench and socket set — 1/4″–1″ sockets depending on hardware
- Locking pliers (Vise-Grips) — to hold door during tests
- Silicone spray or garage-door lubricant — 1 can
- Replacement galvanized cable of manufacturer-specified diameter — 1 spare pair
- Rated cable clamps/crimps and swaging tool or replacement end fittings
- Safety gear: safety glasses, heavy gloves, long sleeves
- Tape measure and carpenter’s level — for leveling the door
- Flashlight and camera — document worn areas before disassembly
Step-by-step Hands-On Procedures
- Confirm door type and identify parts on the diagram. With the door closed, photograph the header area and both sides of the tracks. Compare against the diagrams above to locate the cable drum, torsion or extension springs, bottom brackets, and pulleys. Note: this takes 10–20 minutes.
- Disconnect power and secure the door. Unplug the opener, pull the emergency release, and clamp the door to one side of the track with locking pliers. Attempt to lift the door manually: note if it feels balanced (should require ~15–35 lbs force at the handle for a typical single-car door). If force exceeds 50 lbs, stop and consult a professional. Time: 5–10 minutes.
- Inspect cables, drums, and pulleys visually. Look for fraying, birdcaging, rust, or groove wear on drums. Use the flashlight and camera to document findings. If any cable shows broken strands within 12 inches of attachment points, plan immediate replacement. Time: 15–30 minutes.
- Check door level and cable tension (torsion systems): With the door at mid-height, measure the height left vs right with a level. If off by more than 1/4″, adjust as follows: for torsion springs, add or remove 1/4-turn on the winding cone on the heavier side (tighten the spring by winding toward the center if the door side is low). Always use two winding bars and secure the set collar. Document every 1/4-turn. Time: 30–60 minutes.
- Adjust cable tension (extension systems): For extension springs, shorten the cable by moving the lower hook back one hole in the bottom bracket or reposition the spring’s mounting hook to increase tension. Make changes in small increments and re-check door level after each adjustment. Time: 20–40 minutes.
- Test manual operation. With the opener disengaged, lift the door to full open and full close slowly, watching for binding, scraping, or cables moving out of grooves. Confirm that the door remains level and that cables spool neatly onto drums. Time: 10–20 minutes.
- Re-engage opener and test motor-assisted operation. Reconnect the opener, run a single up/down cycle and watch cable behavior and opener load. If the opener stalls or the door jerks, cut power and re-inspect cables and drums. Time: 10–15 minutes.
- Replace frayed cables (if required). Remove cable tension, detach from bottom bracket, and unspool from drum. Install new cable of the correct diameter and grade, seat into the drum groove, reattach at the bottom bracket with two rated clamps or a swaged end fitting. Restore tension per manufacturer spec and retest manual operation. If replacing torsion-spring–mounted cable you may need to adjust spring tension after replacement. Time: 60–180 minutes depending on experience.
- Lubricate moving parts and record maintenance. Apply lubricant to springs, hinges, and rollers (see lubricant guidance earlier). Note the date and work completed in a maintenance log. Perform a follow-up check in one week after normal cycles. Time: 15–20 minutes.
- Final safety check and documentation. Verify safety sensors, auto-reverse functionality, and emergency release operation. Photograph the finished setup and retain receipts for parts for warranty and future reference.
Common mistakes and how to avoid them
I once tightened a torsion spring by half a turn too many because I failed to mark the original position; the door started to “fly up” when tested. I now always mark reference points with paint and record every 1/4-turn. Another mistake I saw often: homeowners lubricate nylon roller tread excessively, which attracts grit—apply only one light spray. I avoid using the wrong cable diameter by photographing the old cable and noting the stamped diameter in the manual before ordering a replacement.
Checklist: verify your work
- Door moves smoothly by hand at mid-height and stays in place (lift force 15–35 lbs for single-car doors)
- Both cables show no broken strands within 12 inches of attachments
- Drum grooves are uniform and cables seat evenly
- Openers run one full cycle without stalling or jerking
- Safety sensors and auto-reverse function properly
- Maintenance log updated with parts and adjustments recorded
When to call a professional
Call a licensed technician if you encounter snapped torsion springs, if the door requires more than 50 lbs of lift force to operate manually, if you lack winding bars, or if you are unsure of spring specifications. Torsion spring work is the single biggest DIY hazard on garage doors.


