

how to repair garage door cable — By the end of this hands-on guide you’ll have safely repaired or fully replaced the steel lift cables on a single-car residential door, tested door balance, and adjusted tension. Typical time: 90–240 minutes depending on whether you repair one side (90–120 min) or replace both cables and drums (150–240 min). Skill level: competent DIYer with basic mechanical ability and comfort using winding bars and sockets.
Before you start, read the safety section that follows and assemble the tools listed below. If you are uncomfortable with locked-in spring tension, stop and call a pro.
Before you start
- Confirm door type (torsion or extension) and the side of failure.
- Have a helper available for lifting and alignment tasks.
- Turn off opener power and disconnect the trolley before work.
- Measure and photograph current cable routing and drum orientation for reference.
Introduction to Garage Door Cable Repair and Replacement
This guide covers both repair and full replacement of residential garage door cable systems so you can fix a garage door cable snapped scenario or proactively replace worn wire. You will learn how cables interact with springs and drums, how to safely release and reapply tension, and step-by-step procedures for one-sided breaks and full re-installation. Follow all safety notes — handling torsion spring tension without proper tools risks severe injury. According to a 2024 industry report, cable-related failures made up an estimated 28% of residential garage door service calls, highlighting how often homeowners face these repairs.
Transition: The next section explains the components you’ll be working with and why correct parts and routing matter.
Understanding Garage Door Cables and How They Work
At its core the garage door cable transfers the counterbalancing force from the spring to the door. A brief glossary and component list first, then a mechanics description.
- Cable (steel wire cable) — braided or single-eye end steel cable that wraps on a drum and attaches to the bottom bracket. Function: carry lift load in tension only.
- Cable drum — the grooved cylinder (on torsion springs) or drum assembly (on extension systems) that winds cable as the door closes; critical for even winding to maintain balance.
- Spring — torsion or extension springs store energy; cable connects spring torque to door weight. See how spring type affects cable operation below.
- Bottom bracket — fastened to the door bottom; cable hooks or loops to this bracket and secures door lifting.
- Safety devices — safety cables (for extension springs), cable clamps, and set screws on drums/winders that maintain position.
How the system works (mechanics)
- Spring tension provides counterbalance — the spring stores rotational energy (torsion) or axial tension (extension) that offsets the door’s weight; cable converts that force into vertical motion.
- Drum wraps cable — as the door closes the drum winds cable; correct drum alignment keeps the door level. A mismatched drum groove or damaged drum will accelerate cable wear.
- Cable tension and travel — cable must be taut at rest with no slack; too much tension binds operation, too little causes sag and uneven winding.
- Failure points — cable fray near the bottom bracket, kinks from sharp edges, wear at drum grooves, and corrosion at attachment points.
Types of cable — most residential systems use 7×7 or 7×19 galvanized steel wire cables sized by door weight. Manufacturer specs list breaking strength and recommended usages; match diameter to the door and spring torque. For full guidance on spring systems related to cables, see extension spring replacement and sizing.
Transition: Before touching cables, gather the right tools and safety gear described next.
Tools and Safety Gear Needed for Garage Door Cable Repair
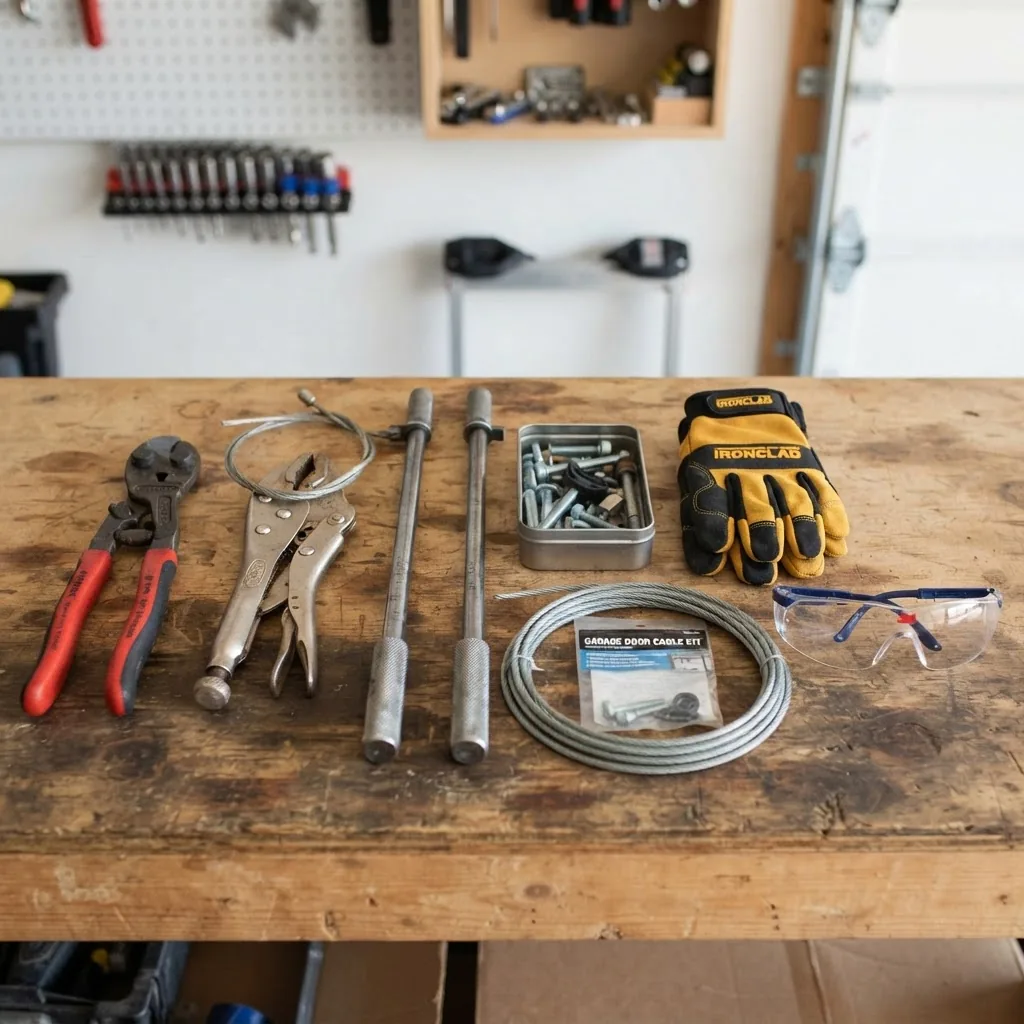
- Winding bars (set of 2) — 1/2″ to 5/8″ diameter hardened steel bars, used for torsion spring work; do not substitute. Use to hold and control spring torque during adjustment.
- Cable pliers — long-nosed pliers for bending and seating cable ends and clamps; useful for finishing cable loops.
- Adjustable wrench set and deep sockets — for set screws, drum bolts, and bottom bracket hardware (commonly 1/2″, 9/16″).
- Ratchet and breaker bar — provide leverage for stubborn fasteners and spring components.
- Vice grips / locking pliers — temporarily clamp the door in place when disconnecting the opener or during one-sided repairs.
- Clamps and cable grips — for securing a temporary hold on a snapped cable during removal or inspection.
- Tape measure and permanent marker — measure lengths and mark drum alignment and cable groove start points.
- Safety glasses and ANSI Z87.1 goggles — required; OSHA recommends eye protection for mechanical work. OSHA safety guidelines
- Cut-resistant gloves — steel cable can fray; use cut-resistant rated gloves (ANSI/ISEA 105 level 3+).
- Flashlight or headlamp — for seeing set screws and drum grooves.
- Replacement cable kit — pre-cut or a spool of cable matching diameter and rated breaking strength; include new clamps and bottom bracket hardware. Consult manufacturer specs for load limits—see technical manuals for your brand for exact ratings. Manufacturer technical resources
Transition: With tools ready, learn to diagnose whether a repair will suffice or full replacement is required.
Diagnosing Garage Door Cable Problems: When to Repair vs Replace
Start by visually inspecting both cables, drums, bottom brackets, and the spring system. Common failure modes include frayed strands near the bottom bracket, a snapped cable on one side, uneven winding, and rusted wires. Below is a concise troubleshooting checklist followed by a comparison table.
- Look for fraying within 6″ of the bottom bracket — replace the cable if any broken wires are visible.
- If one cable snapped but the opposite cable looks intact, check drum condition and spring alignment before attempting partial repair.
- Inspect drums for groove wear or burrs that will cut a new cable quickly.
- Test door balance manually (with opener disconnected) — if the door falls quickly or is extremely heavy, springs may be the root cause and both cable and spring replacement should be done together.
- Rust and corrosion across multiple strands indicate full replacement; a single broken strand near clamp might be temporarily repaired but should be scheduled for replacement soon.
| Condition | Repair? | Replace? | Why |
|---|---|---|---|
| One strand broken near clamp | Possible temporary repair | Recommended within 1–3 months | Localized damage can be clamped, but remaining fatigue risk remains. |
| Multiple frays within 6″ | No | Yes | Sign of imminent failure; full replacement is safest. |
| Cable snapped on one side; drum grooves worn | No; not safe | Yes — replace cable(s) and drum | Uneven wear indicates systemic problem; replacing one cable only risks repeat failure. |
| Visible corrosion along length | No | Yes | Corrosion reduces breaking strength; replace both cables. |
When to prioritize spring replacement vs cable replacement: if manual balance tests show the door does not stay at mid-height or the springs show significant wear, replace springs along with cables. See differences between repairing a cable and a spring later in this guide.
Also consider related hardware — when rebuilding a bottom bracket or addressing persistent fraying, you may need to update other parts. For guidance on complementary parts, see garage door handle and hardware replacement tips.
Transition: If diagnosis points to a repair, follow the controlled, step-by-step repair procedure below. If replacement is needed, jump to the next major section.
How to Repair a Garage Door Cable: Step-by-Step Process
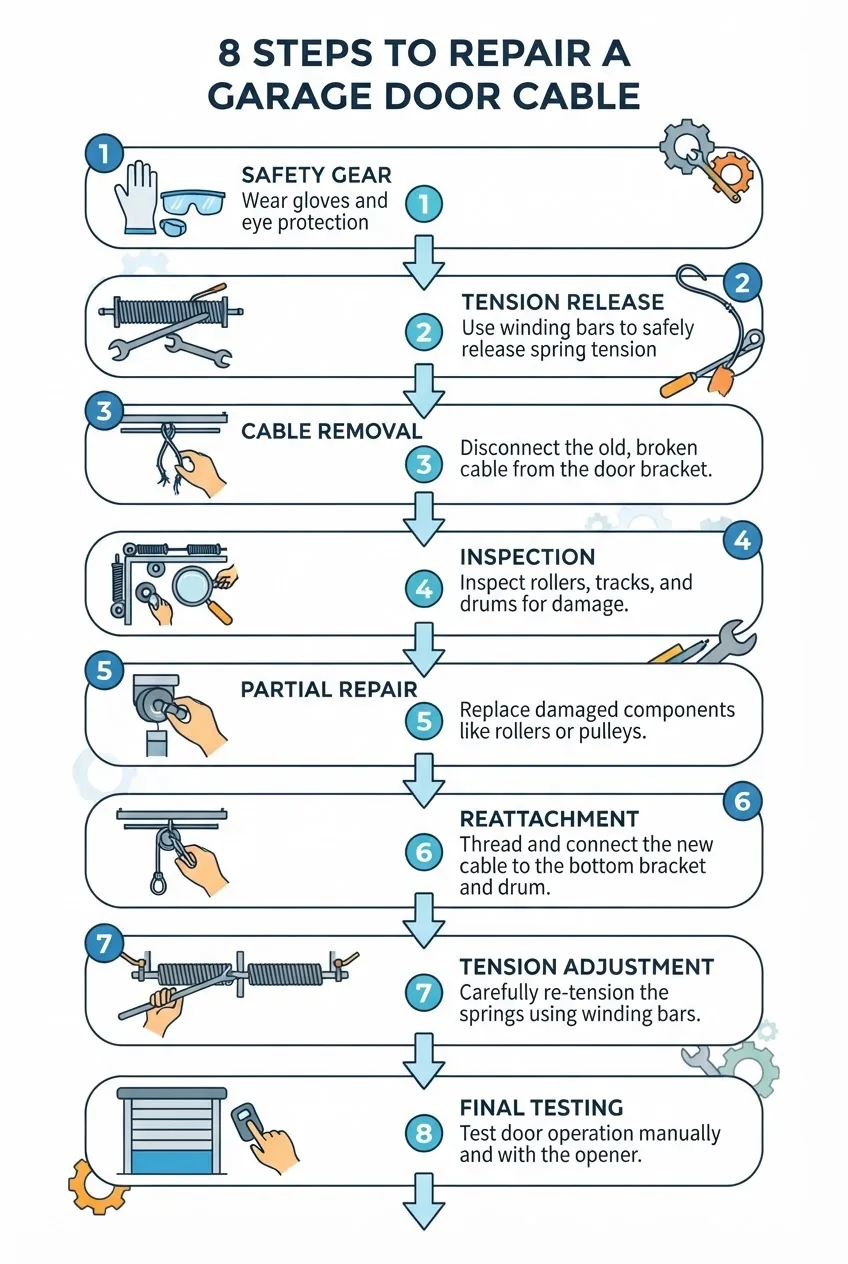
This section walks through an 8-step repair workflow for a partial cable fix or re-seating a snapped cable when the opposing side and drums are in good condition. Follow every safety tip — only attempt torsion spring adjustments if you have winding bars and understand spring behavior.
- Disconnect power and secure the door — Unplug the opener and pull the emergency release cord to disengage the trolley. Close and clamp the door in the track using locking pliers on a roller or have a helper hold it in place. This prevents accidental movement during cable work. OSHA guidance emphasizes disconnecting power before mechanical fixes. OSHA safety guidelines.
- Inspect and photograph the system — Take clear photos of the drum grooves, cable routing, anchor points, and spring orientation before dismantling. Measure cable length from drum groove start to bottom bracket and mark the drum with a marker at the winding start to aid reassembly.
- Release minor tension (one side) — If working on a single broken cable and spring tension is still present, you must reduce load enough to remove the cable safely. For torsion systems, insert winding bars into the torsion cone and back off one-quarter turn to relieve slack at the broken side only — do not remove bars. For extension springs, use clamps on the track and relieve tension by lowering the door slightly until slack shows. Only perform if you are confident using winding bars; otherwise stop and call a professional.
- Remove damaged cable and inspect attachments — Loosen the cable clamp(s) and unthread the cable from the drum or winding. Inspect the drum groove for burrs and the bottom bracket for sharp edges. If minor burrs exist, file them smooth with a metal file; deep grooves require drum replacement.
- Make a partial repair or create a new loop — For a temporary repair: form a double-loop near the bottom bracket, seat the cable into a new clamp (use at least two clamps spaced 3/4″ apart with the U-bolt over the dead end of the cable), and torque clamp nuts to 80–100 in-lbs for 1/8″–3/16″ cable. This method is a stopgap for one-side failures; schedule full replacement. For a permanent repair, skip to full replacement steps below.
- Reattach cable to the drum — Feed the live cable end into the drum groove, align the groove mark you made earlier, and ensure the cable wraps evenly. Tighten any drum set screws per manufacturer torque specs. If the drum uses a set screw to trap the cable tail, seat it squarely and torque to spec (commonly 40–60 in-lbs). Confirm cable sits centered in the groove.
- Restore tension carefully — Reintroduce tension slowly. For torsion systems, use the winding bars to add half-turns back to the spring until the door balance improves; check the door stops every 2 quarter-turns. For extension systems, reposition the springs and re-tension per original marks. After each increment, test door travel manually to avoid over-tensioning.
- Test operation and secure all hardware — Reconnect the opener, operate the door through two full cycles, and watch for drift, uneven winding, or binding. Verify bottom brackets, clamps, and set screws are tight. Perform a balance test: with the door halfway open, it should remain in place; if it drops quickly or lifts strongly, adjust spring tension or re-check cable routing.
Safety tip per step: when using winding bars, always keep one bar fully seated in the cone and never let both bars be loose simultaneously. I learned this when I nearly lost control of a torsion cone years ago — a firm seated bar and clear hand positions prevented an injury.
Transition: If the inspection revealed drum wear, multiple frays, or you prefer a durable fix, proceed to a full cable replacement process in the next section.
How to Replace and Install Garage Door Cables
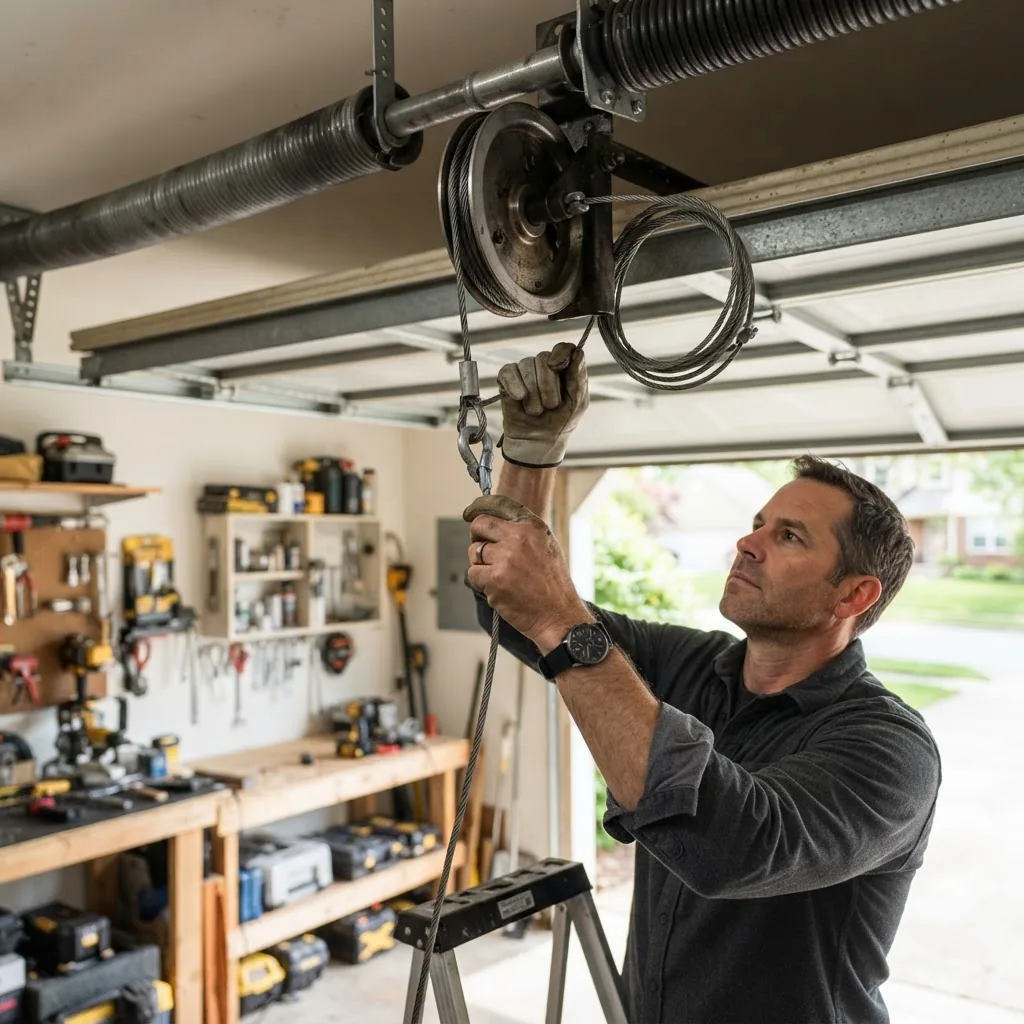
Full replacement is the recommended solution for worn cables, snapped cables on one side with drum damage, or simultaneous spring replacement. Below is a detailed step-by-step installation with subsections for common attachment methods (set-screw drums and winding cones).
Preparation and parts selection
- Choose correct cable diameter and length — Match the OEM diameter (commonly 1/8″ or 3/16″) and buy cables rated for at least the same working load. Purchase two cables to replace both sides at once. According to manufacturer specifications, using undersized cable reduces safety margin rapidly; consult brand manuals for exact ratings. Manufacturer technical resources.
- Obtain new clamps and bottom bracket hardware — Use two U-bolt clamps per cable at minimum; for 3/16″ cables use 5/16″ U-bolt clamps. New hardware prevents galvanized surfaces from failing at threads.
- Prepare workspace and helpers — Ensure a stable ladder, clear garage floor, and one helper for lifting door panels when aligning drums.
Full replacement steps
- Disconnect power and clamp the door — As before, disconnect opener and clamp door to prevent movement. For full replacements I always use a second pair of locking pliers on the track at knee height as a backup.
- Remove old cables and inspect drums/springs — Remove both cables, then rotate the drum manually to check groove integrity. If grooves are filed or deformed, replace drums now to avoid rapid new-cable wear.
- Route new cables through bottom brackets — Feed new cable from the drum down to the bottom bracket. Create a loop at the dead end if using U-bolt clamps: leave 1.5″–2″ of tail past the clamp for secure seating.
- Attach cable to bottom bracket using U-bolt clamps — Put the U-bolt over the cable dead end with the saddle on the live side; tighten nuts to manufacturer torque (typically 80–100 in-lbs for 1/8″–3/16″). Use at least two clamps spaced 3/4″–1″ apart. For a cleaner finish, form a factory-style loop and crimp sleeve as specified by manufacturer if you have a crimper for cable sleeves.
- Seat cable into drum grooves — Wind the cable into the drum groove following the previously marked orientation. For set-screw drums, ensure the cable dead end sits in the clamp or cone pocket, then torque set screws per spec (commonly 40–60 in-lbs). For winding cones, feed the cable through the cone and secure with set screw after seating.
- Tension springs incrementally — Re-tension springs by the original number of turns: count quarter-turns during re-winding to match the stored energy. If original turn count is unknown, tension until door balances near mid-point (see balancing section). For torsion springs, typical single-car doors require 5–7 full turns on spring; add in safe increments and test frequently.
- Check alignment and re-torque all hardware — With cables under tension and drums seated, operate the door manually through several cycles. Tighten clamp nuts and set screws once the system is under load. Re-check cable alignment so both cables enter the drum groove evenly without contact with track edges.
- Install safety cables if using extension springs — Feed safety cables through extension springs and anchor them per code to contain a broken spring and prevent the spring from flying off. This is a critical safety upgrade on older systems.
- Final function test — Run 10 full cycles with the opener and listen for rubbing or slow winding. Verify door balance at halfway and check the auto-reverse system using a 2×4 on the floor; door should reverse when striking the block.
Attachment methods explained
- U-bolt clamps (common, field-friendly) — Use the ‘U’ over the dead end method and saddle under the live side. Tighten clamps to 80–100 in-lbs and stagger clamps by at least 3/4″. Use two clamps at minimum; three gives higher safety margin.
- Crimped sleeves (factory-style) — Provide the cleanest, strongest connection but require a hydraulic crimper. If you can access professional crimping, this is the preferred permanent solution.
- Set-screw drums and cones — Ensure the set screw contacts a wrapped tail or a machined cable seat; never let the set screw press directly on the cable without a tail wrapped or dead end secured.
Material and labor costs vary by region and parts quality; consider the long-term benefits of replacing both cables and drums if you see substantial wear. For planning and budgeting, consult our pillar on costs: garage door installation costs and material options.
Transition: After installation, the next essential steps are tension adjustment and testing to ensure safe operation.
Adjusting Cable Tension and Testing After Replacement
Correct tension is the difference between a smooth-operating door and one that damages hardware or is dangerous. Cable tension works in tandem with spring tension — they must be calibrated together. For deeper spring adjustment procedures, see garage door spring tension adjustments.
- Pre-check: visual alignment — Ensure both cables enter drums at the same height, the bottom brackets sit flush, and drums face the same orientation. If cables rest outside grooves, stop and reseat drums.
- Balance test — With opener disconnected, lift the door manually to waist height and release; it should remain in place. If door rises more than 1–2 inches, springs are over-tensioned; if it falls more than 1–2 inches, springs are under-tensioned.
- Adjust springs in small increments — For torsion springs, add/remove quarter-turns per side and retest. For extension springs add/remove 1–2 coils (on systems with adjustable anchor points). After each adjustment, cycle the door twice and re-check balance.
- Check cable tension symmetry — Measure the distance from the top edge of the bottom bracket to the floor on both sides; they should match within 1/8″. If difference exceeds 1/8″, adjust drum set screws or cable clamp to even out take-up.
- Operational safety checks — Run the opener and test auto-reverse with a 2×4 placed on the floor under the door; the door must reverse within 2 seconds of contact. Test photo-eye alignment as well.
- Final torque and re-check — With tension under load, retorque clamps and set screws to spec. Re-run balance and operational tests. Keep a maintenance log noting number of turns applied and hardware replaced.
If you require additional spring guidance related to balancing with new cables, review our detailed spring adjustment resource: garage door spring tension adjustments.
Transition: Prevent future failure by avoiding common installation mistakes and following maintenance best practices described next.
Common Mistakes to Avoid and Maintenance Tips for Longevity
Below are practice-proven mistakes I’ve seen repeatedly — written in first person to share direct experience — plus maintenance tips to lengthen cable life and reduce the chance of a broken garage door cable.
- Mistake: Replacing only the snapped cable — I once repaired a single snapped cable and left the opposite cable unchanged; the old cable broke two weeks later because drums had worn grooves that accelerated failure. Always inspect and consider replacing both sides.
- Failure to replace worn drums — New cables on damaged drums will fray quickly. If drum grooves are deformed or have sharp edges, replace drums.
- Under-torqued clamps and set screws — Loose clamps let cables slip under load, causing rapid wear. Torque to manufacturer specs and re-check after the first 24 hours of operation.
- Not installing safety cables on extension springs — Missing safety cables allow extension springs to fly off on failure; install them per code.
- Ignoring lubrication points — Lubricate rollers, hinges, and spring bearings per manufacturer guidance; do NOT lubricate cable surfaces — grease attracts grit that accelerates wear.
For a wider preventive maintenance plan and typical tune-up costs, see garage door maintenance tips and tune-ups.
If your door is older or flexes excessively (causing cable rubbing), consider reinforcement: garage door strut and support upgrades can reduce flex and extend cable life.
Transition: A short checklist follows to verify your repair or replacement is ready for everyday use, and guidance on when to call a professional.
Conclusion and When to Seek Professional Help
Summary: You should now understand the relationship between springs and cables, how to diagnose cable damage, perform a controlled repair, and carry out a full cable replacement including proper attachment to drums and bottom brackets. If you followed the steps, your door will balance within 1–2 inches at mid-height, cables will seat cleanly in drums, and clamps will be torqued to spec.
Call a professional immediately if:
- You are unsure how to use winding bars or suspect torsion spring damage.
- Drums or springs are severely corroded or broken.
- The door does not balance after your adjustments or auto-reverse fails.
For urgent situations beyond DIY limits, seek certified emergency help: emergency garage door repair services.
Final CTA: If you followed this guide but still see uneven winding, repeated fraying, or any part that looks brittle, schedule a professional inspection. Safety first — springs store dangerous energy and must be handled by trained technicians when in doubt.
Compact verification checklist
- Both cables are identical diameter and length, properly clamped with two U-bolts each.
- Drums/grooves are smooth; set screws torqued to spec (40–60 in-lbs typical).
- Door balance test: stays at mid-point within ±2 inches.
- Auto-reverse works reliably using a 2×4 pressure test.
- No rubbing, binding, or unusual noises during 10 test cycles.
If spring wear is significant and you must do more than cable work, compare cable replacement vs spring replacement before proceeding; comprehensive spring info is in types of garage door springs with openers.

