

By the end of this guide you will have safely assessed and adjusted your garage door spring tension, re-balanced the door, and verified correct operation. Expect 60–180 minutes depending on door size and your experience; this assumes a competent DIYer with basic mechanical skills and the right tools.
Before you start
- Confirm you have working knowledge of basic hand tools and a stable ladder.
- Read the entire guide from start to finish — do not skip safety sections.
- Have someone on standby (working alone is not advised for torsion spring work).
- Check your garage door warranty and opener manual for restrictions.
- Ensure the work area is clear of vehicles, children and pets for a 10 ft radius.
Understanding Garage Door Spring Tension
This section explains the physics and purpose of springs so you can judge why tension matters. A torsion spring stores rotational energy and applies torque across the torsion tube to counterbalance the door’s weight; the result is lower required force from the opener and a safer manual lift. Tension is the amount of stored energy (force times displacement) the spring provides to hold the door at any position.
Think of spring tension like a counterweight system in a window shade: too little tension and the shade drops; too much and it flies up. For garage doors, incorrect tension leads to uneven movement, opener strain, and sudden failures.
How springs assist door operation
Torsion springs convert stored energy into a steady torque that holds the door in place and smooths movement. When you raise the door manually, the spring unwinds and supplies most of the lifting force; when you lower the door, the spring winds and stores energy. Proper tension balances the door so an average person can lift it approximately 3–5 inches from mid-height by hand and the door will stay in place.
Torsion vs extension springs — brief comparison
| Feature | Torsion Springs | Extension Springs |
|---|---|---|
| Mounting | Mounted above door on a torsion tube | Mounted along horizontal tracks |
| Adjustment | Wound with winding bars — incremental turns | Adjusted via cable anchor points or by replacement |
| Safety | Higher stored energy — risky if mishandled | Lower energy per spring but multiple springs increase complexity |
If your door uses extension springs rather than torsion springs, consult the extension garage door springs replacement and size guide for replacement and sizing specifics. To review how springs integrate with different openers, see the types of garage door springs guide with opener systems.
Transitioning to tools and safety: before you touch a spring, make sure you have the precise tools and protective gear described next.
Tools and Safety Equipment Needed for Adjustment
Assemble quality tools: cheap substitutes turn a controlled task into a hazardous one. Below are the recommended items and their purpose.
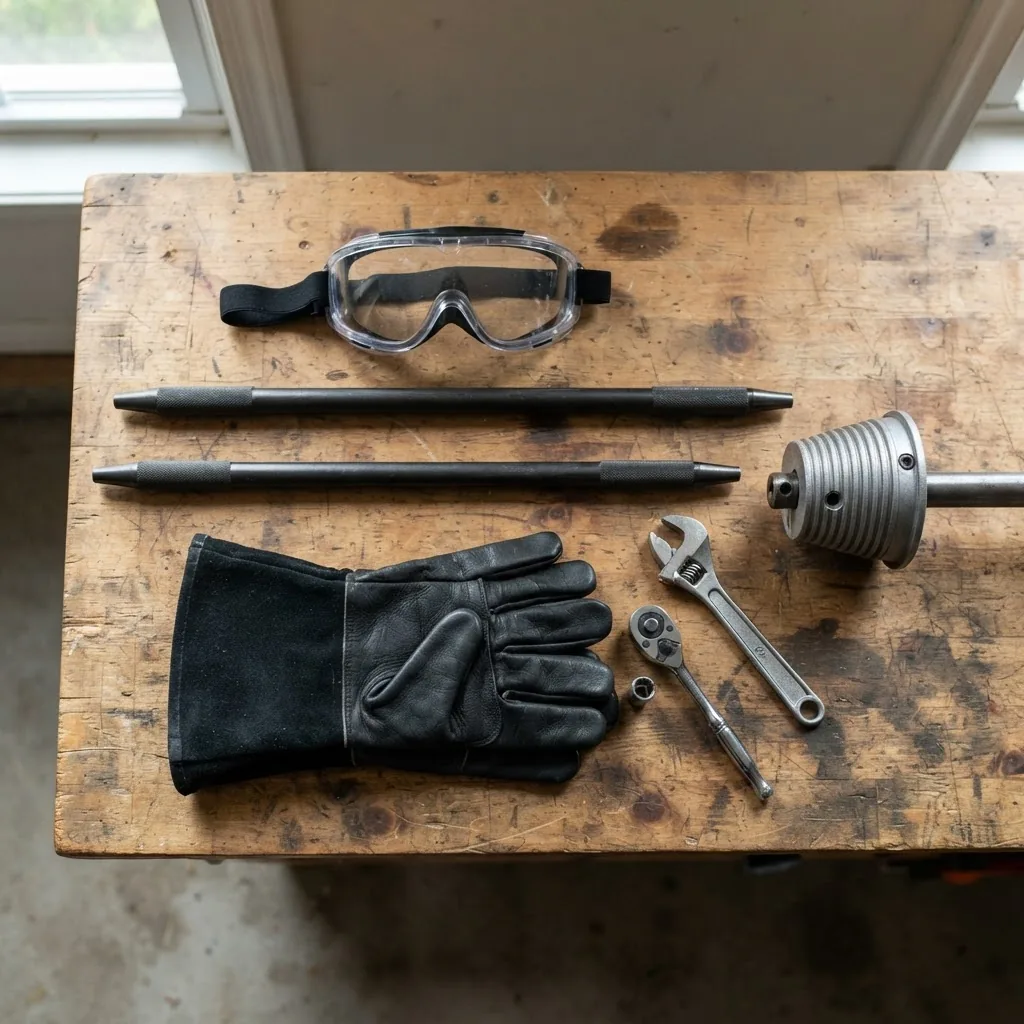
- Winding bars (two, hardened steel, 1/2″ diameter, 18″ long) — used to wind and hold torsion spring cones. Never use screwdrivers or pry bars as substitutes.
- Adjustable wrench and socket set — for set screws on the spring cone and anchor plate nuts; metric and SAE sizes recommended.
- Clamps or C-clamps — secure the track and keep the door from moving while adjusting.
- Safety gloves (cut-resistant) and eye protection — protect against flying debris and potential spring recoil.
- Spring winding cone (if original is damaged) — match to your spring’s cone profile and diameter.
- Ladder (stable, 6–8 ft) — position safely; a second person should hold the base if possible.
- Torque-measuring method — a door balance test and measured winding increments (see step-by-step) to estimate required turns.
- Marker, tape measure, and permanent marker — mark original spring position, count wind turns, and verify cable alignment.
- Service manual or manufacturer torque specs — follow manufacturer torque and tension recommendations: manufacturer manuals.
Before adjusting springs, it’s important to understand the cost factors of garage door materials and professional installation, covered in our garage door prices and installation cost guide.
Safety warnings: wear eye protection and cut-resistant gloves at all times; ensure all wrenches and winding bars are fully seated before applying force; keep hands away from the spring’s center and cone during winding.
Next we’ll cover diagnosis — learn how to test, observe and measure symptoms before making any adjustments.
How to Check and Diagnose Garage Door Spring Tension Issues
Diagnosing tension problems prevents unnecessary adjustments. Use the checklist and simple tests below to identify the symptom and likely root cause.
- Visual inspection — with the door closed, check springs, cable drums, cables, cones, anchor plates and track for wear, gaps in coil, rust, or oil leaks. Look for uneven gaps between coils which indicate a fatigued spring.
- Door balance test — disconnect the opener by pulling the emergency release cord. Manually raise the door to waist height (approx. 3–4 ft) and release it gently. A properly balanced door will stay in place or move less than 1–2 inches. If it rises quickly, springs are overtight; if it falls, springs are too loose. This is the field evaluation method technicians use for a quick assessment.
- Manual lift force check — with the door at mid-height, apply steady upward force. You should need 15–30 lbf (pounds-force) to lift a standard single-car sectional door; larger doors will require proportionally more. This provides a ballpark for tension adjustment.
- Noise and motion observation — run the door and listen for rattling, grinding, or metal-on-metal sounds. Note whether movement is jerky or uneven — that often points to mismatched spring pairs or broken spring coils.
- Measure cable drum marker — mark the torsion tube or spring cone position with a marker before any adjustment. Measure the number of turns already on the cone by counting wind markings or using the marker as a reference. Record baseline data: door weight estimate, current turns, and cable alignment.
- Check for loose set screws — inspect the spring cone set screws and anchor plate nuts; loose hardware can mimic tension problems.
- Document symptoms — create a short checklist: uneven lift, slow opener response, excessive sag, visible coil gaps, broken cable strands. Use this to decide whether to adjust or replace.
If you find evidence of severe wear (multiple broken coils, frayed cable, or a detached cable drum), stop and consult a professional — these are high-risk conditions beyond basic tension adjustment.
We’ll now move into the step-by-step tension adjustment process for torsion springs. Read each step fully and have all safety gear and tools in reach before you begin.
Step-By-Step Guide to Adjusting Garage Door Torsion Springs
This hands-on walkthrough assumes a single torsion spring system above a standard sectional door. If you have dual springs, follow the same pattern but adjust both symmetrically and in small increments. Every step includes explicit safety annotations from a field technician’s perspective.
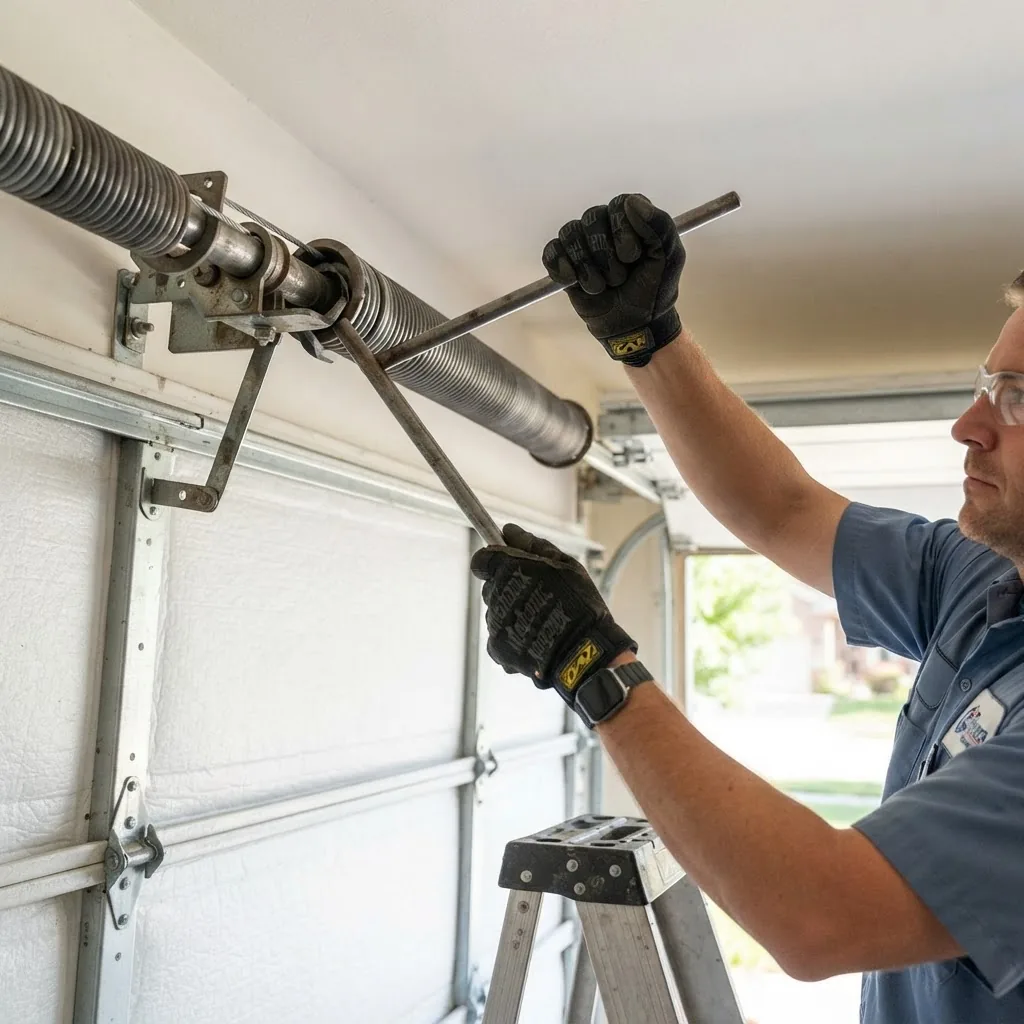
- Confirm door is closed and secure — Place the door in the fully closed position. Clamp the bottom roller to the track on both sides with C-clamps directly under the lowest rollers to prevent upward movement. Annotation: I always test the clamps by pushing the door gently to ensure they hold before any winding begins.
- Disconnect the opener and mark reference points — Pull the emergency release to disengage the opener. Use a permanent marker to mark the torsion tube at the spring cone and at a fixed frame point so you can count turns and return to baseline if needed. Annotation: I mark both the tube and spring cone — this saved me once when a miscount required rollback.
- Loosen the spring anchor and set screws slightly — With the winding bars in-hand, use a properly sized wrench to break loose the set screws on the stationary cone just enough to relieve clamping tension (1/4 turn). Do not remove them. Annotation: Loosening first prevents binding during winding but never remove the screws entirely.
- Insert first winding bar fully into the cone — Slide a winding bar into the cone’s winding hole all the way. Stand with your body to one side (not directly behind the bar) and keep your grip near the end. Annotation: Keep both bars on hand; losing leverage is dangerous.
- Apply initial counter-hold with second winding bar — Insert the second bar into the next available hole to hold the spring position while you remove the first bar and apply the next advance. Work in 1/4-turn increments for safety. Annotation: I never attempt half-turn or full-turn jumps — small increments are controllable and reversible.
- Count and record each quarter-turn — Most residential doors require between 7–10 full turns on a torsion spring (single spring) — that’s 28–40 quarter-turns — depending on door height and spring rate. Refer to manufacturer torque tables when available. Annotation: For my 7-ft, single-car door I recorded 7 full turns (28 quarter-turns); always log each quarter-turn on your marker lines.
- Adjust in small increments and test balance frequently — After every 4 quarter-turns (1 full turn), test the door balance: re-engage the opener temporarily or perform the manual balance test at waist height. If the door rises or falls more than 2 inches, reverse one quarter-turn and retest. Annotation: On one job I over-wound by 2 full turns — frequent checks prevented a dangerous over-tension.
- Tighten set screws and verify cone seating — When target turns are reached and balance is within thresholds (see balance testing), hold the winding bar firmly and tighten the stationary cone set screws to manufacturer torque spec (commonly 8–12 ft-lb for many models — verify your manual). Do not overtighten beyond spec. Annotation: I use a calibrated torque wrench to match manufacturer recommendations to avoid crushing the cone.
- Reinstall any removed brackets and clean the area — Check that the cable drums are seated and cables have equal tension. Remove clamps and slowly operate the door by hand to ensure smooth motion across the entire travel. Annotation: I wipe grease from visible hardware and re-mark the final wound position for future checks.
- Reconnect opener and run a full cycle — Re-engage the opener and run the door through an automatic cycle. Listen for dragging noises and watch for acceleration at endpoints. Test the auto-reverse function with a 2×4 placed on the floor under the door — the door must reverse on contact. Annotation: If the door closes faster than expected or the opener strain light activates, recheck spring turns and cable alignment.
- Fine-tune tension if necessary — If the door is slightly heavy or light, adjust in 1/4-turn steps. For a door that drifts up, remove one quarter-turn; for one that drifts down, add one quarter-turn. Never change more than a total of 2 quarter-turns during a fine-tune session without retesting. Annotation: Incremental adjustments reduce risk and simplify rollback if something feels wrong.
- Document final settings and take photos — Record the final number of turns, set-screw torque, and take close-up photos of cone seating and cable alignment. Keep these in your home maintenance log. Annotation: Photos and notes save time during future inspections and support warranty claims.
Case study (technician perspective): I once responded to a homeowner with a door that jerked during opening. Visual inspection showed one spring with two fewer full turns than its mate. I adjusted the low-tension spring in 1/4-turn increments, tested balance after each full turn, and restored equal turns. The door cycles smoothed, opener draw reduced, and the homeowner avoided an unnecessary spring replacement.
Practical measurement tip: if you lack torque tables, use the door balance test and a consistent count of turns from a known baseline. For example, a 7-foot door typically needs 7 full turns on a standard 1 3/4″ wire single torsion spring; taller doors scale proportionally — consult manufacturer specs for exact numbers.
Notes on multi-spring systems
On dual-spring systems, divide the required turns equally and adjust each spring alternately: add one quarter-turn to spring A, test, then to spring B, test, and repeat. This prevents lateral torque that can twist the torsion tube and bind the system.
Transition: With tension set and operation verified, follow the safety dos and don’ts to lock in safe practices and avoid common errors.
Dos and Don’ts for Garage Door Spring Adjustment Safety
Safety-first rules distilled from professional practice and industry guidance. Follow every “Do” and strictly avoid the “Don’ts” below.
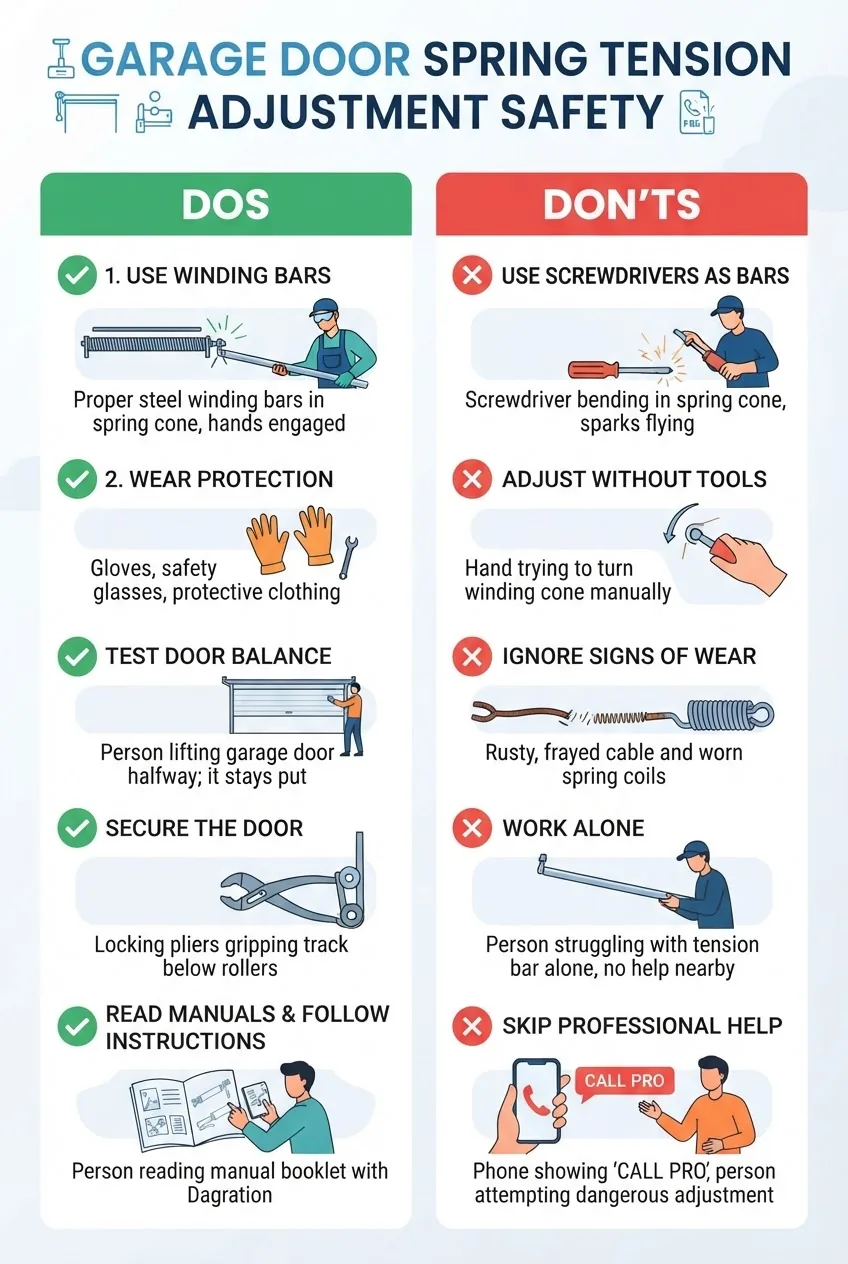
Dos
- Use hardened steel winding bars and keep both bars in hand while transferring torque.
- Wear eye protection and cut-resistant gloves every time you handle springs.
- Test door balance frequently (every 1–4 turns) and mark your progress.
- Follow manufacturer torque/recommendation tables precisely when available — see manufacturer manuals.
- Work with a helper present and keep bystanders well clear of the work area.
Don’ts
- Never use screwdrivers, pry bars or cheater pipes in place of winding bars.
- Don’t attempt repairs if the spring shows multiple broken coils or the cable is shredded.
- Avoid working alone — a second person can call emergency services and keep the area safe.
- Do not overtighten set screws beyond manufacturer torque — it can deform the cone and cause slippage.
- Do not ignore warning signs such as sudden loud bangs, visible coils separation, or opener overheating.
For recognized safety standards see the Consumer Product Safety Commission and OSHA guidelines: CPSC and OSHA. According to a 2023 safety report from the Consumer Product Safety Commission, misuse of garage door springs contributes to a significant share of emergency repairs and injuries among homeowners.
Proper struts improve door safety and support heavy springs; learn how in the garage door struts and support installation guide.
Transition: If after following the steps your door still misbehaves, use the troubleshooting section below to match symptoms to fixes or learn when to escalate to emergency service.
Troubleshooting Common Problems After Adjustment
If your door exhibits any of the following symptoms after adjustment, match the symptom with the likely cause and corrective action.
- Door still unbalanced (rises or falls more than 2 inches) — Cause: inaccurate turn count or unequal spring pair tension. Fix: Re-clamp the door, add or remove one quarter-turn, test balance, and repeat until within ±2 inches. If imbalance persists, check cable drum seating.
- Rattling or loose-sounding springs — Cause: set screws loose or cone slipping. Fix: Re-tighten set screws to manufacturer torque (8–12 ft-lb typical), seat the cone fully, then re-check balance. If slipping continues, replace the cone or spring.
- Door won’t open or close smoothly — Cause: opener force/speed needs reconfiguration or cables misaligned. Fix: Verify cable drum alignment, lubricate bearings, and check opener torque settings per the opener manual. If opener motor strains, reduce spring tension slightly and retest.
- Abnormal noises at endpoints — Cause: springs over-wound or end bearings failing. Fix: Reduce spring tension by one quarter-turn and test; if noise persists, inspect end bearings and replace if worn.
- Tension rechecking shows slippage — Cause: rounded cone holes, stripped set screws, or damaged winding bars. Fix: Replace damaged cones and use fresh hardened winding bars; ensure set screw threads are clean and the correct grade.
- Cable fraying or drum slipping — Cause: cables are worn or improperly seated. Fix: Stop using the door; replace cables and possibly drums. For instructions refer to our how to repair garage door cable replacement and installation guide.
- Hardware issues (handles, locks, brackets) — Cause: small parts may have shifted or loosened during adjustment. Fix: Tighten hardware and inspect handles and locks for wear. If parts are missing or broken, consult the garage door handle replacement and hardware guide.
If your door malfunctions dangerously after spring adjustment, learn more about emergency garage door repair services.
Transition: troubleshooting finishes with diagnostic recommendations — now know when to stop and call a pro.
When to Call a Professional for Garage Door Spring Issues
Some conditions require licensed technicians. Call a pro when any of the following scenarios apply:
- Visible broken coils or a spring that has separated — immediate replacement is needed.
- Multiple broken cable strands, distorted drums, or bent torsion tube.
- Springs covered by warranty that specify professional service only.
- Complex systems (commercial or high-lift doors) with multiple springs and custom torque requirements.
- Opener suffering repeated overloads and thermal trips after spring tuning.
Regular maintenance can extend spring life; refer to our garage door maintenance tips and tune up cost guide for schedules, typical costs, and service intervals.
If torsion springs must be replaced rather than adjusted, technicians use specialized equipment and safety jigs to remove stored energy safely. Professional technicians often carry certification and insurance; ask for references, proof of insurance and a written estimate.
Common mistakes and how to avoid them
I’ve seen homeowners and even some so-called pros make the same predictable errors — here are the real-world failures and how I prevent them.
- Working alone: Once I started a winding job solo and had to stop mid-sequence because I couldn’t safely handle the bars and tools — now I always have a helper to steady the ladder and watch for hazards.
- Using wrong-size bars: I once tolerated slightly undersized bars to “make do” — they slipped. Now I check bar diameter and buy the correct set before starting.
- Skipping balance checks: Early in my career I completed full winding without intermediate tests; the door ended up overtight. I now test every full turn (or every 4 quarter-turns).
- Ignoring manufacturer specs: I’ve adjusted springs based on “rule of thumb” rather than specs and later found replacements needed sooner. I always consult the manual first and document torque settings.
- Not marking the original position: I once lost track of turns and had to revert to photos to estimate the baseline — marking prevents that confusion.
Final checklist: verify your work
- Door balance: door stays within ±2 inches at waist height when released.
- Set screws: tightened to manufacturer torque and properly seated on the cone.
- Equal tension on multi-spring systems verified visually and by balance test.
- Opener cycles smoothly, no overheating or abnormal force indication.
- Auto-reverse test passes with a 2×4 block placed under the door.
- All hardware tightened, cable drums seated, and no visible frayed cables.
- Photos and notes recorded with final turn counts and torque numbers.
When to call a professional instead
Call a certified garage door technician if you encounter any broken coils, warped or bent torsion tubes, shredded cables, or if the door remains unbalanced after two measured adjustment attempts. Professionals carry the tools, jigs and insurance to remove stored spring energy safely and will provide a written estimate and parts warranty.
According to a 2024 industry report, properly maintained torsion springs typically last 10,000–20,000 cycles; regular inspections and timely tune-ups prolong life and avoid unexpected failures.
Conclusion — key takeaways: You can safely adjust how to adjust garage door torsion springs by preparing the right tools, following small incremental turns, testing balance frequently, and stopping immediately if you see broken coils or cable damage. When in doubt, call a qualified technician to avoid serious injury. Ready to act: gather the tools, read your manual, and follow the step-by-step sequence above for a safe, reliable adjustment.

