

By the end of this guide you’ll know exactly which garage door parts to source, where to buy them online, and how to verify compatibility and quality in one 2–4 hour sourcing session. Skill level: basic-to-intermediate DIYer or homeowner comfortable with parts identification and online orders.
- Before you start: confirm vehicle parking space, door model year, current operator model number, and whether the door is commercial or residential.
- Skill requirements: ability to read part numbers, measure lengths (tape measure), and inspect hardware.
Introduction to Garage Door Parts and Components
This hands-on guide covers the full inventory of garage door parts and garage door components you’ll encounter when replacing or repairing a door, and it maps each component to reliable online sources. Expect precise part names—springs, cables, rollers, tracks, hardware, operator parts and accessories—and practical buying paths rather than installation walkthroughs.
A few definitions up front: garage door replacement parts are individual items sold to restore function, like a torsion spring; garage door repair parts usually reference hardware kits or OEM components for a specific manufacturer model; garage door accessories include items such as keypads, sensors, and weather seals that enhance functionality rather than restore mechanical operation.
Why parts-focused guidance? Many searchers land on shopping pages and hit compatibility roadblocks. This guide bridges that gap with checklists, sourcing steps, and supplier evaluation so you don’t order the wrong torsion spring or an incompatible operator part. For readers also replacing panels, see Garage Door Panel Replacement Cost and Where to Buy Panels for material and supplier specifics tied to panel work.
What you’ll find in the article: itemized part descriptions, a comparison of commercial vs residential parts, a step-by-step supplier sourcing workflow, specialty accessory considerations, buying best practices, and a troubleshooting outline for repair part availability. Real-world examples illustrate where specific parts resolved common failures and how long typical replacement cycles run.
According to a 2024 industry report from the International Door Association, common replacement items (springs, rollers, sensors) make up over 70% of single-door service calls—knowledge that helps prioritize what to buy first when budget or lead time is constrained.
Key Garage Door Parts Explained
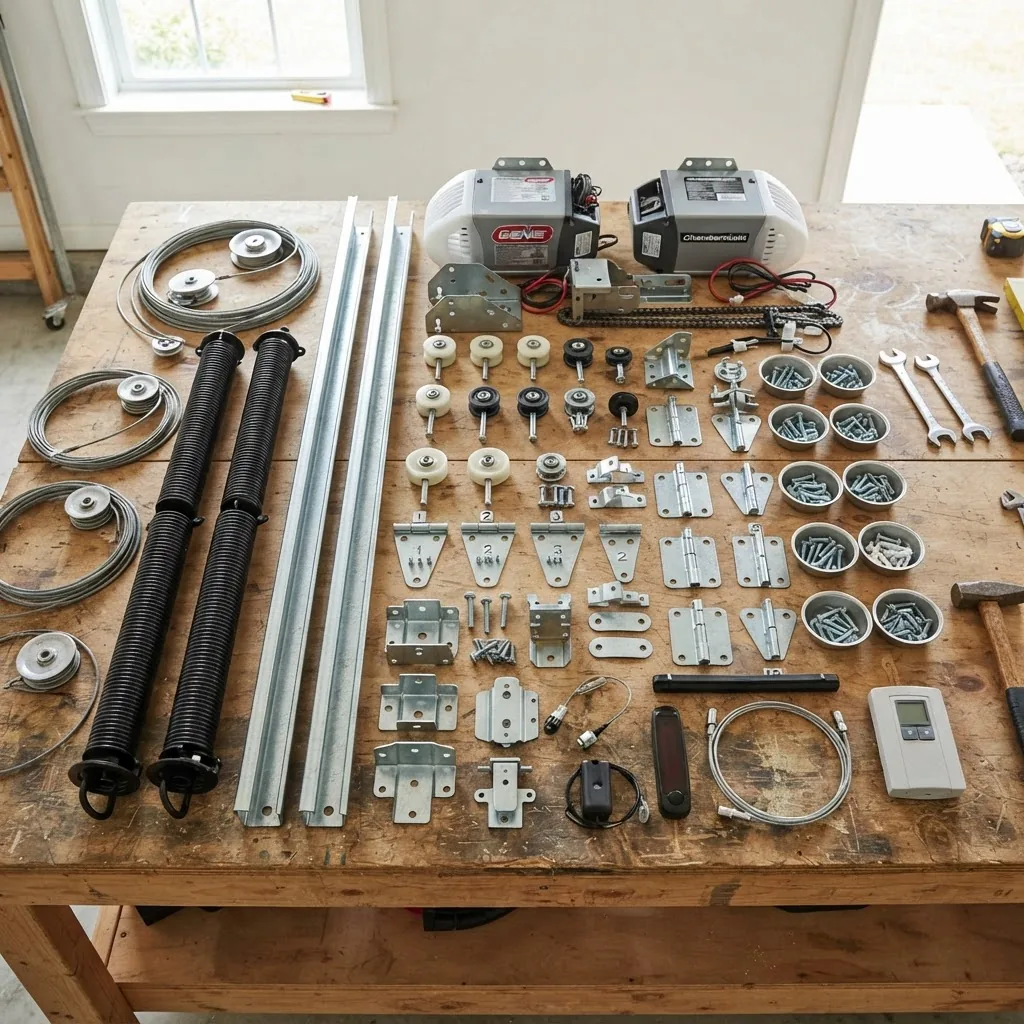
This section lists the mechanical and hardware parts you will most commonly buy online. Each subsection explains function, common types, measurement notes, lifespan expectations, and where mismatch is most likely to occur.
Springs and Cables
Springs are the energy storage components that counterbalance a door’s weight. Two primary types exist:
- Torsion springs: mounted above the door on a torsion tube, rated by inside diameter (1″, 1 3/4″), wire gauge, and active coils. Measure spring length and record stamped part numbers. Typical lifespan: 7,000–15,000 cycles for standard springs; heavy-duty commercial springs often rated to 25,000+ cycles. According to a 2024 industry report from the International Door Association, torsion spring failures remain the leading cause of emergency door service calls.
- Extension springs: mounted above horizontal tracks, stretch to lift the door. They’re sized by extended length and spring rate; clips and safety cables are critical when replacing.
Cables attach the door to drums or rollers and are specified by length, strand count (usually 7×7 or 7×19), and end fittings. Always replace cables in pairs. When sourcing online, match cable length to the measured distance from drum to bottom bracket plus 2 inches for termination.
Real-world example: I replaced a garage door cable where the original was 1,080 mm (42.5 in). Ordering a cable listed as 43 in with 7×19 strand and correct end fitting eliminated spool slippage and restored smooth travel.
Rollers and Tracks
Rollers guide the door along the tracks. Key roller specs:
- Bearing type: nylon vs steel (nylon quieter, steel more durable for heavy commercial use).
- Shaft diameter and stem type (so you can match the hinge/roller bracket hole).
- Roller diameter—commonly 2″, 2 1/2″, or 3″. Larger rollers reduce deflection on heavy doors.
Tracks are specified as backroom radius (for single-car doors), material (hot-rolled steel), and rail profile (standard, high-lift, or vertical lift). When ordering replacement track sections, measure height from floor to top-of-opening, and include the radius if present. Compatibility errors are common when homeowners order track kits that assume a different headroom or door style.
See also detailed component references at garage door frame parts for how track mounts interact with the jamb and header.
Hinges, Brackets, and Other Hardware
Hinges and brackets transfer loads between panels and attach rollers. Hardware is often manufacturer-specific: hinge hole patterns, bracket thickness, and pin lengths vary. When replacing hinge sets for a sectional door, count hinges per panel (commonly 2–3) and note pin diameter (typically 3/8″ or 1/2″).
Other hardware parts include bottom brackets (attach cables), center supports for long doors, and reinforcement plates. Order hardware kits when available; they combine matching fasteners and minimize fit problems.
Garage Door Operator and Motor Parts
Garage door operator parts or operator motor components include circuit boards, drive sprockets/chains/belts, safety sensors, remotes/keypads, and belt/chain assemblies. Operators are model-specific—record the opener model number from the housing plate. Typical procurement steps:
- Record the model and serial: printed label on the opener motor housing.
- Search manufacturer parts list: many OEM vendors publish exploded diagrams; cross-reference part numbers with online suppliers.
- Consider compatibility of accessories: newer smart keypads may require a specific logic board firmware; see compatibility notes on product pages.
Case reference: a garage owner bought a replacement circuit board for a 2009 opener without checking firmware compatibility; the replacement powered the motor but would not accept remotes. The correct board had a suffix in the part number indicating firmware version—always verify with parts diagrams or manufacturer listings.
Specialized Door Types and Links
For non-standard systems consult targeted resources: tilt-up garage door hardware parts often use different hinges and bearings than sectional doors. For decorative panel choices paired with parts, see style-specific guidance in the specialty section below.
Commercial vs Residential Garage Door Parts
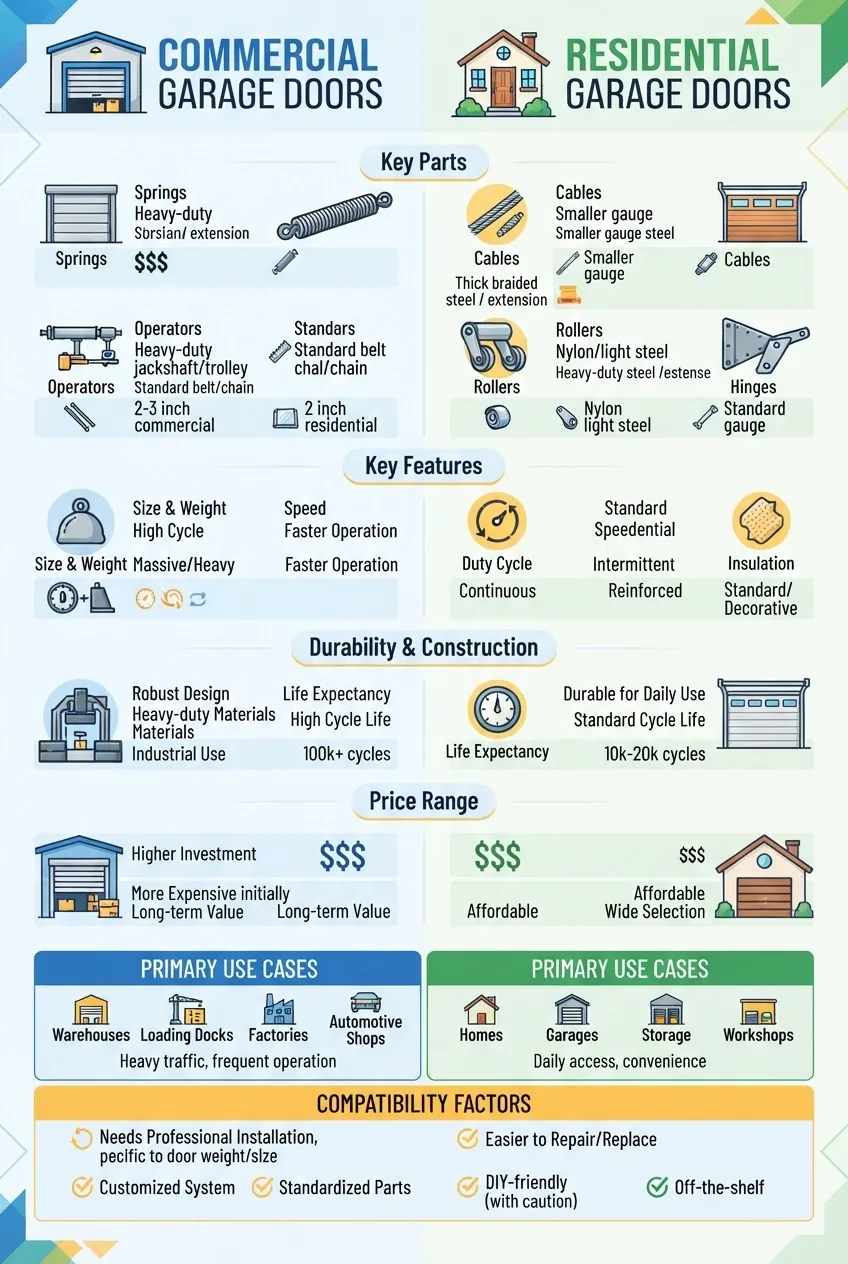
Commercial doors and residential doors look similar but are engineered with different duty cycles, safety margins, and component sizes. Below is a compact comparison table followed by a pragmatic discussion of how those differences affect sourcing.
| Category | Residential | Commercial / Overhead |
|---|---|---|
| Springs | Torsion or extension, 7k–15k cycle rating | Heavier-gauge torsion, 25k–100k cycles |
| Cables | Standard 7×7 or 7×19, shorter lengths | Higher-strand counts, reinforced end fittings |
| Operators | Light-duty motors, consumer remotes | High-cycle commercial operators, industrial controls |
| Hardware | Consumer-grade hinges and rollers | Heavier brackets, steel rollers or sealed bearings |
| Price range | Lower initial cost, lower warranty | Higher upfront; longer life; larger warranty |
Discussion: Commercial overhead door parts are designed for continuous use—warehouses move doors dozens of times daily—so springs, operators and tracks use larger tolerances and different steel grades. Buying a residential-rated torsion spring for a commercial door shortens life and increases safety risk. Conversely, retrofitting a residential garage with a commercial operator can be overkill in cost and noise.
When to choose which: if your door cycles more than 10 times per day, specify commercial-rated springs and an industrial operator. For typical homeowner garages (1–5 cycles/day), standard residential parts balance cost and longevity.
Standards reference: For safety and application guidance see the International Code Council guidelines—According to a 2023 code summary from the International Code Council, commercial door installations must meet higher operational safety and control requirements; consult local code for required accessories like reversing sensors and manual disconnects. For industry part standards and dealer directories, consult the International Door Association at International Door Association.
Finding a Reliable Garage Door Parts Supplier Online

Follow this step-by-step sourcing workflow to identify, vet, and order parts with minimized mismatch risk. Each step is actionable and timed for a 2–4 hour sourcing session if you already have measurements and part photos.
- Document the part and context (15–30 minutes): Photograph part numbers, labels, and the general door setup (panel count, hinge spacing, operator nameplate). Measure length/diameter where applicable with a tape measure to the nearest 1/8″. Keep these files in one folder for quick uploads to supplier chats.
- Classify the part (10–20 minutes): Decide whether the item is an OEM part (manufacturer-specific operator board), a generic consumable (roller, hinge), or a safety device (sensor). OEM parts require exact model numbers; generic parts require measurements and spec matching.
- Search manufacturer resources (20–40 minutes): Use the operator or door manufacturer’s parts diagrams. This confirms part numbers and reduces the risk of wrong fit. If the opener model is older, search the manufacturer’s legacy parts section or call customer support for cross-reference numbers. Many manufacturers publish exploded diagrams with part numbers—use those first.
- Compare three supplier types (30–60 minutes): Evaluate (a) OEM dealers, (b) specialty distributors, (c) big home-improvement retailers. Prioritize OEM for electronic control boards and model-specific components. Choose specialty distributors for difficult-to-find torsion springs and high-cycle commercial parts. Consult warranty and return policies in writing.
- Verify compatibility and return policy (10–20 minutes): Confirm the supplier accepts returns on used-fit issues or provides cross-reference support. Look for clear return windows (30 days is typical). For electronics, verify restocking and firmware notes.
- Check shipping and lead times (5–15 minutes): Confirm cut-off times and courier. According to 2024 retailer listings at Home Depot, many common rollers and hinges ship within 1–2 business days; OEM operator components can take 3–10 business days depending on stock and warranty registration requirements.
- Place order with contingency parts (10–20 minutes): For critical items (springs, operator boards), buy one set plus a small backup consumable (rollers or cables) to avoid a second shipping wait. For example, order a pair of torsion springs and an extra bottom bracket if the door is older than 15 years.
- Inspect upon arrival (10–30 minutes): Compare part numbers, physical dimensions, and mounting hole patterns immediately. Photograph mismatches and contact supplier within the return window if anything differs. Keep packaging and do not install until compatibility is confirmed.
Supplier vetting checklist:
- Clear model/part cross-references and exploded diagrams
- Return policy explicitly covers “does not fit” within 30 days
- Customer service available by phone with parts specialists
- Reviews with photo evidence of correct parts arriving
- Warranty details—OEM backed vs. aftermarket supplier
Tools to speed verification: use a digital caliper (for shafts and hole spacing), a phone camera with macro mode, and a small notebook with measurements. For identifying torsion springs, measure wire gauge with a wire gauge tool or count coils versus length—many suppliers accept these metrics for cross-referencing.
Recommended authorities and retailers: manufacturer parts pages and the International Door Association for standards; for availability check national retailers such as Home Depot and specialty distributors—these sources help validate whether a part is commonly stocked or specialty-ordered.
Specialty Garage Door Parts and Accessories
Specialty parts and accessories expand functionality or address specific problems. Below are categories and mini-case examples that illuminate sourcing decisions.
- Keypads and Smart Accessories: Choose a keypad compatible with your opener’s RF frequency and security codes. For smart upgrades, confirm whether the operator supports Wi‑Fi adapters or requires a manufacturer gateway module.
- Weather seals and bottom seals: Measure door width and order 1–2 inches extra to trim on-site. For insulation projects, buy seals rated for your climate’s UV and cold resistance.
- Decorative and panel parts: If you’re pairing hardware replacements with new panels, consider material-specific panels—see fiberglass garage door panels for a lightweight option, or explore custom decorative garage door cover panels for aesthetic upgrades.
- Recessed and style-specific parts: Decorative hardware and trim often require different hinge placements; design-oriented readers can view recessed panel garage door styles for style-compatibility notes.
Mini-case: a client in Phoenix wanted quiet operation plus improved curb appeal. We ordered nylon rollers, a belt-drive operator upgrade, and minimal foam-backed weather stripping sized to 8 ft × 7 ft. The combination reduced noise and improved thermal performance while using parts rated for desert UV exposure.
Operator accessory walkthrough: to add remote control and safety sensors, first check the opener’s logic board for available port pins and firmware compatibility—this prevents buying a sensor that uses an incompatible signaling protocol. If an opener lacks a Wi‑Fi module slot, select a manufacturer-approved adapter rather than a generic bridge to maintain remote reliability and warranty coverage.
Tips for Buying Garage Door Replacement Parts
Below are practitioner-tested best practices to reduce returns and ensure durability when buying garage door replacement parts.
- Match measurements, not assumptions: Record exact shaft diameters, hole-to-hole distances, and spring dimensions in millimeters and inches. Sellers won’t accept “looks like my old one” as a return reason in many cases.
- Buy by cycles for springs: Choose springs rated for at least 10,000 cycles for standard homes; opt for 25,000+ cycles for commercial or heavy-use doors.
- Prioritize OEM for electronics: Circuit boards and logic modules are often not interchangeable across models; OEM buys reduce debugging time.
- Keep a spare consumable kit: Order an extra set of rollers, a pair of cables, and a bottom bracket if your door is older than 12 years—these items are low-cost insurance against repeat shipping delays.
- Check return window and restocking fees: Document return policies before purchase and retain original packaging. Photograph unboxing within 24 hours to support claims.
- Ask for exploded diagrams: Suppliers who provide diagrams demonstrate a higher level of parts support than sellers who only list SKU lines.
- Consider local pick-up for heavy parts: Track sections and commercial springs can incur high shipping fees—local distributors often offer freight or pickup options.
- Beware of counterfeit bearings and rollers: Use suppliers with verified reviews and photo evidence; cheap bearings can seize within months.
- When replacing panels, plan trim and casing: Factor in related items such as garage door jamb trim and casing if your panel work will alter clearances.
- Document serial numbers: For warranty claims, photograph and log serial numbers and receipt details immediately.
Troubleshooting and Repair Components Availability
This step-by-step troubleshooting outline helps determine whether to repair or replace and where to source the required components quickly.
- Identify the symptom (5–10 minutes): Is the door sagging, noisy, stuck, or is the opener not responding? Note whether the issue occurs on manual lift or only via operator.
- Isolate the subsystem (10–20 minutes): Test manually: disconnect the operator and lift the door a few inches. If it’s heavy, suspect springs or cables; if it’s stiff in travel, suspect rollers/tracks.
- Inspect parts visually (15–30 minutes): Look for broken spring coils, frayed cables, flat spots on rollers, bent tracks, missing hinge rivets, and burned smell near operator boards. Photograph each defect for supplier support and warranty claims.
- Cross-reference part numbers (10–30 minutes): Use exploded diagrams or online parts lists. For panels or large components see the panel replacement guide: how to change a garage door panel.
- Source replacement parts (30–90 minutes): Apply the supplier workflow above. For older doors, search for “old garage door parts” and check salvage networks or specialty distributors—some keep legacy springs and drum sizes in stock.
- Temporary fixes and safety (5–15 minutes): Use cable clamps and temporary supports if you must secure the door until parts arrive—never attempt a spring repair without proper tools and experience.
- Install or schedule service (varies): Electronic or spring work beyond your comfort level should be scheduled with a licensed technician; for parts-only replacements like rollers or hinges, follow manufacturer torque specs and fastener grades (usually grade 8 hardware for load-bearing bolts).
Additional repair resources: for panel repair kits and DIY tips see garage door repair tips and kits—they list common kits for dent and edge repair and help you locate matching hardware.
Common mistakes and how to avoid them
I once ordered a torsion spring by matching only the door weight listed in a forum post; the spring fit physically but the door was underbalanced and the opener strained. After that, I always measured wire gauge and active coils and verified with the manufacturer’s spec sheet. Another time, I bought generic sensors that used different connector pins; they powered but did not communicate with the opener—now I purchase OEM or explicitly compatible sensor sets for the opener model.
Checklist: Verify your parts order
- Photographs and measurements saved (lengths, diameters, hole spacing)
- Exploded diagram matching part numbers documented
- Supplier return policy and lead time confirmed
- Order includes at least one spare consumable for critical repairs
- Received parts inspected against spec before installation
- Warranty and serial numbers recorded
When to call a professional
Hire a licensed technician when any of the following applies: torsion spring replacement, major operator motor or logic board replacement, heavy commercial door repairs, or when the door fails safety tests after parts replacement. If you observe metal fatigue, torn spring coils, or structural damage to tracks, stop and call a pro—these risks can cause severe injury. According to a 2024 safety bulletin from a consumer safety organization, spring-related injuries account for a significant portion of severe garage door accidents.
Conclusion: Best Practices for Garage Door Parts Purchasing and Maintenance
To buy the right garage door parts online, start with clear documentation: photos, part numbers, and measurements. Prioritize OEM for electronic components, specialty distributors for torsion springs and commercial parts, and reputable retailers for common rollers and hardware. Use the supplier checklist above to verify returns and lead times before you commit.
Maintenance tip: schedule a basic inspection every 12 months and replace consumable parts (rollers, cables, weather seals) on a 5–10 year cadence depending on wear. For heavy-use doors, shorten that cycle and upgrade to commercial-grade components.
If you followed the sourcing steps here, you should be ready to place your first parts order with confidence. Need panel-specific buying info or costs? See Garage Door Panel Replacement Cost and Where to Buy Panels for the next steps. Ready to source parts now? Gather your measurements and photos, and use the supplier workflow to complete an order in 2–4 hours.


