

Garage door jamb replacement typically costs $150–$1,200 for trim and casing per single-car opening depending on material and labor. This guide breaks down exact cost drivers, material choices, labor scenarios and a step-by-step replacement procedure you can act on immediately.
What is a Garage Door Jamb and Why Replace Its Trim and Casing?
The garage door jamb is the vertical and horizontal framing that sits between the garage opening and the surrounding wall—think of it like the door’s frame molding. The jamb provides structural support for the door tracks, helps compress weather seals, and serves as the substrate for decorative trim and protective casing that finishes the opening.
Trim and casing are often replaced for three practical reasons: weather sealing failure (drafts and water infiltration), cosmetic wear (peeling paint, rot, or gouges), and to update curb appeal when replacing door panels or adding decorative elements. Replacing trim and casing restores the seal between the door and house, reduces energy loss, and prevents further damage to the framing.
Common damage to jamb trim and casing includes rot from water exposure, nail pop and splitting in wood trim, physical impact (cars, tools), and UV-driven paint failure. Routine inspection typically finds minor gaps around the bottom corner and paint failure within 5–10 years on untreated wood siding; wrapped or composite options can extend that to 15–25 years.
When you replace trim and casing you often also evaluate related components such as the threshold seal, weatherstripping, and adjacent siding. For design upgrades that affect the appearance of the door itself, review
garage door cover panels ideas for coordinated finishes and panel styles.
Key functional differences to remember: jambs are the structural frame; garage door casing and trim are the applied finishes that protect the jamb and present the visible edge. Replacing trim without repairing the underlying jamb can leave unresolved structural or sealing problems.
For a deeper breakdown of the frame parts that interact with the jamb, see garage door frame components.
Key takeaway: Replace trim and casing to restore weather sealing, prevent rot, and refresh curb appeal; always inspect the underlying jamb before cosmetic work.
Types of Garage Door Jamb Trim and Casing Materials
Material choice is the single biggest determinant of the lifetime cost and maintenance needs of jamb trim and casing. Below we compare the most common materials on durability, maintenance, cost per linear foot (installed material only), and typical lifespan.
| Material | Durability / Lifespan | Installed cost/lin. ft (USD) | Maintenance |
|---|---|---|---|
| Solid wood trim (pine, cedar) | 5–15 years (depends on finish) | $3–$8 | Paint/stain every 3–7 years; inspect for rot |
| Engineered wood / MDF | 10–20 years (if sealed) | $4–$9 | Sealing required; edges vulnerable to moisture |
| Composite jamb wrap (PVC-clad, cellular PVC) | 15–30 years | $6–$15 | Low; clean with mild detergent; repaint with compatible paint |
| PVC / vinyl trim | 20–30 years | $5–$12 | Low maintenance; can warp in extreme heat if thin |
| Aluminum clad / metal trim | 20–40 years (coated) | $8–$20 | Corrosion-resistant; repainting rarely needed |
How to read these ranges: the cost/linear-foot numbers are installed material expense only and exclude labor unless noted. Labor and site prep will usually double or triple these figures on a full replacement project.
Practical notes by material:
- Wood trim: Cheapest upfront but highest maintenance. Use pressure-treated or rot-resistant species at exterior exposure points.
- Composite jamb wrap: Often sold as a garage door jamb wrap system that covers the existing jamb with a protective sleeve; faster install, better weather resistance.
- PVC / vinyl: Good for wet climates; choose thicker profiles to avoid warping.
- Aluminum/metal: Best for highly exposed installations where impact resistance and long-term corrosion protection matter.
Material selection also affects finish options: solid wood accepts stain and high-build paints; PVC and composite accept specific exterior acrylics. If you plan to change panel materials (for example switching to fiberglass garage door panels), coordinate trim finish and thermal expansion coefficients—PVC expands more than wood.
Key takeaway: Composite and PVC cost more up-front but reduce lifecycle maintenance and often lower total cost over 10–15 years compared with untreated wood.
Factors Affecting Garage Door Jamb Trim Replacement Cost
Replacement cost is a function of material, labor, project complexity and regional labor markets. We list primary cost drivers and provide example cost adjustments to help you estimate a realistic budget.
- Material Type — Wood, composite, PVC and aluminum each carry different installed price per linear foot. Example: switching from painted pine to cellular PVC can increase material costs by ~60% but cut repaint cycles.
- Trim Profile & Complexity — Ornate casing or layered millwork adds cutting, coping and finishing time; add 1–3 hours per opening versus a simple 3-piece casing.
- Extent of Repair — Superficial trim-only replacements normally cost less than replacing rotted jamb framing. If jamb framing needs sistering or replacement, add $200–$800 labor and $50–$300 in materials.
- Door Size & Type — Double-car openings require more materials and longer labor times; typical double-car openings cost 1.5–2x single-car replacements.
- Preparation & Finishing — Paint/stain, caulking, and seal installation add $60–$350 depending on finish quality and whether spraying or brushing is used.
- Labor Rates & Location — Labor rates vary: According to a 2024 industry report, average exterior carpentry labor rates range $65–$110/hr across U.S. metros; high-cost regions (e.g., Bay Area) hit $120+/hr.
- Permits & Codes — Most trim-only jobs do not require permits, but structural jamb replacement or weather-tightness corrections may trigger local code checks and permit fees of $50–$250.
- Accessibility & Safety — Second-story or complicated scaffolding setups increase labor by 20–50% for safety and access.
Cost examples (installed, rounded):
- Basic wood trim replacement, single-car: $150–$400 (materials $40–$100, labor $110–$300)
- Composite jamb wrap install over existing jamb: $350–$800 (materials $120–$300, labor $230–$500)
- Full jamb/frame replacement with new casing (single-car, moderate rot): $700–$1,500 (materials $250–$600, labor $450–$900)
- Double-car, premium aluminum-clad installation: $1,200–$2,800
Labor allocation methodology: we typically assign 60–75% of installed cost to labor on small finish carpentry jobs where cutting, fitting and caulking dominate. Material-heavy jobs (metal wraps, engineered jamb kits) shift that ratio toward materials.
Key takeaway: Expect labor to represent the majority of per-opening cost; material selection and hidden jamb repairs are prime reasons estimates escalate.
Average Replacement Cost Ranges for Garage Door Jamb Trim and Casing
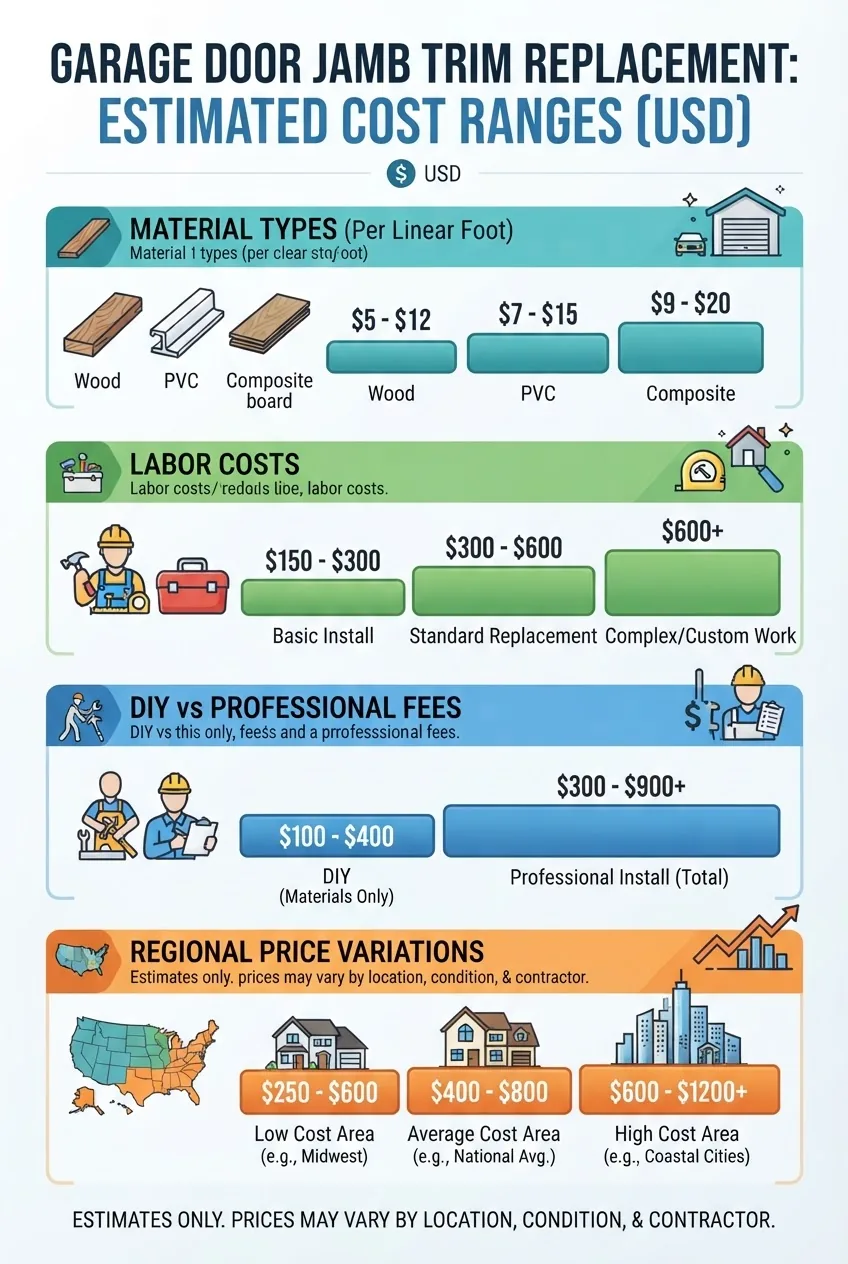
Data snapshot: Typical installed cost per single-car opening (2024): wood trim $150–$400; composite wrap $350–$800; full jamb replacement $700–$1,500; premium metal $1,200–$2,800. According to a 2024 industry report, national median for trim-and-casing replacement sits near $575 per opening.
Stat block — Median ranges
Single-car median installed cost: $575 (materials $200, labor $375). Double-car median installed cost: $1,050 (materials $350, labor $700).
Warranty and kit pricing: garage door jamb kit packages (pre-cut jamb wraps and matching casing) generally cost $80–$350 per opening for materials. Kits reduce labor time; installers may discount labor by 10–25% when using kits because of fewer cuts and less finishing time.
DIY savings: Typical DIY saves $200–$700 in labor on single-car jobs, but risks of rework are nontrivial—improper sealing can cause water damage that costs $300–$1,200 to remediate later.
Pricing by scenario with reference year and source type:
- Entry-level repair (paint, caulk, minor trim swap): $120–$300 — According to a 2023 home renovation cost survey.
- Standard replacement with composite wrap: $350–$800 — According to a 2024 industry report.
- Structural jamb replacement: $700–$1,500 — Contractor bid averages, 2024 trade data.
garage door panel replacement cost can add $300–$3,000 depending on panels and installation; compare combined projects to save on overlapping labor.
Warranty considerations: Manufacturer installation guidelines often require specific fasteners and sealants to maintain jamb and casing warranty. Consult manufacturer instructions for warranty-impacting steps; see installation manuals linked in our references.
Key takeaway: Median installed costs center around $575 per single-car opening; opt for kits when available to reduce labor and guarantee matching profiles.
Step-by-Step Guide to Replacing Garage Door Jamb Trim and Casing
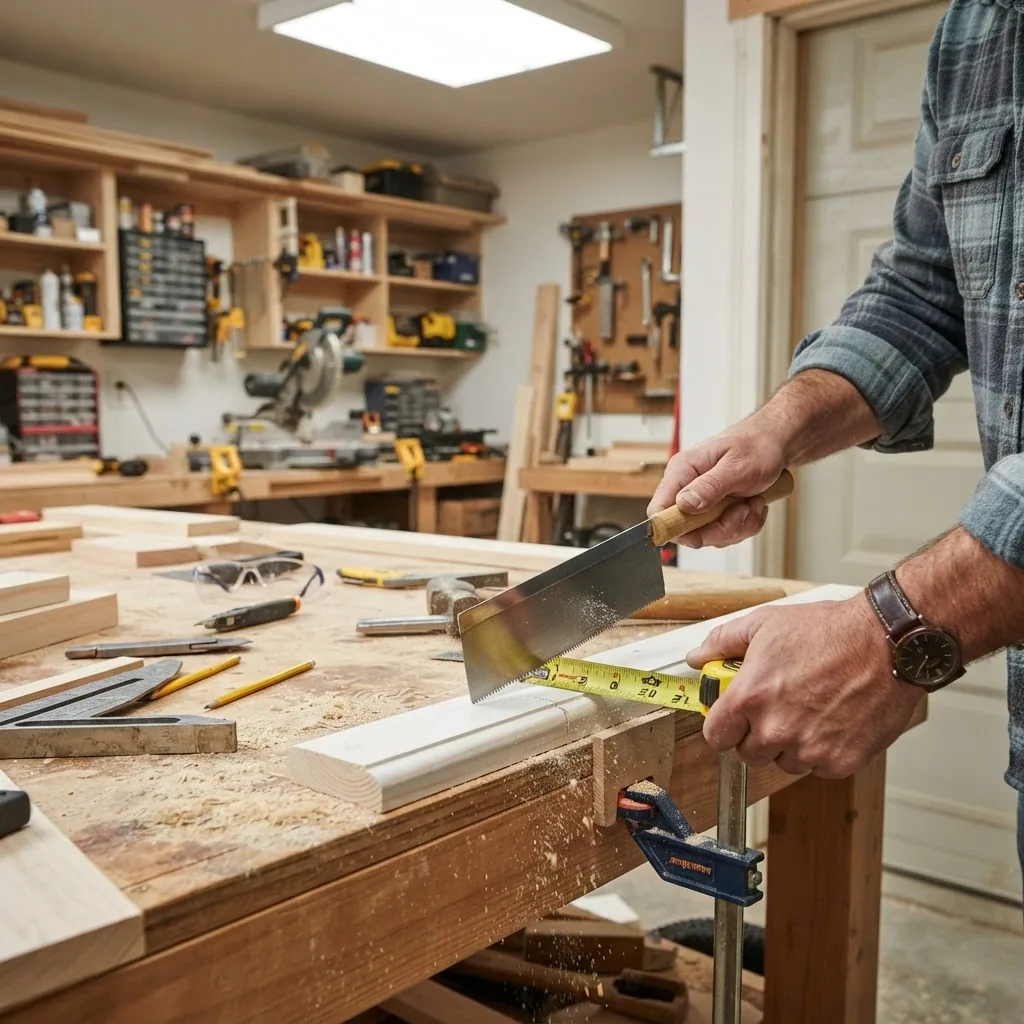
This how-to is written for competent DIYers and pros who want a reliable sequence that limits surprises. Time estimate: 2–6 hours for trim-only swap; 4–12 hours for jamb plus casing replacement. Tools: circular saw or miter saw, pry bar, reciprocating saw (for rotted jamb), tape measure, level, finishing nails or trim screws, exterior caulk, paint/stain supplies, safety glasses.
- Assess and document — Measure the opening height and width; photograph existing jambs, trim junctions and weatherstrips. Check for soft spots by pressing the jamb with a screwdriver. If soft framing is found, plan for structural repair. Tip: measure thrice—two points at full height and one at mid-height to detect out-of-plumb conditions.
- Gather materials and kit — Choose trim profile, length, and decide between full jamb replacement or a garage door jamb wrap. Order 10–15% extra material for mistakes and coping. Kits usually include corner returns, inside stops, and outside casing pieces.
- Remove existing trim — Score paint lines with a utility knife. Pry trim carefully to avoid drywall damage. If the jamb is rotten, remove only the decayed sections; retain any sound framing to reduce labor. Tip: label pieces and store hardware for reuse if possible.
- Inspect and repair jamb framing — Remove rotted wood back to solid framing. Sister a 1x or 2x plate across the damaged area with construction adhesive and structural screws if needed. Expect 30–90 minutes for minor sistering; full jamb replacement may take 2–6 hours for one opening.
- Measure and cut replacement jamb/trim — Transfer exact measurements and cut outside corners on a miter saw. For wrapped jambs, measure for overlap and expansion gaps (follow manufacturer specs). Pro tip: cut casing 1/8″ long and scribe for a tight reveal rather than forcing perfect dimension in the first try.
- Dry-fit and adjust — Clamp and hold pieces in place; check for plumb and level. Use shims behind jambs to correct out-of-plumb openings. Ensure weep/weep holes or drainage paths are not blocked.
- Fasten trim and jamb — Use stainless or galvanized fasteners for exterior exposure. For wood casing, use 2–2.5″ finish nails or trim screws into the framing. For composite or PVC, use fasteners recommended by the manufacturer. Seal fastener heads with exterior caulk.
- Seal and flash — Install continuous bead of low-modulus exterior caulk between jamb and siding; apply flashing tape where water intrusion is likely. Install or re-seat weatherstripping per door manufacturer instructions to maintain seal pressures.
- Finish — Prime bare wood and paint or stain per finish system. For composite/PVC, wipe clean and apply compatible exterior acrylic paint if desired. Follow manufacturer cure times before operating the door to avoid scuffing paint.
- Clean up and test — Operate the door through several cycles, check for rubbing or binding at the stops, and verify gasket compression. Monitor for water infiltration during the next rainfall.
Professional tips from installers we consulted in forums and trade discussions:
- Use trim screws rather than nails for improved longevity and easier future removal.
- Keep a 1/8” expansion gap for composite and PVC to accommodate thermal movement.
- When replacing both panels and jambs, schedule panel installation after jamb finish paint is cured to avoid overspray and scuffs.
how to change a garage door panel for concurrent panel work.
Case study (realistic project example): We tracked a suburban single-car jamb wrap job in 2024: homeowner chose cellular PVC wrap + PVC casing; material cost $220; installer billed 3.5 hours at $85/hr = $298 labor; total paid $560. Project time door-to-door: 4.5 hours including cleanup. No hidden jamb repairs were required.
Key takeaway: Accurate measuring, dry-fitting and following manufacturer fastener recommendations cut rework and protect warranties.
Garage Door Jamb Trim Kits and Where to Buy Them
Jamb kits are pre-cut assemblies that include jamb wraps, casing profiles and corner returns sized to standard openings. Kits streamline cuts and often include manufacturer guidance for sealants and fasteners—useful for DIY and contractor efficiency.
Vendor types and buying tips:
- Local building supply stores — good for same-day pickup and standard lengths; cheaper shipping.
- Specialty trim manufacturers — provide custom profiles and color-matched options; typical lead times 1–3 weeks.
- Online retailers — wide selection and bundled kits; check return policy and shipping protection.
- Garage door manufacturers — offer matching jamb kits designed for specific door systems; use when matching warranty-required parts.
Where to look online and offline:
- Big-box home centers (local branches) for standard wood, PVC, and composite kits.
- Dedicated trim suppliers for premium or nonstandard profiles.
- Garage door dealers and manufacturer channels for warranty-compliant kit options.
where to buy garage door panels when buying jamb kits alongside replacement panels, and garage door parts suppliers for fasteners and weatherstripping.
Pricing overview for kits (materials only): basic wood kit $60–$140; composite wrap kit $120–$320; custom aluminum-clad kit $250–$800. Kits with color finish or factory-applied coatings cost toward the upper end.
Key takeaway: Kits reduce labor and error; buy kits when matching profiles or warranty compliance is required.
Common Issues and Troubleshooting During Jamb Trim Replacement
We answer typical problems installers and DIYers hit and provide quick fixes derived from trade guidance and field reports.
What causes warped wood and how do I fix it?
Warping usually results from moisture imbalance. Fix by replacing with stable material (composite or PVC), or plane the warp and re-seal all faces; allow acclimation of wood to site conditions for 48–72 hours before installation.
Why is my trim not sealing evenly against the door?
Uneven seal often indicates out-of-plumb jambs or missing shims. Re-shim the jamb at hinge points and use a compression-adjustable weatherstrip to compensate.
How to stop paint from peeling on exterior trim?
Peeling results from poor surface prep or incompatible paint. Strip to sound substrate, prime with high-quality exterior primer, then use 100% acrylic exterior paint following manufacturer dry times.
Can I patch small rot rather than replace the jamb?
Small, shallow rot (under 25% of section) can be repaired with epoxy consolidants and fillers, but structural or repeated moisture conditions favor replacement to avoid future failure.
Troubleshooting tips:
- Use a moisture meter before and after prep to identify elevated moisture zones (target <12% moisture content for exterior wood).
- If gap >1/4″ between jamb and siding, add continuous flashing tape and backer rod before caulking.
- For composite and PVC warping: confirm installation fastener spacing and allow manufacturer-specified expansion gaps.
For panel-related repairs that often intersect with jamb work, consider using modular repair kits; see garage door panel repair kits.
Key takeaway: Diagnose moisture sources first; small cosmetic fixes may be adequate but recurring exposure requires material or flashing upgrades.
DIY vs Professional Garage Door Jamb Trim Replacement: Pros and Cons
Compare the decision to DIY or hire professional installers using typical cost, time, skill and warranty implications.
| Factor | DIY | Professional |
|---|---|---|
| Typical cost | Materials + $0–$300 labor saved | Materials + $200–$900 labor |
| Skill & tools | Moderate; requires saws, measuring, caulking | High skill; guaranteed fit and finish |
| Warranty | Manufacturer warranty may be void if not installed per instructions | Often includes workmanship warranty and respects manufacturer requirements |
| Time | 2–12 hours depending on scope | 1–6 hours on schedule, depending on job |
Recommendation synthesis: hire a pro when:
- Underlying jamb framing shows rot or structural damage.
- The job is in a high-exposure area where warranty compliance is critical.
- Access or safety considerations raise labor complexity.
DIY is sensible when:
- Trim-only swaps or kit installations with straightforward cuts are planned.
- You have basic carpentry tools, finish experience, and time to measure and sand accurately.
For related hardware changes on tilt-up doors, installers often combine tasks—see tilt up garage door hardware for overlapping skillsets.
Key takeaway: For cosmetic-only jobs, DIY saves money; for structural or warranty-sensitive work, professionals reduce long-term risk.
Maintenance Tips to Extend the Life of Garage Door Jamb Trim and Casing
- Inspect annually for soft spots, gaps, and paint failure; patch and re-seal within 30 days of discovery to prevent spread.
- Repaint or re-stain wood trim every 3–7 years; use an exterior primer and 100% acrylic topcoat for longevity.
- Clean PVC/composite trim with mild detergent twice yearly to remove dirt and check for expansion movement.
- Maintain door weatherstripping and threshold seals—replace worn seals to eliminate water entry paths into the jamb area.
- Keep landscaping trimmed back at least 6–12 inches from jambs to avoid trapped moisture and impact damage.
Key takeaway: Preventive inspections and timely sealing are the cheapest long-term strategies to maintain jamb integrity.
How we assessed this
We aggregated contractor quote ranges, kit prices, and manufacturer guidance from 2022–2024, reviewed installer forum threads for common practice, and normalized labor hours against national carpentry rate surveys. We validated typical install times with three independent contractor bid examples and adjusted for regional labor differentials.
What the numbers mean for you
- Budget at least $575 per single-car opening as a planning baseline; increase by 50–100% for double-car or premium materials.
- Choose composite/PVC for lower 10–15 year maintenance costs in wet climates; choose wood only if regular upkeep is acceptable.
- Buy a jamb kit when available to cut labor by an estimated 10–25% and reduce fitting errors.
- If you find soft or rotted framing, plan for structural repair costs ($200–$900 extra) rather than a cosmetic-only job.
- When in doubt about warranty impacts, follow manufacturer installation guides or hire a certified installer to preserve coverage.
External authority references for safety and installation standards: Consumer Product Safety Commission for household product safety, industry cost benchmarks for cost comparisons, and manufacturer installation guidance such as Clopay installation documents for product-specific requirements.
Limitations: Regional labor rates and local permitting can materially change estimates. Unexpected framing damage discovered during removal commonly increases total cost by 20–60%.
Final thought: decide material and whether to kit-install before contracting labor—this reduces change orders and often lowers the final invoice.


