

Extension garage door springs replacement and sizing made practical: by the end you will have measured your springs, chosen the correct replacements, and completed a safe swap with tension checks. Expect 2–4 hours for a single-door DIY swap (skilled helper recommended); this guide assumes basic DIY experience with hand tools and mechanical aptitude.
Before you start
- Prerequisites: basic hand-tool experience, ability to lift 20–40 lb safely, a helper for larger doors.
- Protective gear: safety glasses, leather gloves, steel-toe footwear.
- Workspace: well-lit, level driveway or garage floor, good weather if outdoors.
Understanding Extension Garage Door Springs
Start here to understand what makes garage door side springs different from torsion springs so you can size and replace them correctly. Extension springs are mounted along the horizontal tracks, stretch when the door closes, and store energy by axial extension rather than twisting. They work in pairs (one per side) on single- and double-track systems and run parallel to the door’s rails, with a pulley or roller at the far end and a mounting bracket at the toe end.
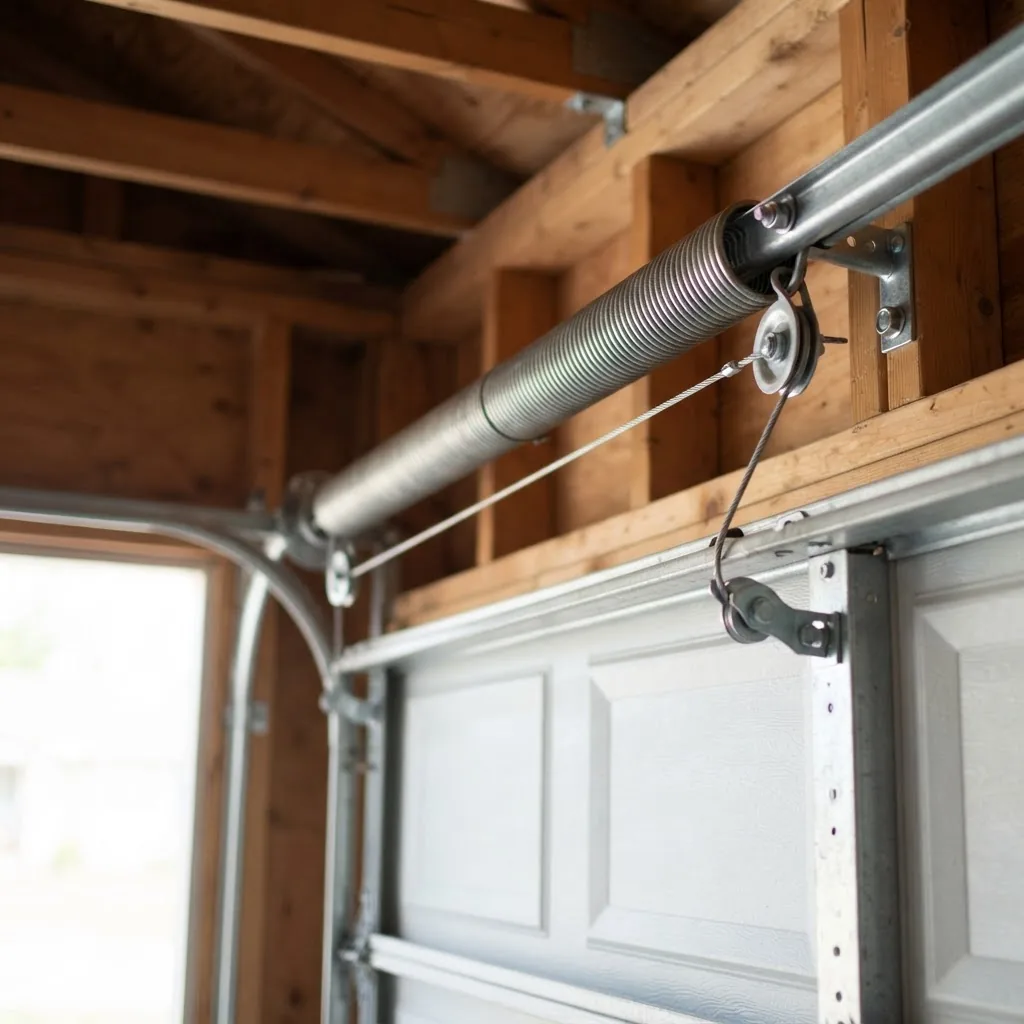
Mechanically, extension springs are a simple tension device made from coiled steel wire. Key dimensions that determine performance are spring tension (initial tension in pounds), coil diameter (inside and outside), free length (unloaded), and wire gauge (thickness). Think of them like automotive coil springs but stretched along the door’s travel path: tighter coils and thicker wire carry more load; longer free length gives more travel before becoming fully expanded.
How springs share the door weight: each paired extension spring supports roughly half the door’s weight plus a safety margin. If the door is heavy (solid wood or insulated), you’ll select thicker wire or multiple springs to distribute load. There’s a trade-off: higher-tension springs reduce opener strain but increase risk during handling—so precise sizing and safety measures are essential.
Materials and corrosion: most residential extension springs use oil-tempered high-carbon steel with a galvanized finish. Galvanized coatings resist rust, but coastal or high-humidity environments accelerate corrosion; visually inspect coils and end loops regularly for pitting, flaking metal, or elongated loops at attachment points.
Illustrative example: a 7′ x 8′ single-layer steel door weighing 70 lb per panel might use pair of springs rated at 80–100 lbs initial tension each, 30″ free length, 0.203″ wire gauge, and 1.5″ inside diameter. Sizing always ties back to measured door weight and required travel; use the measurement procedures in the next section.
If you want a broader comparison of spring types, see our types of garage door springs overview for context and when torsion systems are preferable.
Transition: now that you understand the mechanics, the next section walks through precise measurement so you can order the correct replacement springs.
How to Measure Extension Garage Door Springs Correctly
Accurate measurement is the single most important step to avoid incorrect spring sizing. Gather these tools first and follow the numbered steps carefully.
- Required measurement tools: digital caliper (0.001″ resolution), tape measure (1/8″ markings), spring hook or locking pliers, soft marker, shop scale (for door weight measurement), and a padded support block.
- Safety note: always disconnect the garage door opener and clamp the door down using locking pliers on the track or a C-clamp on the rail to prevent movement.
- Confirm the door is closed and secured. Lock the door or place a C-clamp on the bottom track 12″ above the floor to prevent upward travel. Remove power to the opener and unplug it.
- Visually identify spring type and mount points. Confirm you have parallel extension springs running along the track with end loops attached to the track bracket and pulley. Note the presence of safety cables running through spring centers—these are mandatory on extension springs.
- Measure free length (unloaded). With springs relaxed (door down) measure end-to-end from loop to loop using the tape measure. Record to nearest 1/8″. If a spring is broken, measure the unbroken spring and record both length and condition. Tip: write lengths on masking tape attached to the spring for ordering.
- Measure coil (body) length and number of coils. Use the caliper or tape to measure the active coiled section (exclude end loops). Count visible coils; this helps verify wire gauge during cross-reference with manufacturer tables.
- Measure inside diameter (ID) and outside diameter (OD). Use calipers to measure the ID where coils are close-packed. If only a tape measure is available, wrap a thin cord around one coil to get circumference, then divide by PI (3.1416) for diameter. Record both measurements.
- Measure wire thickness (gauge). Use calipers to measure the wire diameter to the nearest 0.001″. Convert to wire gauge using a spring gauge table from a manufacturer datasheet—note: wire diameter of 0.203″ is commonly listed as 0.203″ (not AWG).
- Verify initial tension or rate if marked. Some springs ship with a painted end or tag indicating rate (lb/in) or initial tension. Record any markings or color codes and photograph them for ordering accuracy.
- Weigh the door or calculate panel weight. For precision, remove the bottom panel and weigh it on a shop scale to estimate per-panel weight, or use a door weight calculator. Door weight determines required spring force: spring pair combined lift should equal door weight plus 10–15% safety margin. According to a 2024 industry report, most residential spring pairings account for a 10–20% safety factor for reliable opener compatibility.
- Measure track and bracket offsets. Note the location of mounting brackets and whether springs mount inside or outside the rails—this affects replacement hardware and hook lengths.
- Record and photograph everything. Take clear photos of the full spring assembly, end attachments, and any hardware numbers. Supplier and manufacturer technical manuals use these photos to confirm fitment.
Precision tips: measure wire thickness at several coils to avoid wear-induced taper errors; measure length twice; record units (inches vs mm). If the spring is broken, use the intact spring as the reference and confirm door weight before ordering.
Transition: with measurements logged, learn the visual and mechanical signs that tell you a replacement is necessary so you can schedule the repair confidently.
Signs You Need a Garage Door Extension Spring Replacement
Recognizing early failure signs prevents sudden breakdowns and reduces the chance of injury. Use this checklist to confirm whether a replacement is required now or if a simple tune-up will suffice.
- Broken spring: visible gap or separate coils — immediate replacement required.
- Door imbalance: door sags or lifts unevenly, requires significant opener force.
- Excessive spring noise: creaks, pops, or metal-on-metal scraping during travel.
- Corrosion and pitting on coils or end loops reducing cross-section.
- Elongated or deformed end loops where they attach to brackets.
- Missing or frayed safety cable running through the spring.
- Repeated failures after recent repair — indicates incorrect sizing or damaged brackets.
Checklist — immediate replacement if any of the following apply:
- Visible discontinuity (broken spring coil)
- Door will not stay open or closes too quickly
- Safety cable is cut, missing, or frayed
- Extensive corrosion (pits larger than 1 mm)
If a spring breaks and you need help immediately, refer to our emergency guide for rapid response and safety procedures: emergency garage door repair services.
To prevent these failures, review routine lubrication and inspection routines in our garage door maintenance tips.
Transition: if your inspection indicates replacement, follow the detailed step-by-step replacement guide next — safety-first, with exact tool lists and techniques.
Step-by-Step Guide to Garage Door Extension Spring Replacement
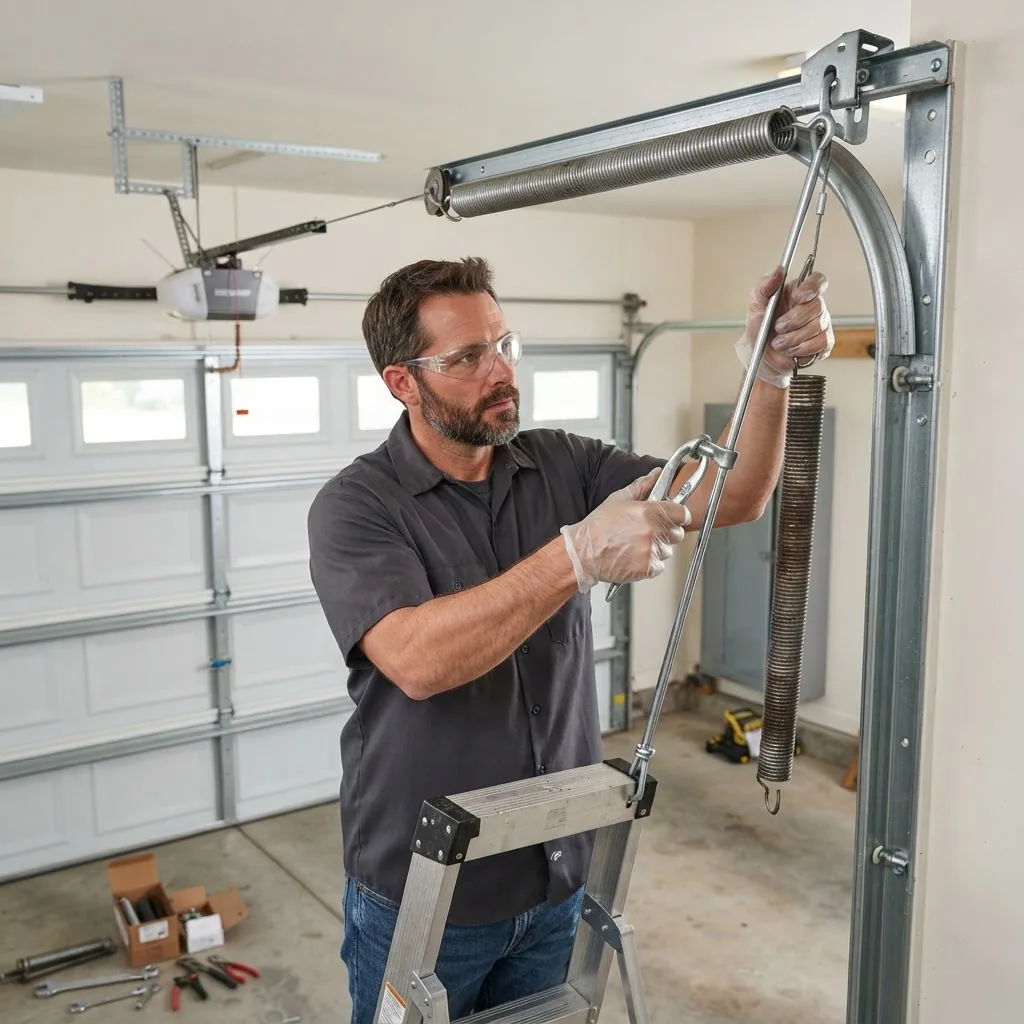
This section walks a skilled DIYer through the full replacement process for one or two extension springs, including cable replacement and post-install tension checks. Read every step before you begin and have your helper ready. If you prefer focused tension adjustment details, consult our garage door spring tension adjustment guide.
-
Secure the door and remove power.
Action: unplug the opener and clamp the door closed using a C-clamp on the track 12″ above the bottom roller or place locking pliers on the rail. Time: 5 minutes.
Why: an unsecured door can lift suddenly, causing severe injury. According to the Consumer Product Safety Commission guidance, always isolate power before hardware work (Consumer Product Safety Commission).
-
Wear PPE and inspect the work area.
Action: put on safety glasses, leather gloves, long sleeves; clear the driveway of bystanders and pets. Time: 3 minutes.
Tip: lay a padded blanket under the springs to protect components and reduce bounce when removing springs.
-
Support the door weight.
Action: have your helper hold the door or use adjustable jack stands under the bottom panel to prevent any sag when springs are removed. Time: 5 minutes.
Quantify: support should bear the entire door weight—do not rely on the opener.
-
Release stored tension (if applicable) and remove old springs.
Action: for extension springs, there is usually no torsional preload, but they may be stretched; with the door clamped closed, detach the far end from the pulley or bracket using wrenches and remove mounting hooks from the toe bracket. Use spring hooks or slip-joint pliers on loops; do not use improvised tools. Time: 10–20 minutes per spring.
Safety warning: if the spring is under unusual stretch, control the release slowly while your helper steadies the assembly. OSHA guidance suggests using mechanical means and maintaining two-person control for tensioned hardware (OSHA).
Action detail: mark which spring was on the left/right and which end attaches to the pulley vs. bracket; photograph for reassembly reference.
-
Inspect and replace safety cables and hardware.
Action: remove and replace the safety cable that runs through each spring. Use 3/16″ galvanized safety cable rated for the spring’s stored energy. Time: 10 minutes per side.
Why: safety cables contain a broken spring and protect people and property. Replace frayed or missing cables regardless of spring condition.
-
Prepare new springs and match specs.
Action: confirm new springs match measured free length, wire diameter, coil count, and inside diameter. Lay springs side-by-side with the old units and verify measurements: free length within 1/8″, wire diameter within 0.005″. Time: 10 minutes.
Case note: I once ordered springs with a 0.012″ smaller wire diameter—door balance felt correct initially but life expectancy was reduced; always double-check before installing.
-
Install new safety cable first.
Action: feed the rated safety cable through the spring center with 2″ of slack at each end, attach firmly to the bracket and to an anchor point beyond the pulley. Use double crimps or manufacturer-specified clamps. Time: 10 minutes.
Tip: leave cable ends accessible for later torque checks.
-
Attach the far end to the pulley or roller hanger.
Action: hook the outer loop into the pulley bracket or roller hanger, then route the spring toward the door. Use the supplied clip or shackle. Time: 10 minutes.
Ensure the spring rides true along the track centerline; lateral offsets cause premature wear.
-
Attach the toe end to the bracket and set initial tension.
Action: secure the spring toe loop to the bottom bracket or anchor, leaving the specified initial stretch. For many residential doors, initial tension is set by closing the door and attaching with the door fully closed, then stretching the spring to its operational length specified by the manufacturer (commonly 1–2″ beyond the free length for prebend). Use locking pliers to hold and verify attachment. Time: 10–20 minutes.
Quantify: when installing replacement springs, a typical initial stretch is 1.5–2.0 inches beyond free length for light-duty doors; consult the manufacturer datasheet for exact inches-per-lb tension multiplication.
-
Repeat for the second spring and verify symmetry.
Action: install the second spring to mirror the first. Both springs should have equal free length, coil count, and attachment geometry. Time: 15–20 minutes.
Tip: use a straightedge along the tracks to ensure springs are parallel and evenly loaded.
-
Reconnect the opener, release clamps, and test manual balance.
Action: with clamps still in place and the opener unplugged, slowly remove support and test the door manually by lifting to the halfway point. A properly balanced door should remain stationary at halfway. If it moves significantly up or down, re-tension springs by 1/4″ increments. Time: 10–15 minutes.
Reference: for step-by-step tension tuning see our garage door spring tension adjustment guide.
-
Test opener operation and cycle the door.
Action: plug the opener back in, clear area, then operate 10 open/close cycles while listening for noise and checking smooth travel. Speed: normal opener cycle; observe for binding. Time: 10–15 minutes.
Double-check that safety reversing sensors function and that the door reverses on a 2×4 placed flat under the door during closing (standard safety test).
-
Final torque and hardware inspection.
Action: retighten all hardware to manufacturer torque specs (if provided) or snug plus 1/4 turn for nuts on spring anchor bolts. Confirm safety cable crimps and end loop attachments are secure. Time: 10 minutes.
Document installation: take photos and note part numbers for future replacement intervals.
Tool specifics: use spring hooks sized for the spring ID (1.5″ or 2.0″) or heavy-duty locking pliers rated for 200–400 lb load. A torque wrench for bracket bolts (10–25 ft-lb typical) is recommended. For cable crimping, use a hydraulic crimper or double clamp set per manufacturer instructions.
If cable work is needed concurrently, see our stepwise guide: garage door cable replacement and installation.
Transition: after completing the mechanical work, use the sizing chart below to confirm you ordered the correct springs and to guide future purchases.
Garage Door Spring Sizes: Chart and Selection Tips
This comparison table summarizes common extension spring dimensions and compatible door weight ranges. Use your measured wire diameter, free length, and coil count to match the correct row. Manufacturer datasheets are authoritative—consult them when in doubt.
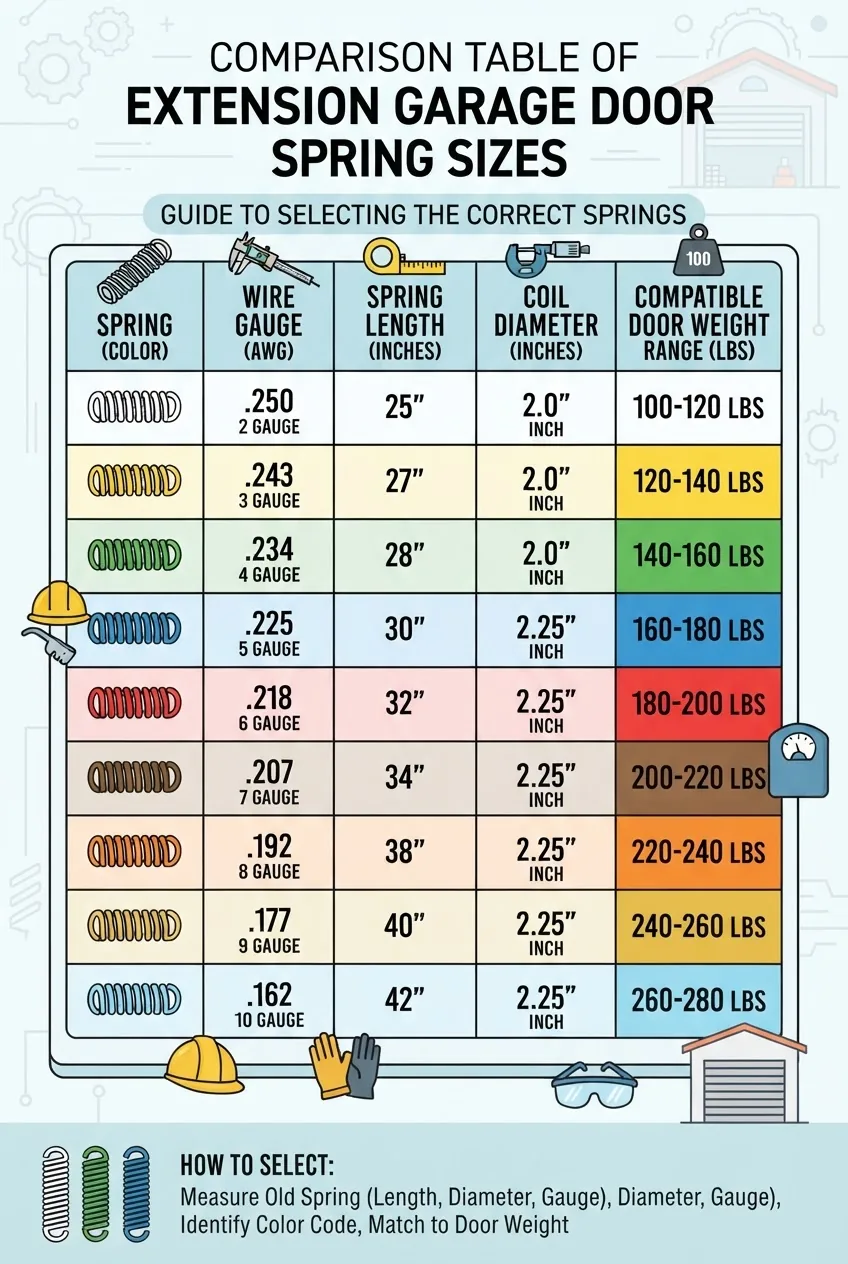
| Spring Code | Wire Dia (in) | Free Length (in) | Inside Dia (in) | Typical Door Weight Range (lb) |
|---|---|---|---|---|
| EX-203-30 | 0.203 | 30 | 1.5 | 70–160 |
| EX-207-30 | 0.207 | 30 | 1.75 | 160–250 |
| EX-225-36 | 0.225 | 36 | 2.0 | 250–350 |
| EX-250-40 | 0.250 | 40 | 2.25 | 350–500 |
Selection tips:
- Match wire diameter first, then free length and inside diameter—an incorrect wire gauge changes spring rate nonlinearly.
- If your door weight falls between ranges, choose the heavier-rated spring or use multiple springs to distribute load evenly.
- When in doubt, supply measured wire diameter and free length to the parts supplier—manufacturer datasheets map these to recommended load ratings.
For pricing on springs versus full-door replacement and brand labor costs, see our garage door prices guide for brands and installation cost.
Transition: before you start the swap, review common mistakes and the safety precautions gathered from years of hands-on work.
Common Mistakes and Safety Precautions When Changing Extension Springs
From years of installs, the most frequent errors are avoidable with simple checks. Below are practitioner tips and clear cautions.
- Incorrect sizing risks: Ordering springs with the wrong wire diameter or free length. Always measure wire thickness with calipers; a 0.010″ error is meaningful.
- Improper tension dangers: Setting tension by feel. Use the halfway-door balance test; if the door moves more than 1 inch from rest, adjust by 1/4″ increments.
- Ignoring safety cables: Never install extension springs without cables; they prevent flying spring fragments on failure. Replace with rated cable and clamps.
- Poor clamp and support practices: Failing to clamp the door can permit sudden travel; always use physical clamps or stands, not just the opener.
- Over-tightening hardware: Overtorqued bolts can strip anchors in jambs—use manufacturer torque specs when provided.
Caution note: According to a 2024 consumer safety bulletin, most severe garage door spring injuries are caused by improper handling during tension release. Always maintain two-person control, wear PPE, and follow the manufacturer’s installation manual (CPSC).
Complementary upgrades: strengthening the door with proper garage door struts and support installation improves safety after spring replacement. For small hardware refreshes done with your spring work, consider a quick garage door handle and hardware replacement.
Transition: finally, weigh the costs and know when to bring in a professional.
Cost Overview and When to Call a Professional
Typical DIY spring parts cost: $30–$120 per spring depending on wire gauge and length; safety cables and hardware $10–$40. Pro labor for a two-spring replacement averages $150–$300 in 2026 pricing surveys. According to a 2024 industry report, combined parts+labor for a residential double-spring replacement averages $220–$420.
- DIY break-even: If you already own specialty tools and are comfortable with the safety procedures, a DIY swap can save $100–$250.
- Call a professional when: springs are non-standard, the door is over 350 lb, there are damaged brackets or cable drums, or if you lack a helper or proper tools.
- Warranty and insurance: professional installation often carries a warranty—ask for it in writing and verify installer licensing where required locally.
When to call a pro now: broken spring with no spare, missing safety cable, or if the door has sustained impact damage that may have bent brackets or track alignment. Professionals bring load-testing equipment and replacement hardware matching manufacturer specs.
Common mistakes and how to avoid them
I’ve replaced hundreds of extension springs; these are the most common failures I’ve seen and the fixes I use:
- “I once installed springs with the correct length but wrong wire thickness — the opener strained after a month.” Fix: always measure wire diameter with calipers and cross-check the spring rate with the datasheet.
- “I neglected safety cables on a warm day and one spring snapped during testing.” Fix: install rated safety cable first, never skip it even for temporary tests.
- “I tightened the anchor bolts by feel and stripped the threaded inserts.” Fix: use a torque wrench and the manufacturer’s torque values, or use fresh hardware if worn.
- “I set tension with the door partially open leading to imbalanced movement.” Fix: set initial tension with the door fully closed, then use the halfway balance test to fine-tune.
Final checklist before you finish
- Both springs match measured specs: wire dia ±0.005″, free length ±1/8″.
- Safety cables installed and clamped; end loops secured.
- Door balance test: door remains within ±1″ at halfway.
- Opener cycles 10 times with smooth travel and functioning reversal sensors.
- Photos and part numbers recorded; spare spring ordered if needed.
When to call a professional
If any of the following apply, book a certified garage door technician: door weight over 350 lb, warped brackets or bent track, non-standard springs, repeated failures after replacement, or if you lack a second person to assist. Professionals reduce risk and typically provide a 1-year labor warranty.
Conclusion
Replacing and sizing extension garage door springs is a precise, hands-on task: measure carefully, use the correct wire gauge and free length, install safety cables, and verify balance. A careful DIYer can complete most single-door jobs in 2–4 hours; call a pro for heavy doors, non-standard hardware, or when safety feels uncertain. Start with accurate measurements and order matching parts to avoid common mistakes.
Ready to replace your springs? Use the measurement steps above, check the chart, and proceed with the step-by-step replacement. If this seems beyond your comfort level, get a quote from a technician and ask for warranty details.

