

add windows to garage door — by the end of this hands-on guide you’ll have planned, cut, installed, sealed, and finished one or more windows in an existing sectional garage door. Typical timeline: 1–2 days for a single-row retrofit (4–8 hours active work), or 2–3 days for multiple custom openings. Skill level: intermediate DIY (basic carpentry, power tool experience, and a helper for lifting panels).
Before you start
- Confirm your garage door material (steel, wood, aluminum, or composite) and check manufacturer warranty terms.
- Obtain measuring tape, marker, level, jigsaw with metal and wood blades, drill and bits, rivet gun or screws, silicone sealant, primer/paint (if needed), window kits or glass inserts, and safety gear.
- Plan window layout, size (common: 12″x36″ to 24″x48″), and number; sketch on paper and on the door with low-tack painter’s tape.
- Allow helper for heavy panels; arrange a flat work surface and protective floor covering.
Introduction to Adding Windows to Garage Doors
Adding windows to a garage door is one of the most effective garage door upgrades for improving natural light, curb appeal, and perceived home value without replacing the entire door. This guide explains practical installation techniques—both DIY and professional—covers compatibility with common garage door materials, walks through tools and step-by-step procedures, and gives a detailed cost analysis with energy and security considerations.
Why homeowners choose this project: windows reduce the need for electric lighting, break up large door surfaces visually for better curb appeal, and can be insulated to avoid energy loss. Expect to spend between a half-day and three days depending on door condition, window complexity, and whether you retrofit pre-fab window kits or cut new openings for custom glass.
This article assumes intermediate DIY skills: you must be comfortable with power tools, cutting sheet metal or wood, and using sealants and fasteners. Read the Tools and Materials section before touching tools, and follow local building codes for any structural modifications.
Transition: next we compare window styles and explain what fits your door material so you can pick the right option before buying.
Types of Windows for Garage Doors and Compatibility
Choosing the right window type affects appearance, insulation, and cost. Below is a concise comparison followed by short explanations for each option and how they pair with garage door materials.
| Window Type | Typical Materials | Best For | Rough Cost Range (2024) |
|---|---|---|---|
| Decorative (grilles, frosted) | Glass, acrylic, polycarbonate | Curb appeal; wood and steel doors | $50–$200 per window |
| Insulated (double pane, argon) | Tempered insulated glass, insulated acrylic | Energy savings and climate control | $150–$450 per window |
| Arched / Specialty | Custom glass or polycarbonate | Architectural doors, upscale look | $200–$800+ |
| Vinyl / Acrylic Inserts | Acrylic, PVC frames | Economical, lightweight doors like aluminum | $40–$150 per window |
| Tinted / Low-E Glass | Tempered glass with coatings | Privacy, UV control, energy efficiency | $120–$500 per window |
Decorative glass: Frosted, textured, or grille-backed panes; excellent for curb appeal on wood or painted steel doors. They typically use single-pane glass or acrylic with decorative overlays.
Insulated windows: Double-pane tempered glass with argon fill or insulated acrylic. These are best for attached garages where heat transfer matters. According to a 2024 industry report, insulated windows can reduce garage-side heat loss by 10–20% when paired with insulated doors.
Arched and specialty windows: Require precise cutting and often custom glazing; they pair well with carriage-style or solid wood doors. Expect higher cost and longer lead time.
Vinyl and acrylic inserts: Lightweight and inexpensive; easier to retrofit into aluminum or composite panels. Acrylic resists shattering but scratches more easily than tempered glass.
Tinted or Low-E: Good for privacy and solar heat control, particularly on east/west-facing garages. Low-E coatings are recommended for energy-conscious homeowners; see the Department of Energy for more on glazing and energy savings: Department of Energy.
Compatibility notes by door material:
- Steel doors: Most window kits are compatible; thin single-skin steel may need reinforcement or use of pre-framed inserts. Carefully follow manufacturer instructions to avoid warping.
- Wood doors: Best for custom cut and framing; wood accepts routed frames and trim for a refined finish.
- Aluminum doors: Lightweight; use rivets or self-tapping screws and avoid heavy glass that can sag panels.
- Composite doors: Often accept standard window kits; check for hollow vs solid cores and use adhesive and screws as specified.
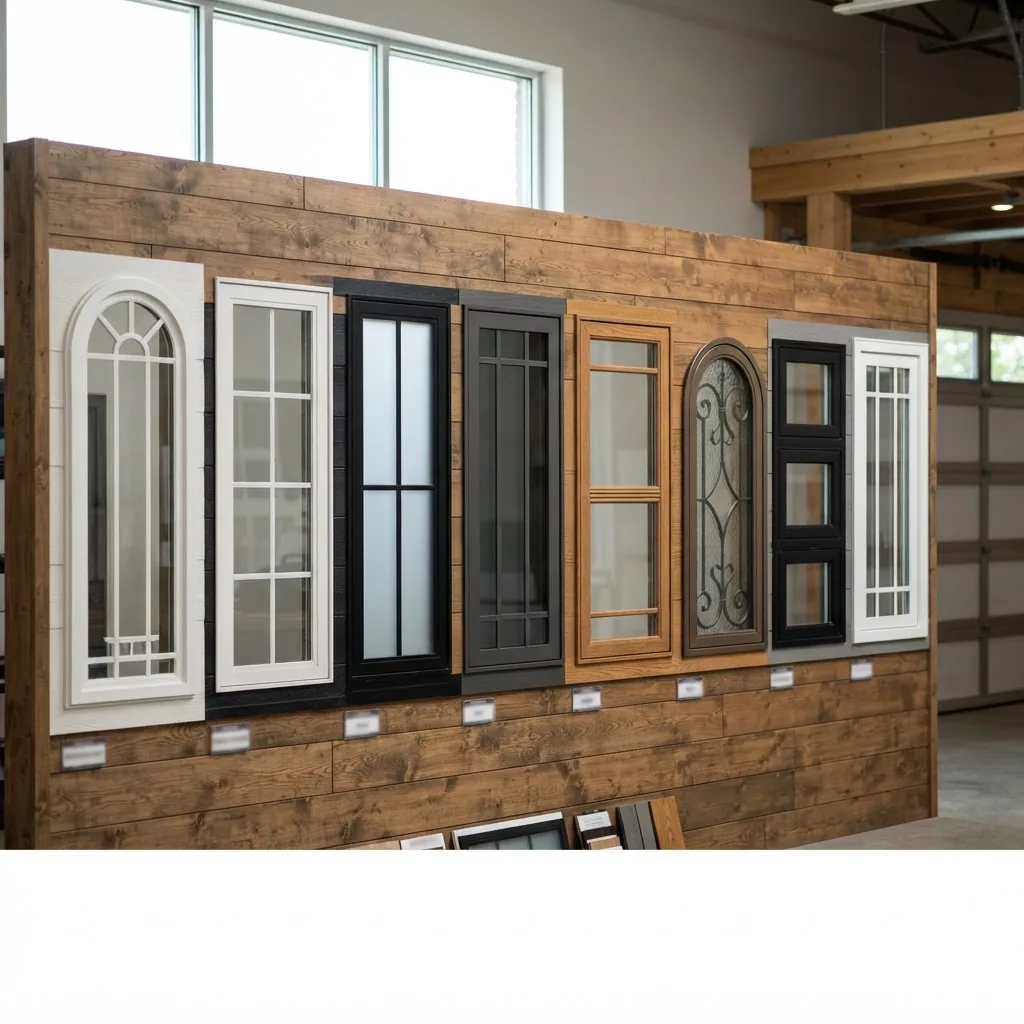
Transition: with the style and compatibility chosen, gather the correct tools and materials so the actual installation goes smoothly.
Tools and Materials Needed to Install Windows in Garage Door
- Jigsaw — with metal-cutting and wood-cutting blades; variable speed recommended. Use a fine-tooth metal blade for steel and an aggressive wood blade for wood doors.
- Drill and drill bits — 1/8″ to 1/2″ bits for pilot holes and hinge or rivet holes; use cobalt bits for steel.
- Rivet gun or screw gun — pop rivets for thin metal panels; stainless steel screws for wood or composite.
- Measuring tools — tape measure, carpenter’s square, level, and a laser level for aligning multiple windows.
- Marker and painter’s tape — non-permanent marking, alignment guides, and templates.
- Sealants — exterior-grade silicone or polyurethane sealant (neutral-cure recommended for certain metals).
- Primer and paint — rust-inhibiting primer for exposed steel edges and matching exterior paint.
- Glass or acrylic window kits — pre-framed inserts, tempered insulated glass units, or raw glazing with frames.
- Safety equipment — safety glasses, cut-resistant gloves, hearing protection, and a dust mask; consider a respirator when cutting painted or galvanized steel.
- Support equipment — sawhorses, panel stands, clamps, and a helper for lifting panels.
Tool tips from experience: use a drill stop on hinge holes to prevent cracking frames; when cutting steel, clamp a sacrificial wood strip behind the cut line to reduce burrs and vibration. For insulated glass, store panes vertically and avoid laying them flat to prevent seal damage.
Transition: now follow the full installation sequence — these are the practical steps I use on retrofit jobs that consistently minimize leaks and alignment problems.
Step-by-Step Guide on How to Add Windows to Garage Door
Overview: This sequence applies to most sectional garage doors. If you plan to remove panels entirely, refer to the broader removal and replacement techniques in the pillar replacement guide: How to Change Garage Door DIY Replacement and Installation Guide.
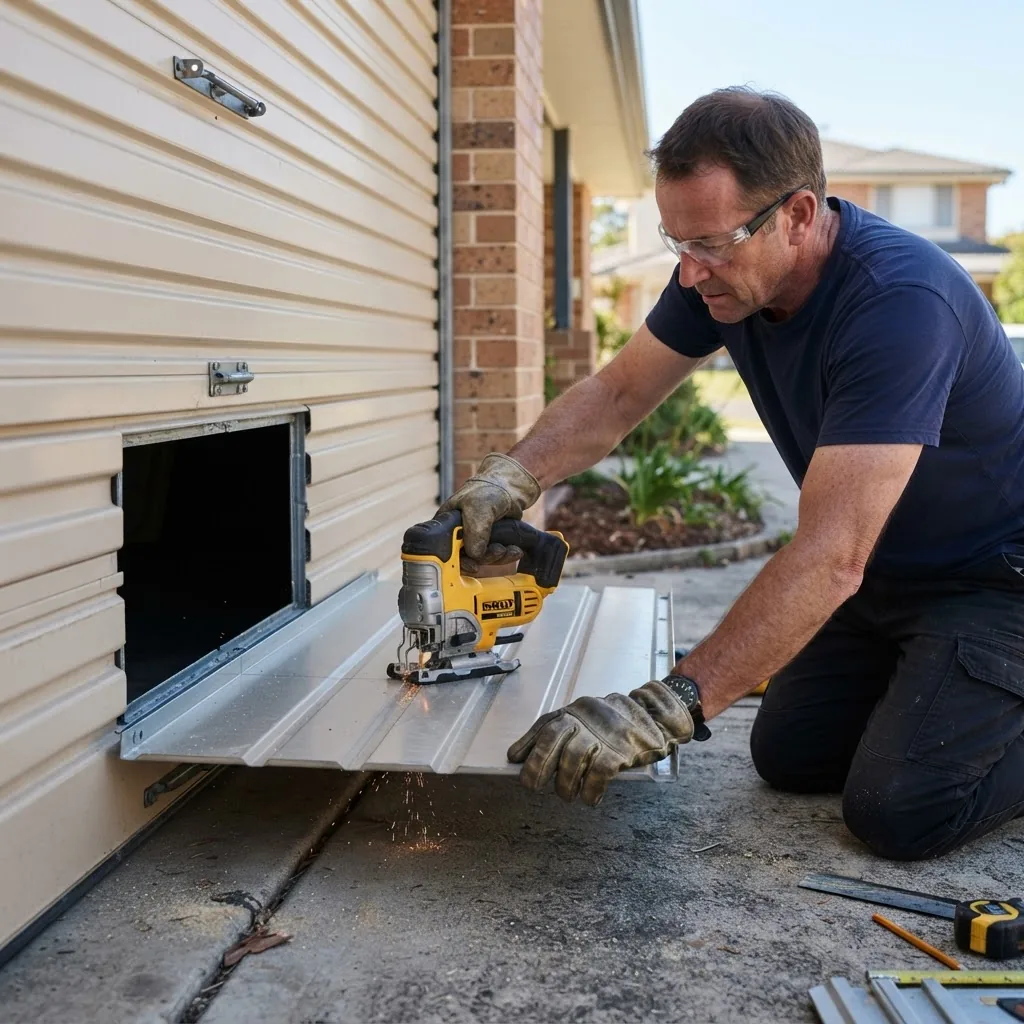
- Plan window layout and confirm panel construction. Measure panel heights and seam lines. Most sectional doors have horizontal rails where windows align best across the top two panels. Typical panel height is 21″–24″; choose windows that fit within a single panel or span two panels only if you will reinforce the seam. Mark centerline and vertical spacing: keep at least 3″ from panel edges and 2″ from vertical stiles. If you plan multiple windows, use a laser level to transfer the reference line across the door.
- Choose window kit and verify fit with a template. Most kits include a paper or cardboard template. Tape the template to the exterior face and verify the window will clear internal hardware on the inside of the panel (foam insulation, ribs, or handles). If the panel is insulated with foam, check thickness: cutting through foam needs extra care to avoid tearing internal facings.
- Detach the door from opener and secure the door. For safety, unplug the opener, release the trolley, and clamp the door closed with vice grips on the track to prevent accidental movement. If you must remove a panel to work on a flat surface, follow safe lifting procedures: two people, panel on sawhorses, and keep track of hinge and roller hardware.
- Prepare the work surface and protect finishes. Lay drop cloths or cardboard beneath the area and apply painter’s tape where you will cut to reduce chipping of paint. For steel doors, use a ground clamp or magnet to reduce vibration; for wood doors, pilot drill all screw locations to prevent splitting.
- Drill pilot holes at corners of the cutout. Using the template, mark cut lines and drill a 3/8″ (10 mm) pilot hole at each corner just inside the cut line to accept the jigsaw blade. For steel, countersink the hole slightly to seat the blade before cutting. For wood, ensure the bit is sharp and set drill clutch low to avoid tear-out.
- Cut the opening with a jigsaw. Cut slowly—target 1/2″ beyond the interior face if you will trim from the inside. For steel, use a fine-tooth bi-metal blade at moderate speed; do not force the blade. For wood or composite, use a wood blade and keep steady pressure. Recommended cutting speed: 1–2 inches per minute for steel; faster for wood but pause every 6–8″ to check alignment.
- Deburr, clean, and prime exposed edges. Remove burrs with a deburring tool or file. Clean metal edges with a solvent, then apply a zinc-rich primer to bare steel within 10 minutes of sanding to prevent flash rust. For wood, sand to 120 grit and apply an exterior primer to the cut edge.
- Dry-fit the window frame or insert. Insert the window into the opening to check alignment. For boxed frames, ensure the exterior lip sits flush; for drop-in inserts, check for level and square. Adjust or shim with thin PVC shims where necessary—avoid compressible materials that may settle.
- Secure the window per kit instructions. Typical methods:
- Rivet through the frame into the panel flange (use stainless steel rivets for outdoor corrosion resistance).
- Use self-tapping stainless screws with neoprene washers into pre-drilled holes in wood or composite.
- Adhesive and screw combination for insulated units—apply continuous bead of construction adhesive on the back of the frame.
Torque rivets or screws snug—do not over-tighten to avoid distorting frames. Use fastener spacing every 6–8″ around perimeter unless kit specifies otherwise.
- Seal the perimeter with exterior-grade sealant. Tool a 3/16″ to 1/4″ bead of neutral-cure silicone or polyurethane sealant along the exterior and interior perimeters. For metal-to-metal joints, use a butyl-backed sealant tape first and then a silicone bead outside. Wipe excess sealant within 5–10 minutes for a clean finish. Recommended bead dimension: 3/16″–1/4″. Allow 24 hours for common silicones to skin over, 48–72 hours for full cure in cool conditions.
- Install glazing stops or interior trim. Refasten any interior stops or trim pieces supplied with the kit. For retrofit kits, drill pilot holes for interior trim screws and use trim screws no longer than 3/4″ to avoid piercing insulation. Paint or finish interior trim to match the panel interior.
- Test panel balance and opener operation. Reconnect the door to the opener. Lift the door manually to check for smooth action; the addition of glass or heavier inserts can change panel weight. If the door feels heavy, adjust the torsion springs in 1/4-turn increments per your door’s adjustment chart or call a professional—spring work is hazardous.
- Final weatherproofing and cosmetic touch-up. Paint exposed cut edges and trim to match door finish. Apply a small bead of exterior caulk where trim meets panel for added water protection. Clean windows with non-abrasive cleaner and protect with a temporary film if construction continues.
Real-world example: On a 16’x7′ steel sectional I retrofitted two 18″x36″ insulated acrylic windows. I used a cardboard template, drilled 3/8″ pilot holes, and cut with a fine-tooth blade. After priming exposed edges and using stainless rivets with a continuous silicone bead, the install took 6 hours with one helper and no air leaks after 48 hours of curing.
Common mistakes and how to avoid them (practitioner experience)
I once cut too close to a stamped rib on a thin steel panel and caused a structural deformation that created a visible dent; I had to replace the panel. Learnings: always measure twice and keep cuts within flat zones, not ribbed areas. I also encountered windows installed flush without sealant—these later leaked. Always prime exposed edges and use a continuous backer or seal tape before the visible silicone bead.
Checklist to verify your work
- Window is square and level within 1/16″.
- Perimeter sealant continuous and tooled smooth; no visible gaps larger than 1/8″.
- Fasteners torqued and countersunk or capped; no sharp burrs.
- Door balance and opener function test passed (manual lift smooth, no binding).
- Painted/primed exposed edges and interior trim installed.
- No interior condensation or leakage after 48–72 hours.
When to call a professional (short)
If your installation requires spring adjustments, structural panel replacement, or custom glass glazing in arched openings, hire a professional to avoid safety and warranty issues. For complex commercial doors, see the commercial installation guide: Commercial Garage Door Installation Services and Cost Guide.
Transition: next, a detailed cost breakdown helps you budget for parts, labor, and hidden expenses prior to purchase.
Cost Breakdown: How Much Does Adding Windows to Garage Door Cost?
Costs vary widely by window type, glazing, door material, and whether you DIY or hire labor. Below are realistic ranges and factors that influence each line item. According to a 2024 industry report, average homeowner retrofit costs for two standard windows ran between $300–$1,200 when including materials and local labor.
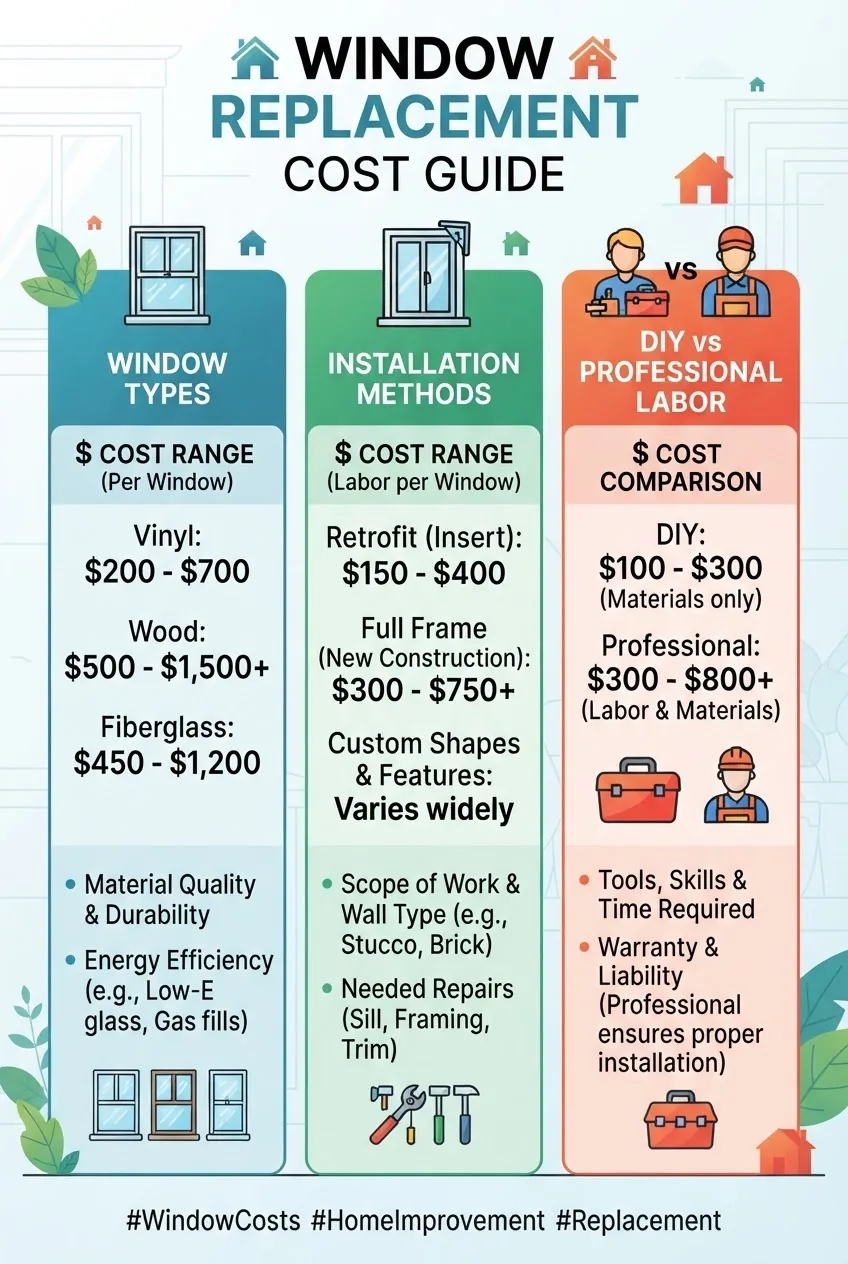
Material and window cost table
| Window Type | Parts Cost (per window) | Notes |
|---|---|---|
| Basic acrylic insert | $40–$120 | Lightweight; best for aluminum doors. |
| Tempered single-pane glass | $60–$180 | Inexpensive but lower insulation. |
| Insulated (double-pane Low-E) | $150–$450 | Better energy performance; heavier. |
| Custom arched or specialty glass | $200–$800+ | High-end finishes and long lead times. |
Installation method cost table
| Method | Typical Cost Range | Pros/Cons |
|---|---|---|
| DIY retrofit with pre-framed insert | $80–$400 total per window | Lowest cost; requires tools and time. |
| Professional retrofit | $250–$900 per window (labor incl.) | Faster, warranty may be included. |
| Panel replacement (pre-windowed panels) | $300–$1,200 per panel | Simpler install but higher parts cost; ideal if multiple windows. |
Labor vs DIY considerations
Labor rates vary by region. According to a 2024 industry report, average local handyman or door technician rates range from $65–$120 per hour, with most window retrofit jobs requiring 2–6 hours per opening depending on complexity. If you DIY, budget for tool rental ($25–$60/day for jigsaw), consumables (blades, rivets, sealant ~$30–$80), and contingency for replacement parts.
Hidden costs to anticipate:
- Replacement panel if cut location damages ribbing: $150–$600.
- Spring adjustment by professional (if needed): $100–$250.
- Permit fees in some jurisdictions for structural changes: check local authority.
When comparing to full door replacement, see the two-car and installation cost resources if you’re considering adding windows as part of a larger renovation. For larger doors or full replacements consult the 2 Car Garage Door Replacement Cost Guide and use the Garage Door Installation Cost Calculator and Pricing Guide to estimate integrated project costs.
Decision rule of thumb: if total retrofit costs (materials + labor) approach 40–60% of the price of replacing the affected panels with factory pre-windowed panels, consider panel replacement for guaranteed fit and finish.
Transition: beyond price, consider the benefits and trade-offs in terms of energy, security, and curb appeal before committing to a design.
Benefits and Considerations for Adding Windows to Garage Door
Adding windows brings immediate aesthetic and functional benefits but introduces trade-offs in security, insulation, and maintenance. Below are clear pros and cons and design considerations to help you decide.
Benefits
- Natural light: reduces daytime electric lighting needs and improves interior visibility.
- Curb appeal: windows break up large surfaces and can increase resale appeal; according to a 2024 real estate survey, modest exterior upgrades like garage windows can boost curb perception scores by up to 8%.
- Design flexibility: choose frosted, arched, or decorative patterns to match architectural style.
- Energy improvements: insulated windows (Low-E, argon fill) can lower thermal transfer compared with single-pane openings.
Considerations and trade-offs
- Security: glass can be a point of entry; choose tempered glass, small panes, or internal security film to mitigate risk.
- Insulation loss: poorly sealed windows or single-pane glass can increase heat transfer and condensation; insulated options are pricier but mitigate energy loss.
- Maintenance: glass needs cleaning; seals and spacers may fail over time on insulated units and require replacement.
- Visual privacy: tinted or frosted glazing recommended for garages that face public streets.
If you want a larger makeover involving paint, hardware, and panel accents beyond windows, consult the design ideas in the Garage Door Makeover Guide for Renovation and Upgrades.
Design tip: align window styles with existing home fenestration—use arched garage windows when your house has arched entry windows; use frosted or obscured glazing on facing streets for privacy.
Transition: plan for long-term maintenance and know how to troubleshoot common problems after installation.
Troubleshooting, Common Mistakes, and Maintenance Tips
This section addresses frequent issues after adding windows, explains repair approaches, and lists preventative maintenance routines.
- Q: My window leaks after rain — why?
A: Leaks are usually due to incomplete perimeter sealing, improper backer tape, or missed fasteners. Check for gaps greater than 1/8″, inspect the sealant bead, and remove/replace failed sealant. If the frame-to-panel joint was not primed, corrosion or paint failure can create channels for water. - Q: I see condensation between panes — what now?
A: Condensation between insulated panes indicates a failed IGU (insulating glass unit) seal. Repair requires replacing the IGU; temporary fixes include dehumidifying the garage, but replacement is the long-term solution. - Q: Window cracks from impact — can I replace just the glass?
A: Often yes for framed inserts; order tempered replacement pane of identical size and thickness. For integral bonded units or specialty arched glazing, full-frame replacement may be simpler. - Q: Door is heavier and opener strains after installation — what should I do?
A: Check door balance; heavy glazing can change torsion spring tension. Do not adjust springs yourself unless trained—call a licensed technician. If minor, add counterbalance via springs in small increments per manufacturer specs. - Q: How often should I maintain garage door windows?
A: Clean glass quarterly, inspect seals and fasteners annually, reapply exterior sealant where cracking appears, and replace failed IGUs when condensation shows. Lubricate moving components per door manufacturer schedule.
Common mistakes (first-person practitioner notes):
- I once failed to check the panel’s internal rib layout and cut through a stiffener—result: panel replacement. Lesson: always verify internal construction before cutting.
- I used an oil-based primer on galvanized steel without proper etching—paint peeled within months. Lesson: use recommended zinc-rich or self-etching primers for galvanized or bare steel.
- I omitted a secondary backer seal and later found weepage at fastener lines. Lesson: use a compressible backer (butyl tape) behind the frame before exterior sealant.
Maintenance checklist (annual):
- Inspect sealant and reseal any cracks larger than 1/16″.
- Check for condensation and inspect IGU seals.
- Tighten visible fasteners and inspect for corrosion; replace stainless hardware if near-salt environment.
- Clean glass with mild detergent; avoid abrasive pads on acrylic.
Transition: after weighing troubleshooting risk and maintenance needs, decide whether to DIY or hire a pro for your situation.
When to Hire a Professional vs DIY Installation
Deciding between DIY and professional installation hinges on safety, complexity, warranty concerns, and your own time. Below is a concise comparison and resources to help you choose.
| Factor | DIY | Professional |
|---|---|---|
| Skill required | Intermediate carpentry and power-tool experience | Installer handles everything; includes warranty |
| Safety risk | Moderate; spring work hazardous | Lower—pros insured and trained |
| Cost | Lower upfront; tool rental adds | Higher labor cost but time savings |
| Warranty & compliance | May void door manufacturer warranty | Often preserves warranty and code compliance |
When to hire: if you need spring adjustments, have a commercial door, require structural reinforcement, or prefer warranty-backed work. For commercial needs and regulated sites see the industry-specific guide: Commercial Garage Door Installation Services and Cost Guide. For general professional service pricing and scope consult the Garage Door Installation Guide and Service Cost Overview.
If you choose a pro, request proof of insurance, references, a written labor warranty, and ask whether they use factory-authorized parts to avoid invalidating door warranties.
Transition: summarize the decision points and give final actionable recommendations.
Summary and Final Recommendations
Adding windows to a garage door is a high-impact upgrade combining design and function. Summary of core takeaways:
- Choose window type based on your priorities: decorative for curb appeal, insulated for energy performance, tinted or frosted for privacy.
- Confirm compatibility with door material and door manufacturer warranty before cutting panels.
- Follow the step-by-step sequence: plan, template, drill, cut, deburr/prime, dry-fit, secure, seal, and test.
- Budget realistically: $80–$900+ per window installed depending on materials and labor; according to a 2024 industry report typical homeowner retrofits landed near $300–$1,200 for two windows.
Next steps: finalize your window selection, use the supplied cost tables and the Garage Door Installation Cost Calculator and Pricing Guide for exact budgeting, and book a professional if spring adjustments or custom glazing are required.
Final CTA: Ready to upgrade your garage with windows? Make a plan today—measure your door, pick a window style, and decide whether DIY or professional installation fits your timeline and safety needs.

