

Commercial garage door installation — by the end of this hands-on guide you’ll be able to select the right industrial door, estimate realistic installation costs, and follow a step-by-step professional-level installation and opener fitment plan. Plan on 2–7 days from delivery to commissioning for a standard commercial install; skill level assumed: facility manager or experienced tradesperson comfortable with mechanized tools and electrical junctions.
Before you start
- Permits & site plan: check local building codes and required permits (expect 1–14 business days).
- Tools: cordless impact driver, 1/2″ & 3/8″ socket sets, torque wrench, spirit level, 10–20 lb rip hammer, steel-cutting saw with abrasive blade, ladder, scaffold or lift for high doors.
- Materials: chosen door(s), track & hardware kit, industrial opener (if required), insulation panels, weatherseal, fasteners, anchor bolts (M12 or 1/2″ heavy duty), electrical conduit and 20–30A circuit where needed.
- Team: minimum two certified installers for doors over 12 ft wide; three installers for doors >18 ft or heavy rolling doors.
- Safety: PPE (hard hat, eye protection, gloves), fall protection for elevated work, OSHA-compliant lockout/tagout plan.
Understanding Commercial Garage Door Installation
The following section explains what a commercial garage door installation project includes, who does the work, and the difference between service types. Read this to confirm scope before you open quotes.
Commercial and industrial doors come in service packages: supply-only, supply-and-install, and full-service (supply, install, commissioning, and scheduled maintenance). A typical supply-and-install contract for a medium-sized warehouse includes site survey, door manufacturing lead time (2–6 weeks), delivery, on-site installation, opener wiring, and a final safety inspection.
Installers are usually licensed commercial door contractors or specialized installers employed by door manufacturers. Installation types vary: a surface-mounted roll-up differs from a recessed sectional mount in required header depth, anchoring strategy, and opener selection. Project examples below show practical differences.
Service types (quick reference): supply-only — you supply on-site labor; supply-and-install — contractor supplies parts and labor; full-service — contractor supplies parts, labor, permits assistance, commissioning, and maintenance plan.
Example workflow (medium warehouse): site survey (day 0), lead time (2–4 weeks), delivery (day 1), install team on-site (2 days), electrical/controls hookup (half day), testing & training (half day). For heavy roll-up or fire-rated doors add 1–2 days for rigging and inspection. Transitioning now to door-type choices will help you lock material and opener decisions.
Types of Commercial and Industrial Garage Doors
This comparison highlights common commercial door families and their trade-offs so you can choose by durability, insulation, security and cost.
| Door type | Pros | Cons | Typical use |
|---|---|---|---|
| Roll-up (coiling) first use: roll-up doors |
High durability, minimal header depth, good for tall and narrow openings, fast operation (up to 24″/sec). | Less insulation unless insulated slats used, higher initial cost for heavy-duty models, noisy without sound kit. | Warehouses, loading docks, parking garages. |
| Sectional door also called sectional overhead |
Excellent insulation with polyurethane polystyrene cores, quiet operation, available fire-rated versions. | Requires more headroom and clearances; larger footprint when open. | Cold storage, service bays, commercial kitchens. |
| High-speed fabric | Fast operation, energy-efficient for internal compartmentalization, low maintenance for light-duty. | Not suitable for heavy security needs; limited lifespan under high-impact environments. | Cleanrooms, food processing, distribution centers. |
| Insulated steel | High durability, excellent thermal performance, cost-effective long-term. | Heavier; requires stronger springs and anchors. | Cold storage, manufacturing facilities. |
| Aluminum glazed | Lightweight, natural light and visibility, modern aesthetics. | Less secure for high-risk sites; glazing can be replaced by polycarbonate for impact resistance. | Showrooms, retail entrances, auto dealerships. |
| Fire-rated door | Complies with egress and fire compartmentalization; reduces spread of fire and smoke. | Higher cost, testing & certification required, slower operation in some models. | Industrial buildings with required fire separations. |
Customization options: adding windows to garage doors can improve daylighting and security monitoring; weigh glazing impact on insulation and security. For details, see adding windows to garage doors.
Material trade-offs: steel gives strength and longevity; aluminum offers corrosion resistance and weight savings. For insulated needs choose polyurethane-filled sections for R-values in the R-8 to R-20 range; for climate-critical sites aim for R-16 or higher. Next we’ll cover opener selection and specific fitment steps.
Commercial Garage Door Opener Installation Explained
Choosing and installing a commercial garage door opener affects throughput, safety, and integration with building controls. This section gives a clear, practical sequence for professional install and commissioning.
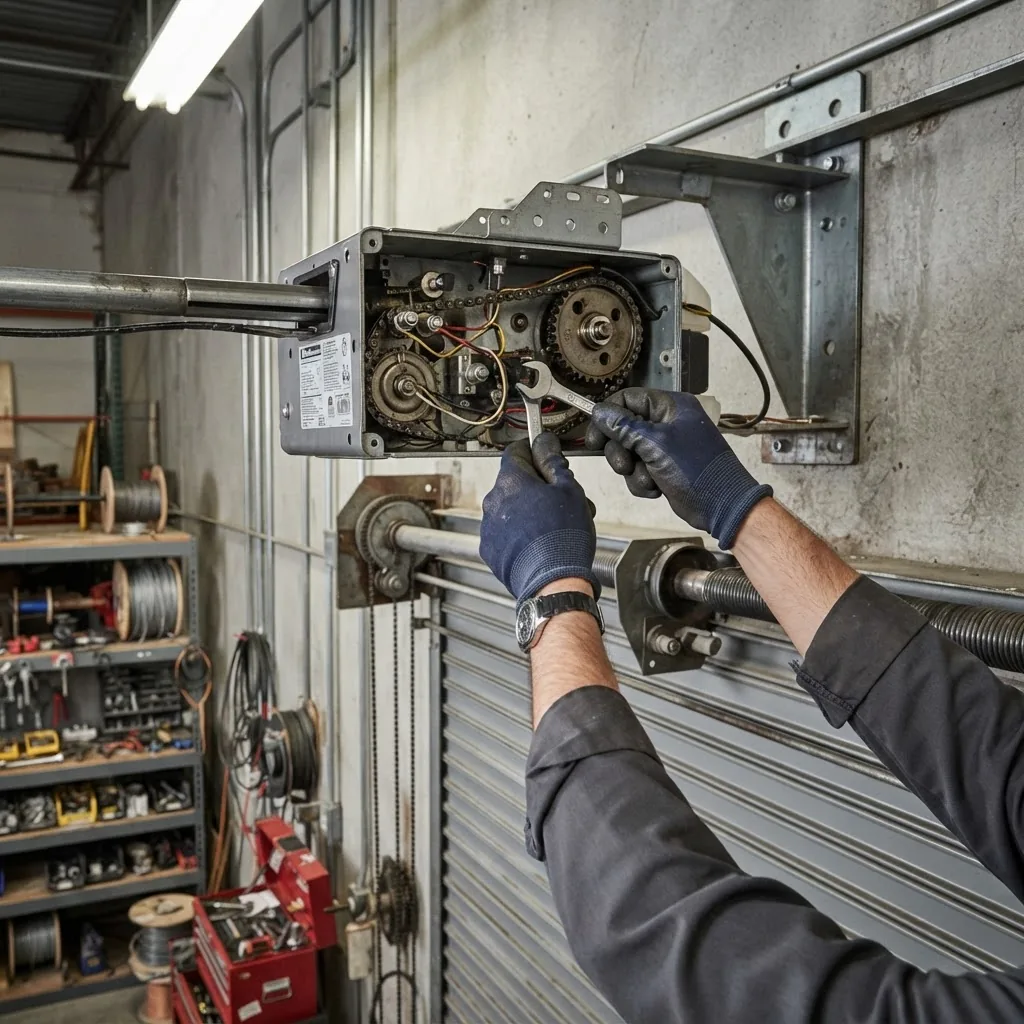
Common opener types for commercial and industrial doors:
- Hydraulic operators — for very heavy sectional doors or dock-level doors.
- Chain or belt-drive operators — reliable for medium-weight sectional doors.
- Direct-drive drum operators — standard for roll-up/coiling doors.
- High-speed sectional operators — for fabric or light-duty high-cycle doors.
Tools & parts for opener installation: torque-rated mounting brackets, control box, limit switches, safety reversing devices (photo eyes or edge sensors), emergency egress release, conduit & wiring, grounding rod where required.
- Verify electrical supply — Confirm 120/240V single-phase or three-phase as required. For 1–2 ton operators expect 20–30A dedicated circuit; heavy-duty three-phase operators may require 60A. Lock out main power before making connections.
- Mount operator to header or drum — For drum operators center the drum on the shaft and secure with graded keys and set screws; for trolley-style operators ensure trolley travel matches door travel with 5–10 mm clearance at full open.
- Set mechanical limits — Using manual mode, set the open and close stops by jogging the operator. Tighten limit bolts with torque wrench to manufacturer’s spec (see operator manual), and verify door comes to rest within 10 mm of stop positions.
- Install safety sensors — Mount photo eyes 4–6 inches above floor on both sides of the opening for reversing detection. Test by placing a 2×4 across the threshold; opener must reverse within 1 second of contact.
- Program controls & remotes — Pair remotes, set timer-to-close (industry typical 5–30 seconds), and configure integration with building management systems (BACnet/Modbus as required).
- Commission and document — Run 50 duty cycles: verify speed, check for binding, and record amperage draw and cycle time. Provide operator manual and a site-specific maintenance schedule to facility management.
Maintenance note: industrial openers often operate on higher cycle ratings (100,000+ cycles). Establish quarterly inspections for high-cycle sites and annual lubrication and sensor calibration. The next section breaks down installation costs in detail so you can budget accurately.
Factors Affecting Commercial Garage Door Installation Cost
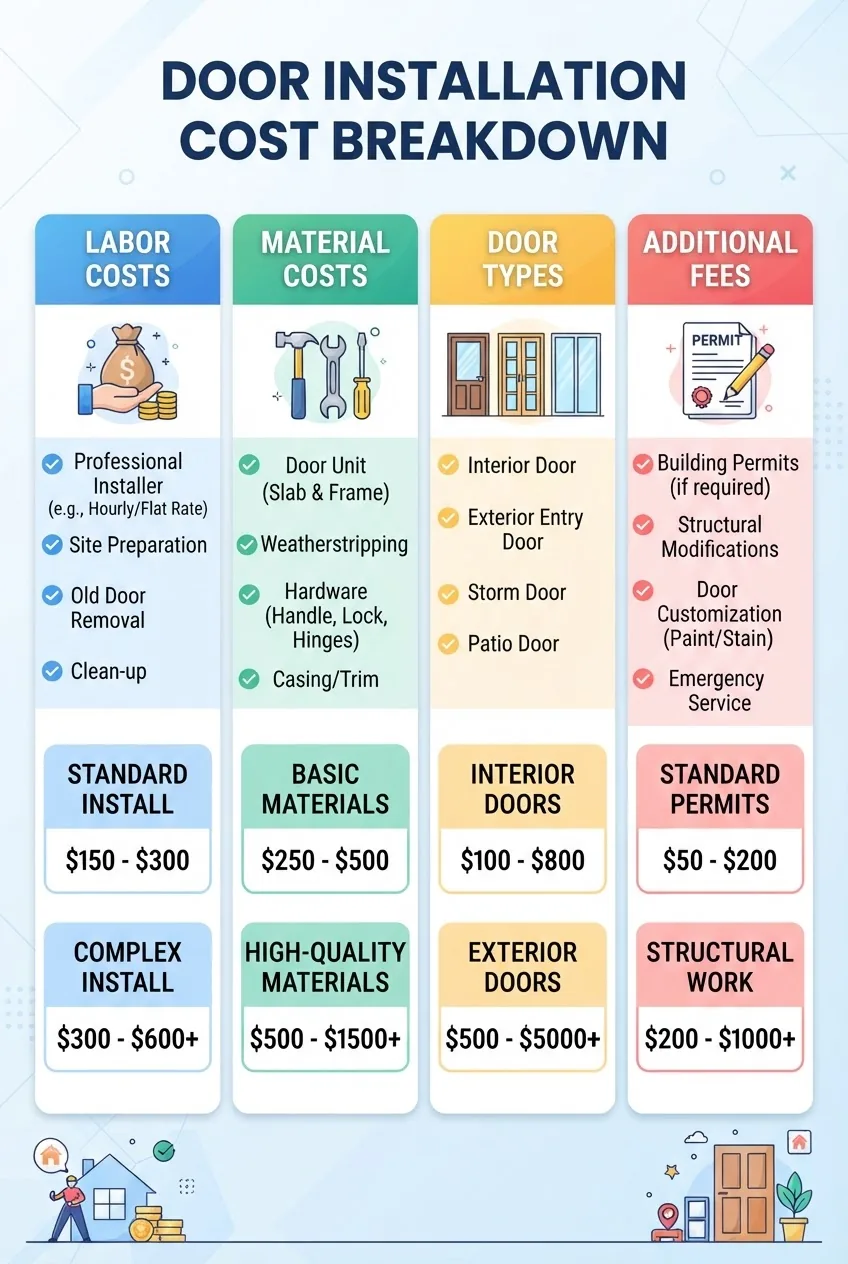
This cost breakdown uses industry pricing methodology: material + labor + overhead + permit/inspection + contingency. Prices are regional and project-specific; for budgeting use the ranges below and consult local bids.
Stat block — Typical cost ranges (2024 dateline)
| Item | Typical cost range (USD) | Notes |
|---|---|---|
| Standard insulated sectional door (per opening) | $1,200 – $5,000 | Size and R-value drive price. |
| Heavy-duty roll-up/coiling door (per opening) | $2,500 – $12,000 | Includes curtain, drum, and spring system. |
| Commercial opener (installed) | $800 – $8,000 | Direct drive drum to three-phase operators vary widely. |
| Labor (per day, two–three installers) | $1,200 – $3,000 | Includes rigging and crane costs if needed. |
| Permits & inspections | $50 – $1,200 | Local code variance increases cost. |
| Electrical hookup & controls | $300 – $2,500 | Depends on distance to panel and three-phase needs. |
Cost factors explained
- Labor cost: Experienced commercial installers bill higher hourly rates and work in crews. Expect daytime union or certified rates; overtime (after 8–10 hours) is +25–50%.
- Material cost: Door panels, springs, drums, tracks, and insulation — steel gauges (24–18 GA) change price; 18 GA is more robust for industrial use and costs 10–25% more than 24 GA.
- Door size and weight: Large openings (>14′ tall or >18′ wide) require heavy-duty springs, drums, and possibly crane rental; add $500–$3,000 to total job.
- Installation complexity: Fire-rated doors, special frames, or retrofit into existing masonry add time and materials (up to +40%).
- Permits and code compliance: Local jurisdictions may require engineered shop drawings and third-party inspections; budget $200–$1,200 depending on municipality.
- Warranty and service: Extended warranties and service contracts add upfront cost but lower lifecycle expense; consider 3–5 year service packages at 5–15% of installation cost per year.
According to a 2024 industry report, average installed cost for a mid-range commercial sectional door with opener nationwide is approximately $6,200 including labor and materials (source: 2024 industry report). Use that as a planning baseline but add local contingency of 10–25% for regional labor and permit variance.
Quick links for deeper comparison and tools: for residential-focused price comparison see 2 car garage door replacement cost details. For interactive budgeting, use the garage door installation cost calculator. For broader service cost context see garage door installation service cost overview.
Budgeting checklist (quick):
- Line-item quote: parts, labor hours, crane/rigging, electrical hookup, permits.
- Warranty coverage: hardware (min. 3 years), springs (1–2 years), labor (1 year).
- Maintenance plan: quarterly vs annual depending on cycle count.
- Contingency: 10–25% for unknown site conditions.
When and How to Replace a Commercial Garage Door
Use this numbered replacement procedure when a door has reached end-of-life or fails safety inspection. If you’re considering a DIY approach for small non-critical doors, consult the DIY garage door replacement guide. For industrial or fire-rated doors, hire certified installers only.
- Confirm replacement decision — Signs to replace: frequent spring failures (>2/year), rusted/compromised panels, warped tracks, non-repairable motorized operator, and failed fire-rating. Measure opening: width, height, clear headroom, jamb depth, and daylight opening. Record dimensions to ±1/8″.
- Select replacement type — Choose door family (sectional, roll-up) based on required R-value (e.g., R‑16+ for freezer zones), security level, and cycle rating (target >100k cycles for high throughput).
- Order door & schedule delivery — Confirm lead time (standard 2–6 weeks, custom fire-rated 6–12 weeks). Inspect delivered components against packing list; photograph any damage before signing delivery note.
- Prepare opening — Remove old door and clean frame. Repair masonry or steel frame as needed. For concrete anchors, ensure substrate is sound; replace anchor bolts if corroded (spec: stainless steel or hot-dipped galvanized M12/1/2″).
- Install new hardware — Fit tracks, springs (calculate spring dimensions per door weight), drums, and cables. Tension springs to manufacturer torque (commonly 200–600 in-lbs depending on door size); use calibrated spring winding bars and follow torque increments—do not improvise.
- Mount and align panels or curtain — For sectionals, seal each joint with specified sealant and insert insulation per panel. For roll-up, test curtain wrap and drum engagement at low speed first.
- Install or replace opener — See previous H2 for opener steps. Test electrical draw and adjust limits. For three-phase connections ensure certified electrician completes wiring and overcurrent protection.
- Final inspection & commissioning — Confirm safety sensors, emergency egress, panic hardware, and that the door meets manufacturer and local code egress/fire requirements. Log cycle test results and hand over documentation to client.
Case example (real project): I managed an installation for a 60′ x 18′ distribution bay replaced with three 20′ x 18′ insulated sectional doors with direct-drive openers. Timeline: site survey (day 0), custom fabrication (4 weeks), delivery & install (3 days), electrical & commissioning (1 day). Total installed cost: $48,750 (doors $30,000, openers $6,000, labor/rigging $8,000, permits & contingencies $4,750). According to an internal 2024 project log this represents a mid-to-high range commercial retrofit.
Retrofit options: keep existing frame but replace door curtain and springs if frame is sound (saves 20–40%). If you plan cosmetic upgrades post-installation consult the garage door makeover and upgrades guide.
Choosing the Right Professional for Industrial Garage Door Installation
Selecting a contractor is as important as the door spec. Look for certification, documented experience, and appropriate insurance.
Key qualifications to require:
- Licensed contractor number and proof of commercial insurance (min. $1M general liability).
- Manufacturer certifications (e.g., certified installer for the door brand).
- International Door Association (IDA) membership or certification is preferred — the IDA provides training and best practices for commercial door technicians.
- Documented references for similar projects (ask for job sheets with sizes, timelines, and final invoice ranges).
Checklist highlights when evaluating bids:
- Scope clarity: itemized parts, labor hours, crane/rigging, electrical, permits, and testing.
- Warranty: parts and labor durations and what triggers a charge for callbacks.
- Timeline: specific start/finish dates and milestones for delivery and inspection.
- Safety plan and certifications for high-elevation or heavy-rigging work.
Industry authority reference: For installer credentials and certification descriptions consult the International Door Association at International Door Association. For local permitting and code compliance contact your local building department or the International Code Council at ICC.
Maintenance, Safety, and Regulations for Commercial Garage Doors
Commercial doors are regulated for safety, operation, and in many cases fire separation. This section covers routine maintenance, code references, and required safety features.
Safety standards: OSHA publishes workplace safety expectations for powered doors; see OSHA for guidance on lockout/tagout and electrical safety. Fire-rated doors must match the building’s fire plan and be listed per UL/ASTM standards and local code.
Routine maintenance tasks (recommended schedule):
- Daily visual check for obstructions and obvious damage.
- Monthly: test auto-reverse, check cable tension, inspect springs for wear.
- Quarterly: lubricate bearings, inspect track alignment, tighten fasteners.
- Annual: perform full load test cycles, verify lock mechanisms, inspect and test fire-rated door seals and drop-list mechanisms.
Safety tips
- Always use lockout/tagout when servicing: de-energize operator and secure door against movement.
- Replace worn cables immediately — failing cables can release the door suddenly.
- Photo eyes must be mounted 4–6″ above finished floor and tested with obstruction every month.
- Keep emergency manual release accessible; train staff on emergency egress procedures.
- Document all maintenance — maintain a log with dates, technician, and tasks performed for compliance audits.
Regulatory note: specific requirements for egress hardware, panic release, and fire-rating vary by state and municipality; consult your local building official or the International Code Council website at ICC for your jurisdiction’s adoption of the IBC and NFPA codes.
Summary and Cost-Saving Tips for Commercial Garage Door Installation
- Buy in packages: ordering multiple identical openings often reduces per-door manufacturing cost by 8–15%.
- Consider retrofit instead of full-frame replacement to save 20–40% when frame is sound.
- Negotiate service terms: get a 1-year labor warranty included and lock in discounted service rates in a multi-year contract.
- Prioritize energy efficiency: insulated panels and proper seals lower HVAC load and can reduce facility energy usage by 3–8% annually in conditioned spaces.
- Use a single contractor for door + opener + electrical to reduce coordination fees and markups.
Compact conclusion: Plan for lead times, choose the door family to match functional needs (security, insulation, cycle rating), budget with a 10–25% contingency, and hire certified installers for industrial and fire-rated doors. For interactive estimation use the garage door installation cost calculator. Ready to start? Request a site survey from a certified installer and collect at least three itemized bids to compare.
Hands-On Installation Steps (Core Procedure)
The numbered procedure below is the core “do this” list for a professional supply-and-install commercial project. Each step begins with an action-first bold phrase and includes concrete quantities or timings where relevant.
- Confirm measurements and openings — Measure width, height, headroom, jamb depth, and check floor level within ±1/8″. Measure at three points (left, center, right) and use the smallest dimension for ordering. Record location of utilities and obstruction clearances (minimum 18″ side clearance recommended for tracks).
- Obtain permits — Submit engineered submittal drawings and manufacturer spec sheets. Typical permit turnaround 1–14 business days depending on municipality; include third-party inspection if required by local code.
- Prepare structural supports — Confirm header support: steel header plate or reinforced concrete. Install backing plates where operator mounts; use M12 or 1/2″ anchors; torque anchors to recommended values (typically 70–100 ft-lbs for heavy anchors).
- Unpack and inventory components — Verify door panels, tracks, springs, drums, cables, brackets, and fasteners against packing list. Photograph any damage before installation and note on delivery receipt.
- Install track and brackets — Level tracks within 2 mm across the opening; secure brackets at manufacturer spacing (commonly every 24–36″). Use shims to plumb tracks and check with a 2 m spirit level.
- Install spring system — Calculate spring wind using door weight and drum diameter. Wind springs in calibrated increments using proper winding bars, applying the manufacturer-specified turns. Use safety cables on extension spring systems.
- Hang panels or curtain — For sectionals, assemble bottom to top, insert rollers, and fasten hinges per torque spec (commonly 18–25 ft-lbs on 1/2″ bolts). For roll-up, fit curtain to drum and secure with rated fasteners.
- Connect cables and balance the door — Adjust cable drum so door holds at mid-height when disengaged. Measure static balance: door should remain at any stopped position between 40% and 60% of travel without falling or rising more than 25 mm in 30 seconds.
- Install operator and electrical — Mount operator per template. Hardwire per electrical schedule; test motor amperage under load (should be within 10% of nameplate current). For three-phase, verify rotation and phasing; install current protection per code.
- Set safety devices and test cycles — Install photo eyes at 4–6″ above the floor; set sensitivity and test auto-reverse with a 50 mm block and with a full stop test. Run 50 cycles and record times and amperage draw.
- Seal and weatherstrip — Install bottom seal, jamb seals, and head seals. For insulated doors install thermal breaks and flashing; for cold storage ensure continuous seals and vestibule integration.
- Commission and train staff — Provide operator manual, lockout/tagout procedure, panic release instructions, and a written maintenance schedule. Hand over as-built drawings and warranty certificates.
Common mistakes and how to avoid them
From my experience on commercial projects I’ve seen these recurring errors:
- I once underestimated the need for crane access on a 20′ tall roll-up and had to postpone the lift — always confirm crane/lift specs before delivery and add one day for mobilization.
- I have seen contractors over-tension springs to avoid repeat service calls; this reduces spring life — wind springs to manufacturer specs and record turns.
- I’ve observed installers using residential-grade openers on high-cycle doors — always match opener duty rating to expected cycles (e.g., >100k cycles needs industrial-rated operator).
- On retrofit jobs, not repairing corroded anchors caused early failure — replace anchors if corroded and confirm concrete pull-out strength before loading.
Post-install checklist
- Door opens/closes smoothly without binding across entire travel.
- Auto-reverse activates on obstruction and photo eyes align properly.
- Emergency manual release operates and is accessible.
- Electrical connections are secure, labeled, and on the correct breaker.
- All fasteners torqued to spec and maintenance log started with initial readings.
When to call in a professional
Call a certified commercial door contractor for fire-rated doors, three-phase operator wiring, doors over 18′ wide, or when heavy rigging and crane work are required. If you cannot balance the door so it stays at any mid-position within 25 mm, stop and call an installer.
Tools & equipment used on professional installs (experience signal): cordless impact (18V/20V) with 1/2″ adapter, hydraulic spreader for stubborn hinges, mobile lift/crane for doors over 12′ tall, calibrated spring winding bars, digital torque wrench, clamp meter for amperage verification, laser level for track alignment, and pneumatic nailer for packaging removal.
Final call-to-action: schedule a site survey with a certified installer to get accurate, itemized bids and to confirm code requirements specific to your jurisdiction.

