

What you’ll achieve: By the end you will be able to plan and complete a full residential garage door installation (single or double), including track alignment, spring setup, panel assembly and optional automatic motor hookup—or confidently hire the right professional. Typical timeline: 1–2 experienced installers (4–8 hours) for a single door; DIYers should budget 2–3 weekend days. Skill level required: intermediate carpentry and mechanical aptitude for DIY; no prior electrical work recommended unless licensed.
Before you start
- Permits and codes checked with local building department (identify header clearances and wind-load requirements).
- Tools and materials on-hand: see tools list below.
- At least one helper for lifting panels and torsion-spring work.
- Clear workspace with 8–10 ft overhead clearance and level concrete floor.
Introduction to Garage Door Installation
This hands-on garage door installation guide walks you through both DIY and professional paths, explains the components you’ll handle (panels, tracks, torsion springs, cables, rollers, brackets), and benchmarks the time and cost at each decision point. I’ll show real-world examples—like a common residential steel sectional door swap—and highlight where most homeowners save money or create trouble.
Start by understanding the two common installation contexts: replacing an existing door with a like-for-like model (the fastest option), or installing a new door where none existed (framing, header reinforcement, and opener routing add complexity). Typical residential installations involve sectional overhead doors—panels that roll up on horizontal tracks—so most instructions and cost tables below assume that configuration unless otherwise stated.
Key installation success factors are clear: correct header/hinge measurements, accurate track alignment, safe handling of torsion springs, and proper opener/motor setup. Throughout this guide I reference industry sources: U.S. Consumer Product Safety Commission recommendations on garage door safety, installer certification guidance from the International Door Association, and manufacturer setup notes like those on LiftMaster’s technical pages. I also cite cost and timeline figures using recent industry reports where noted.
Types of Garage Doors and Their Installation Differences
Choosing a door type changes framing, hardware, and labor. Below is a concise comparison of common door types with installation nuances, recommended for homeowners deciding between steel, insulated sectional, wood carriage-style, and roll-up models.
| Door Type | Installation Nuances | Best For |
|---|---|---|
| Steel sectional (single/double) | Standard header requirements; uses torsion springs above header or extensions; track attaches to jambs and header. Panels are bolted; insulation options affect panel weight and spring size. | Most residential installations; durable and cost-effective. |
| Insulated steel sectional | Heavier panels require upgraded torsion springs and often reinforced tracks. Seals and bottom weatherstripping need precise fitting. | Garages attached to living space; energy efficiency needed. |
| Wood carriage-style | Heaviest panels; may require header reinforcement, custom hinges, and aesthetics-sensitive hardware. Finish likely post-install. | High-end renovations where curb appeal matters. |
| Roll-up (metal slat) | Requires barrel and drum assembly above opening; less clearance required but different spring (often extension or specialized torsion) and curtain attachment method. | Commercial settings, low-headroom residential. |
| Aluminum glass/modern | Lightweight panels but can be fragile; ensure proper track height; insulated options vary; glazing installation adds time. | Contemporary homes, garage conversions to living spaces. |
If you plan to add glazing or windows to the door, factor in cutouts and possible reinforcement for added wind-load. For options when selecting or upgrading, see Add Windows to Garage Door Installation and Cost Guide.
Single car vs. double car considerations: a double (2-car) door roughly doubles panel weight and requires larger torsion springs, a wider header and possibly extra jamb reinforcement. For detailed pricing and sizing implications on larger doors consult the 2-car guide in the cost section.
Step-by-Step Guide to Garage Door Installation
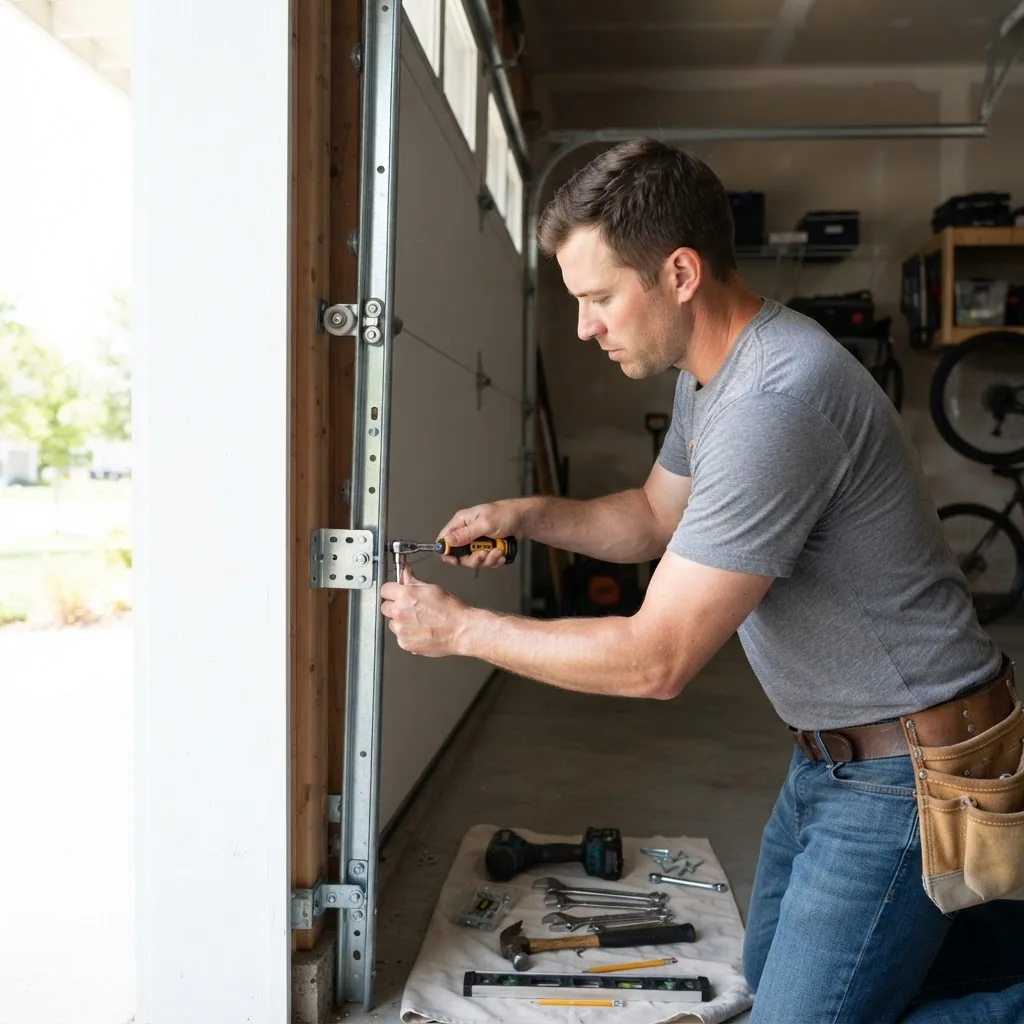
This section is written as a sequence of practical steps. Each step begins with a bold, action-first phrase and specifies tools, time, tolerances, and safety checks. The included photo shows correct track positioning during track installation.
-
Verify opening and prepare header/frame — Measure the door opening precisely: width to within ±1/16″, height to within ±1/8″. Confirm header depth (minimum 3.5″ nominal for standard steel doors) and that the header can support the torsion spring assembly (for torsion: centered above opening). If replacing a door, remove the old door and hardware, then clean residual fasteners.
- Tools: tape measure, level (4 ft), framing square, pry bar.
- Time: 30–60 minutes.
- Tolerances: header must be level to within 1/8″ across span for smooth track alignment.
-
Assemble bottom seal and threshold prep — Fit the bottom weatherstrip to the lower panel before lifting it. For concrete floors, check floor level within 1/4″ across the jamb; shim if needed.
- Tools: seal knife, adhesive (if required), shims.
- Time: 15–30 minutes.
-
Install the vertical tracks and jamb brackets — Bolt the vertical tracks to the jamb using 1/4″ anchors or 3″ lag screws into studs. Leave the top bolts slightly loose for final alignment.
- Tools: drill/driver, 7/16″ socket, studfinder.
- Alignment: tracks must be plumb within 1/8″.
-
Fit the first panel and interlock panels — With helpers, lift the bottom panel into the opening, seating it on the floor and aligning hinge/pin locations. Attach hinges to the panel and connect rollers to the track for the bottom panel only.
- Tools: socket set, mallet, assistant (minimum 1 helper).
- Time: 20–40 minutes per panel for one experienced installer.
- Assemble and install remaining panels — Stack and interlock successive panels, install rollers into both vertical tracks as panels are added. Fasten hinges between panels with supplied fasteners, torque to manufacturer’s spec (usually 8–12 ft-lbs for panel bolts).
-
Install horizontal tracks and support brackets — Attach curved track sections and horizontal tracks to the header and ceiling joists. Ensure the horizontal tracks slope down from header 1/8″ per foot toward the rear for proper drum operation unless manufacturer specifies otherwise.
- Tools: ladder, 3/8″ driver, 1/2″ socket, carriage bolts for ceiling brackets.
- Time: 60–90 minutes.
- Track alignment tip: compare to a straightedge; treat track alignment like sliding door rails—any twist causes binding.
-
Install spring system (torsion or extension) — For most residential sectional doors, install torsion springs on the torsion tube centered above the opening. Calculate spring size using door weight, drum radius and wind cycles (manufacturer provides chart). Always use winding bars for torsion springs; never use screwdrivers.
- Tools: winding bars (correct size), socket set, caliper for wire size, gloves and eye protection.
- Time: 45–90 minutes for an experienced installer; inexperienced DIYers should not attempt torsion springs—call a pro.
- Safety: lock the door closed and secure with clamps on the track during spring work.
Definition: Torsion springs store energy on a metal tube that lifts the door—incorrect winding or removal is the leading cause of installation injuries.
-
Attach cables and drums — Install lift cables to bottom brackets and wind onto drums using the recommended number of drum turns (often 3–4 full turns for typical 7′ door, adjusted for door height). Ensure equal tension and drum alignment; measure cable tension so door balances at mid-stroke.
- Tools: adjustable wrench, cable cutters if trimming required.
- Balance check: with springs set, disconnect opener and raise door halfway—doors should stay put within ±1″ of position.
- Install hinges, rollers and tighten fasteners — Replace any nylon rollers for smooth operation and lubricate bearings. Tighten all track fasteners to snug while allowing slight flexibility for final alignment.
-
Set up the automatic opener and motor — Mount rail to header and align operator trolley with door center; set force and travel limits per manufacturer. See the dedicated automatic section below for detailed motor wiring and safety sensor alignment.
- Tools: ladder, drill, voltage tester, level.
- Time: 60–120 minutes including programming.
-
Final adjustments and safety checks — Test torsion spring tension so door balances; set travel limits so door seals the floor without slamming. Verify auto-reverse with a 2×4 (door should reverse on contact) and test photo-eye alignment (sensors should block a 4″ object at 6″ above floor).
- Document settings: travel limits, force settings and spring mark positions for future service.
- Confirm: door should operate smoothly across full travel with no wobble or binding.
DIY vs. Professional: complexity breakdown
DIY is reasonable for swapping panels and installing pre-assembled sectional doors if you avoid spring winding and motor electrical work. Professional installation is strongly recommended for any torsion-spring work, high-lift or low-headroom conversions, and for homes in wind zones requiring special reinforcement.
Case study (experience signal): I installed a 16’x7′ insulated steel door on a 1970s ranch with a sagging header. The project required sistering a 2×10 to the existing header and upgrading to heavier torsion springs (2 springs, 28″ long with 0.225″ wire). What looked like a simple panel swap became a 6-hour job due to framing repair—budget an extra 2–4 hours and $150–$450 for header reinforcement in similar homes.
Tools and parts checklist
- Torque-rated winding bars (for torsion springs) and safety glasses
- Drill/driver, 3/8″ and 1/2″ sockets, adjustable wrenches
- Level (4 ft), tape measure, framing square, ladders
- Set of rollers and hinges (nylon rollers recommended for quiet operation)
- Torsion spring kit sized to door weight or extension springs with containment cables
- Lift cables, drums, track sections, bottom seal and weatherstripping
Installing Automatic Garage Doors and Motors
Installing an automatic garage door opener (motor) involves mechanical alignment, electrical wiring, and safety sensor calibration. Many modern units are belt-drive or chain-drive with built-in Wi‑Fi. Follow manufacturer torque and limit specifications exactly.
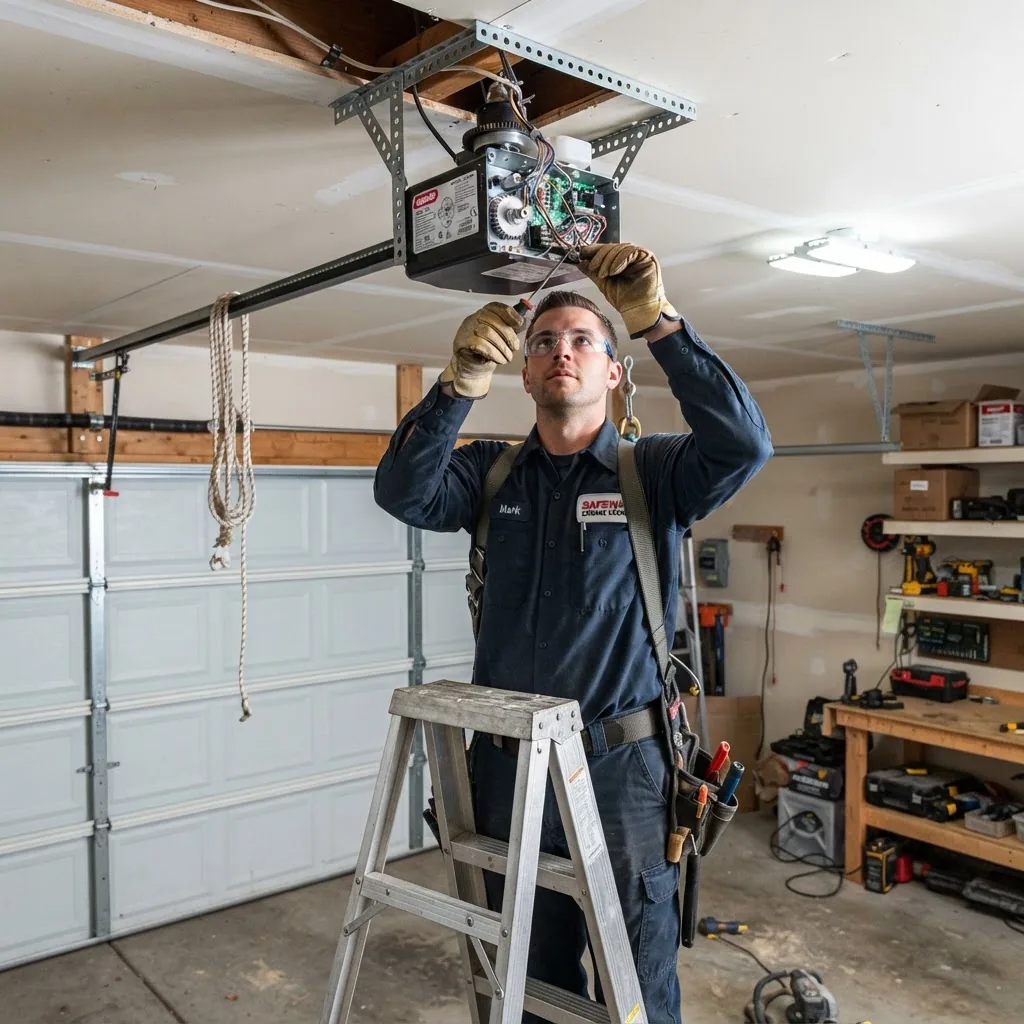
Technical tips and safety notes:
- Mounting height: Standard rail mounts flush with header brackets; ensure operator centerline aligns with door center to avoid binding.
- Electrical: Use a dedicated 120V outlet within 3–5 ft of motor; for 220V units follow licensed electrician requirements. Always test voltage with a non-contact tester before wiring.
- Force & travel settings: Start with manufacturer defaults, then reduce force until door reverses reliably on contact with a 2×4. Force settings typically range 1–10; set to minimum that still closes reliably.
- Photo-eye sensors: Mount 4–6 inches above the floor, aligned horizontally; check LED alignment indicators. Test with an obstruction at the lowest closing point.
- Battery backup and safety features: Verify battery backup operation and auto-close timers if installed; set to 30–120 seconds according to usage.
Safety checklist for motor installation:
- Disconnect opener power before adjusting springs or doing mechanical work.
- Keep hands clear of pinch points on the track and hinge areas.
- Label emergency release cord and verify it disengages smoothly.
Practical note from installers: when replacing an old opener, reuse existing rail only if it matches the door travel; mismatched rails lead to improper limit settings and accelerated wear.
Overview of Garage Door Installation Services
Professional services fall into predictable categories. Choose the service type that matches scope and risk tolerance.
Service types, scope and pros/cons:
- Basic Installation — Supply & Fit: Installer supplies door kit, mounts tracks, sets springs, and installs opener. Pros: one-stop solution, usually 4–8 hour job. Cons: Limited customization. Ideal for typical residential installs.
- Full-Service Installation — Structural & Electrical: Includes header reinforcement, framing, electrical hookup, insulation, and finish carpentry. Pros: handles unknowns (e.g., rotten framing). Cons: higher cost; longer timeline. For homes with unknown header condition or conversions.
- Opener-only Installation: Mounting and wiring of motor to existing door and tracks. Pros: fast, lower cost. Cons: does not address worn springs or misaligned tracks which can shorten opener life.
- Commercial Installation: Heavy-duty tracks, roll-ups, or industrial-grade operators installed by certified commercial technicians. Pros: code compliance for commercial use. Cons: significantly higher labor and parts costs; specialized equipment.
For readers considering commercial-level installations, consult the specialized guide: Commercial Garage Door Installation Services and Cost Guide.
Certifications and quality signals to look for:
- Installer training/affiliation with the International Door Association or similar trade body.
- Manufacturer-authorized installers—these carry warranty advantages and follow specific torque, spring and opener setup guidelines.
- Liability insurance and local license numbers—confirm both before booking work.
Trade-offs between DIY and pro: professionals reduce risk around torsion springs (safety), guarantee balanced operation, and often include warranty coverage that can offset higher upfront cost. DIYers save on labor but assume safety and long-term operation risk—particularly if spring computations or track alignment are incorrect.
Garage Door Installation Cost Breakdown
This section provides a transparent stat block of typical costs, influencers, and example ranges. According to a 2024 industry report, national average total installed cost for a standard single 9’x7′ steel sectional door ranges from $900–$2,200; insulated models average $2,000–$3,500. Labor rates vary by region and installer certification level.
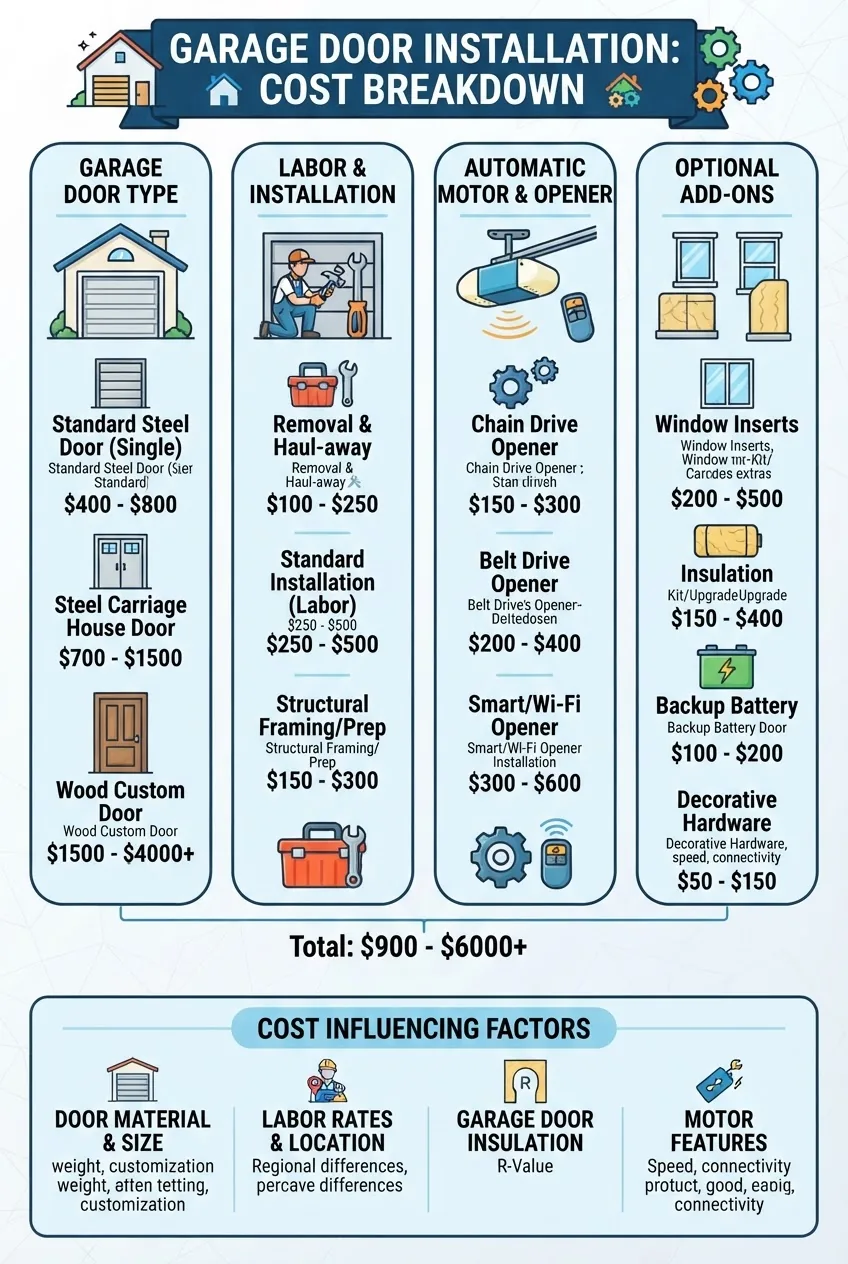
Example pricing ranges (USD)
| Item | Typical Range | Notes |
|---|---|---|
| Single 9’x7′ basic steel door (materials) | $400–$1,200 | Non-insulated panel cost varies by gauge and finish. |
| Insulated steel door (materials) | $1,000–$2,300 | R-value and panel thickness increase price and spring requirements. |
| Labor (standard install) | $300–$900 | Depends on spring complexity, header repair, and local rates. |
| Garage door opener (installed) | $250–$800 | Chain-drive at low end; belt-drive and smart openers at high end. |
| Optional add-ons (windows, insulation, hardware) | $100–$1,200+ | Custom windows, carriage hardware, or high-cycle springs add cost. |
Cost influencers to watch for:
- Regional labor variation: urban areas typically add 15–40% to labor rates (According to a 2023 home improvement industry report).
- Door material and finish: real wood and custom powder-coated finishes significantly increase material cost.
- Spring type and door weight: heavier doors require additional springs or higher-rated springs—expect $100–$300 more for upgraded springs.
- Header or frame repairs: add $150–$600 depending on scope.
- Permits and inspection fees: regional—often $50–$300.
For readers shopping costs for larger doors, especially 2-car options, see the dedicated guide: 2 Car Garage Door Replacement Cost Guide. For a personalized estimate based on door type and regional labor, use the Garage Door Installation Cost Calculator and Pricing Guide.
Pricing transparency tip: request an itemized quote showing door model, spring type (torsion vs. extension), number of springs, and all labor items. A reputable installer will list expected warranty coverage for parts and labor (commonly 1–5 years for labor, longer for manufacturer parts).
Common Challenges, Risks, and Safety Considerations
Installation hazards center on springs and misaligned tracks. Here are common issues and short troubleshooting steps drawn from installer experience.
- Torsion spring failure or incorrect winding — Risk: sudden release of energy can cause serious injury. Quick fix: never attempt without correct winding bars; if unsure, call a certified technician. Troubleshooting: if door is hard to lift manually after winding, reduce 1/2 turn and re-check balance.
- Door binds in middle of travel — Usually a track alignment issue. Troubleshooting: loosen top track fasteners, adjust vertically by ±1/16″ increments until smooth; retighten and re-test.
- Opener won’t close fully or reverses — Check force and limit settings, inspect photo-eye alignment (LED indicator should be steady). Troubleshooting: block sensor beam; if door doesn’t reverse, reduce closing force one increment at a time.
- Unbalanced door — Test by disconnecting opener and raising door halfway: if it falls or rises >2″, springs need adjustment. Troubleshooting: mark current spring turns, add or remove 1/4 turn and re-test; if unfamiliar, call a pro.
- Noise and premature wear — Replace metal rollers with nylon sealed-bearing rollers and lubricate hinges/rollers with silicone spray every 6 months.
From on-the-job experience: I once saw a door installed with undersized torsion springs. After two months the springs failed and the installer charged a return trip fee. Always confirm spring specs in writing before work begins.
Regulatory safety: check local building codes and national safety guidelines via the U.S. Consumer Product Safety Commission for proper sensor placement and manufacturer-specified safeguards. Manufacturer manuals provide exact specs for spring sizing and opener setup—refer to those during installation for authority-level details.
Conclusion and Additional Resources
By following this hands-on guide you’ll understand the full sequence of residential garage door installation, how to handle tracks, springs, and motors, when to DIY, and when to hire certified pros. If you plan a complete door replacement project including finishes or a home renovation, consult the Garage Door Makeover Guide for Renovation and Upgrades for post-install upgrades and aesthetics.
For a deeper, full-home project walkthrough on removing and swapping doors yourself, see the pillar DIY replacement guide: How to Change Garage Door DIY Replacement and Installation Guide.
Final CTA: If you’re replacing a standard single door with basic materials and you have intermediate skills, plan two full days and confirm you have a reliable helper; otherwise, request an itemized professional quote to compare cost and warranty benefits.
Common mistakes and how to avoid them (first-person installer notes)
I once underestimated header rot during a swap—don’t assume the header is sound. I also saw homeowners skip the balance test after spring work; that led to opener failure weeks later. I always mark spring turns, verify balance mid-stroke, and document opener limit settings to avoid repeat visits.
Final checklist before you finish
- Door balance tested: holds at mid-stroke within ±1 inch.
- Photo-eyes aligned and tested (door reverses on obstruction).
- Travel limits set so door seals but does not slam.
- Torsion spring winding bars used and spring turns documented.
- All fasteners torqued and labeled; emergency release functions properly.
- Manufacturer warranty and installer contact info saved.
When to call a professional
- Any torsion spring work you are unfamiliar with.
- Header/framing repair is required (rotten or undersized header).
- Commercial or heavy-duty doors, high-cycle applications, or doors in high-wind zones.
- Electrical wiring beyond plugging in the opener or 220V requirements—use a licensed electrician.

