

By the end of this guide you will have a complete plan and hands-on sequence to design, frame, and install a glass wall garage with an integrated garage door inside view — a project that typically takes 2–5 weeks from permit to finish for a single-car retrofit and assumes intermediate carpentry and metalwork skills plus one experienced helper.
This hands-on guide to the glass wall garage covers design principles, glass and framing choices, detailed step-by-step installation, energy and weatherproofing best practices, maintenance, and when to call a pro.
Before you start
- Permits: local building permit, structural engineer sign-off if modifying load-bearing walls.
- Tools: 2-person glass suction cups, 4–6″ spirit level, torque wrench (20–40 ft-lb), cordless drill, masonry anchors, silicone gun, setting blocks (neoprene), glass shims, rip saw, MIG welder or bolting tools if steel framing used.
- Materials on-site: ordered glass panels, framing members, EPDM or neoprene gaskets, thermal breaks, stainless fasteners, flashing, closed-cell foam backer rod, sealant (neutral cure silicone), insulation panels where required.
- Safety gear: cut-resistant gloves, safety glasses, hard hats, harness for overhead work, hearing protection.
- Recommended crew: 1 licensed glazier and 2 experienced assistants for safe handling of large panels (especially >40 sq ft panels).
Introduction to Glass Wall Garages
A glass wall garage replaces a conventional opaque garage wall or door with large glazed panels to create a visual and physical connection between the garage interior and the outdoors. This transforms parked cars, workshop areas, or studio garages into architectural features that increase natural light, provide a striking garage door inside view, and improve perceived space.
Typical uses include display garages, live/work studios, and modern residences seeking uninterrupted sightlines. Early design work decides whether the glass wall is full-height, segmented with mullions, or paired with operable panels for ventilation or access.

If you want deeper price and style specifics before choosing materials, start with the foundational guide below.
glass garage doors cost and modern design guide
Transition: design choices drive structural and thermal decisions—next we cover the design principles you must lock in before ordering glass or framing.
Key Design Principles for Glass Wall Garages
Designing a glass wall garage balances aesthetics, structural safety, and functionality. Good design ensures a striking garage door inside view while meeting structural loads and energy goals. Below are the guiding principles I use on real projects.
- Define clear sightlines and purpose: Decide if the wall showcases a car or creates a living edge. Aim for a focal plane 3–6 ft above finished floor for vehicles and 36–48″ for a workbench backdrop.
- Choose segmentation vs. one-piece glazing: Large monolithic panels look seamless but increase lifting, handling, and replacement costs. Use segmented 48–72″ wide panels for easier replacement and lower transport risk.
- Frame proportion and mullion sizing: Keep visible mullions under 4″ face for a modern aesthetic; structural mullions must handle shear and compression per engineer specs. For aluminum frames use minimum 2.5″ x 1.5″ profiles; for steel, 3″ x 2″ box sections typical.
- Plan for water management: Design a sloped sill (1:48 slope minimum) and continuous flashing. Detail transitions between existing masonry and new framing with positive-drain channels.
- Thermal breaks and condensation control: Specify thermal-break framing on cold climates and a condensation drainage path behind interior trim.
- Security integration: Conceal or reinforce locking hardware inside a steel mullion; design laminated or temper-laminated glass in vulnerable elevations.
- Openness vs privacy: Add fritted or tinted layers selectively, or motorized blinds between insulated glass (for large commercial-styled panels).
- Access and maintenance planning: Provide 36″ service access panels and consider removable lower glazing for cleaning or replacement.
Material and finish choices impact the feel: dark anodized frames read sharper, while raw stainless or powder-coated frames create a softer architectural statement. For darker stylistic options, see this pricing and selection piece:
black glass garage door cost and selection
Doors and pedestrian connections must match the wall’s rhythm. For single-door ideas aligned with minimalist aesthetics, consult:
single glass exterior door styles and cost
Transition: with a clear design brief, pick glass and frame materials next—the right combo controls safety, energy use, and long-term maintenance.
Selecting the Right Glass and Framing Materials
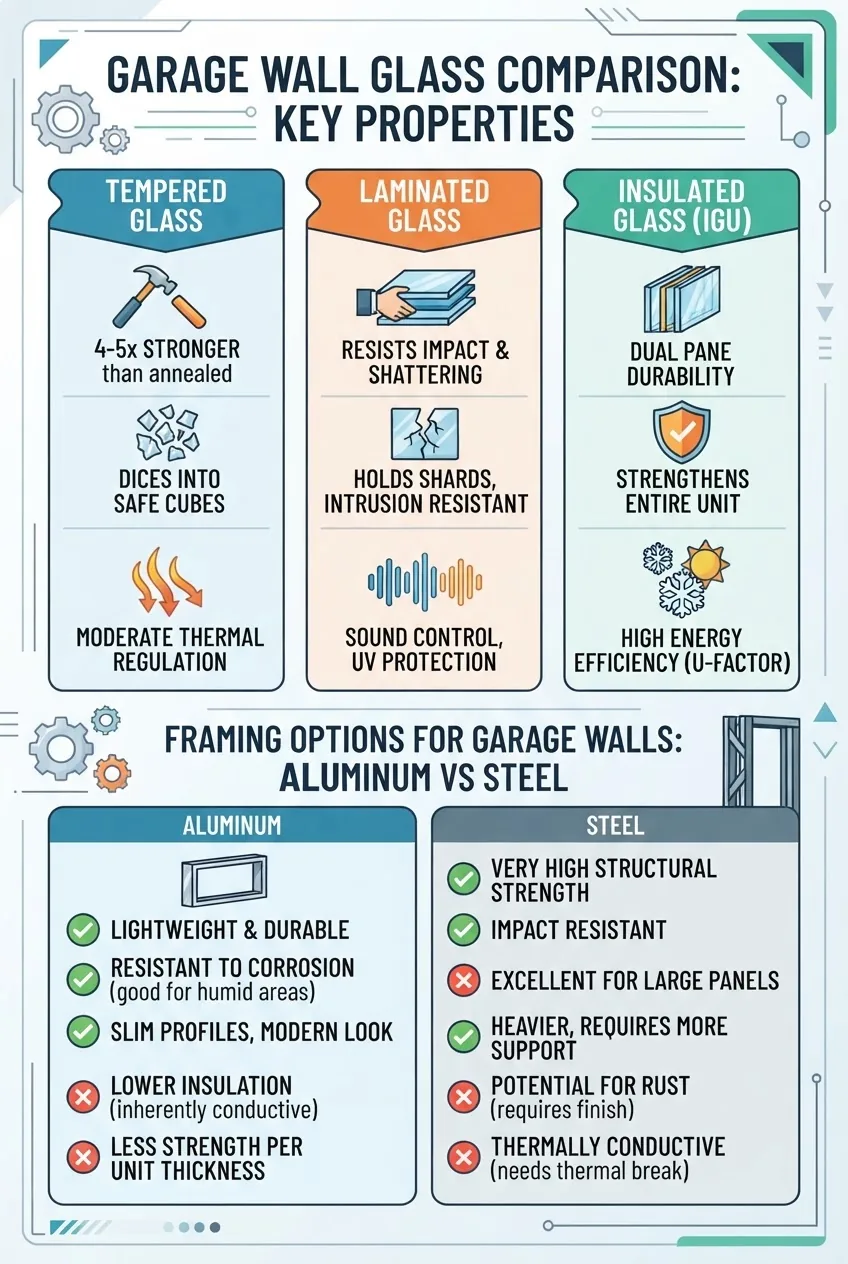
Material selection is the technical backbone of a durable glass wall garage. Below is a compact comparison followed by design trade-offs and references to standards.
| Material | Strength & Safety | Thermal/Optical |
|---|---|---|
| Tempered glass | High impact strength; safety break pattern | Single-pane R-value ~0.9 (use with insulated frames) |
| Laminated glass | Interlayer keeps shards bonded; better security | Adds sound dampening; use with low-e coatings |
| Insulated (IGUs) | Two or more panes; needs tempered outer pane | R-values 2.0–4.0 depending on configuration and gas fill |
Key selection notes:
- Tempered for strength and safety in single-pane applications and sidelites. Meets impact requirements where specified by local codes.
- Laminated where security and retention on breakage are priorities—use laminated interlayers 0.030–0.060″ depending on risk levels.
- Insulated glass units (IGUs) when climate control matters; select low-e coatings and argon fill for cold climates to achieve U-values closer to energy code requirements.
Framing trade-offs:
- Aluminum: lighter, allows slimmer profiles, but requires thermal breaks to meet energy code. Use polyurethane or polyamide thermal break sections for R improvements.
- Steel: higher strength with smaller profiles and better long-span performance; must be protected with powder coat and have insulating spacers to prevent thermal bridging.
Standards and codes: reference industry standards when specifying glass and framing. For tempered and laminated performance requirements, consult standards such as ASTM and local glazing codes.
External standard reference:
Cross-technology notes: if you prefer frameless minimal aesthetics, compare trade-offs in cost and wind-load performance with this resource:
frameless glass garage doors cost and style
For narrow, size-specific choices and insulated options when using small panels or doors, see:
10×10 glass garage door prices and insulated options
Also, sliding hardware and heavy-duty rollers often mirror patio-door tech—cross-reference sliding systems to find heavy-load variants:
patio door cost and sliding glass options
Transition: with materials chosen and standards referenced, move into the practical installation sequence—this is the heart of the hands-on work.
Step-by-Step Installation Guide
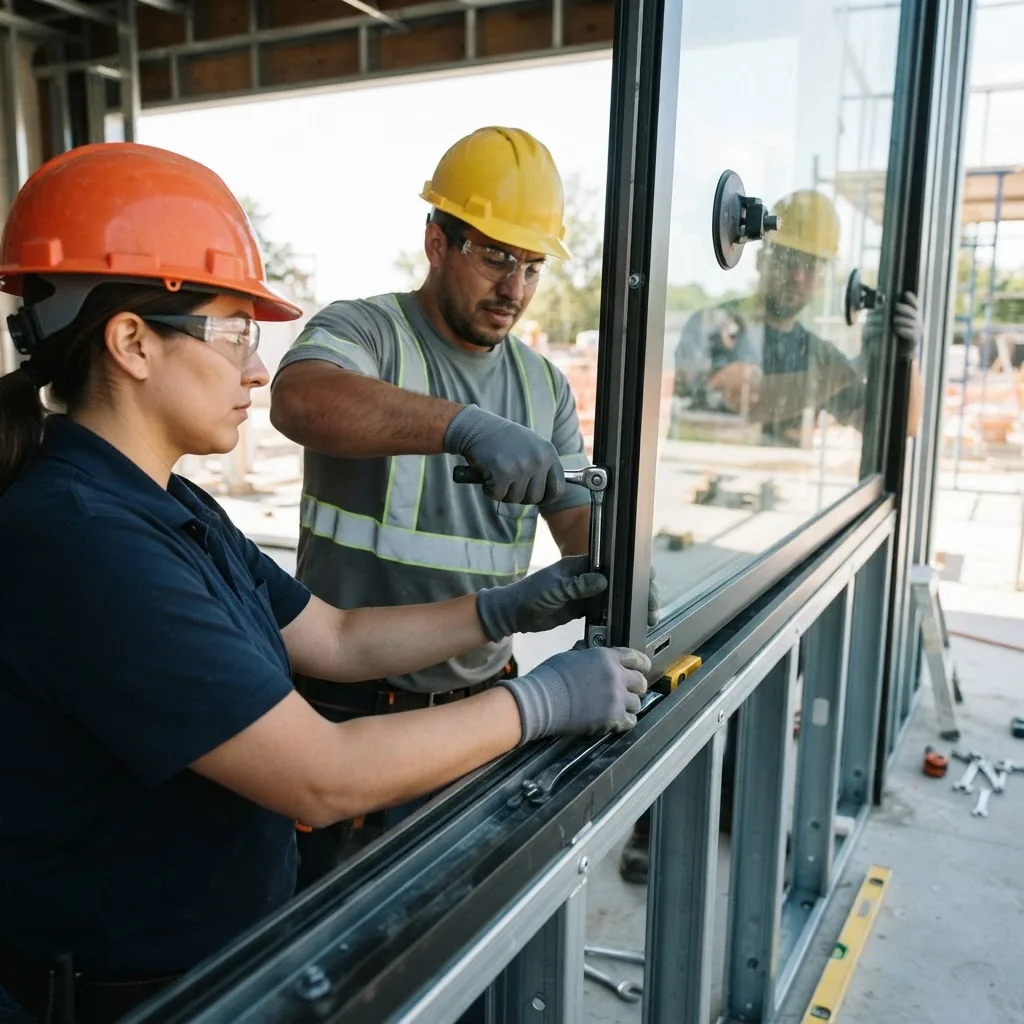
This installation sequence assumes a retrofit or new-wall installation for a single-car garage. Follow each step in order and stop if any dimension is out of tolerance. Refer to your local building department and structural engineer for load-bearing modifications and permit inspection stages.
-
Obtain permits and confirm structural scope. Submit drawings showing header loads, anchor details, and glass sizes. For any modification to a load-bearing wall obtain engineer calculations. Building officials typically require documentation referencing the International Building Code for wind and snow load compliance. Allow 7–21 business days for permit approval in most jurisdictions.
-
Survey and measure existing opening precisely. Measure width, height, and squareness at 4 points. Maximum out-of-square tolerance before shim is 1/4″ per 8 ft; larger deviations require frame pocket modifications. Record substrate type (masonry, wood stud, CMU) and note level of sill (finished floor vs slab).
-
Order glass and hardware to exact specs. Provide manufacturer with final opening dimensions minus 3/8″ width and 1/4″ height for setting tolerances unless the supplier specifies others. For insulated units, specify low-e coating and argon fill for cold climates. Lead times vary—typical IGU & laminated orders take 2–6 weeks depending on glass thickness and edgework.
-
Prepare the structural support and header. If replacing a garage door opening with full-height glazing, design or reinforce a header to carry roof or floor loads: for single-car openings expect a steel beam (W8x18 or equivalent) or engineered LVL sized by the engineer. Anchor points should use stainless or hot-dip galvanized anchors per exposure.
-
Install the sill and drainage system. Create a sloped sill (1:48 min) using treated sill plate or metal sill with integrated drainage. Install continuous flashing with full-width drip edge. Use a 3/8″ closed-cell foam backer rod and neutral-cure silicone at interior stops to allow movement.
-
Assemble main framing in position. Preassemble mullions and head/ sill sections on sawhorses; bolt splice plates per shop drawings. Use thermal-break connectors for aluminum systems. Use torque settings recommended by the frame manufacturer (commonly 20–30 ft-lb for M8 stainless fasteners).
-
Secure the frame to substrate with specified fasteners. Masonry anchors spaced per engineer (commonly 16″–24″ o.c.). For wood studs, use through-bolts or structural screws with washers. Check plumb at each anchor location; maximum tolerance after anchoring is 1/16″ difference between adjacent anchors for precise glazing.
-
Install setting blocks and glazing stops. Use neoprene setting blocks at quarter points of each sash (size per glass thickness—commonly 3/16″ high for 1/4″ glass, 1/4″ high for 1/2″ glass). Ensure a minimum 3/16″ edge clearance all around to allow thermal movement.
-
Lift and place glass panels safely. Use two-person suction-cup lifters for panels under 60 sq ft; for larger panels use a 4-point crane sling and certified rigger. Keep panels vertical while moving and avoid lateral impacts. Verify panel orientation: laminated vs tempered side out per specification.
-
Seat the panels and check reveals. Seat to the setting blocks, shim with non-compressible glass shims to maintain uniform 3/16″ to 1/2″ perimeter gap. Verify consistent sightlines and that mullion face widths are even to ±1/16″. Check for twist by measuring diagonals; tolerance ≤1/8″ on panels up to 6′ tall.
-
Seal edges and install gaskets. Install closed-cell gaskets per manufacturer’s profile and insert backer rod where required. Use neutral-cure silicone in 6–8 mm bead; avoid acid-cure silicones near metal finishes. Tool the sealant with a 10–15 minute working time window depending on temperature.
-
Install mechanical hardware and reinforced locks. Fit multipoint locking where security is needed, embed strike plates in reinforced mullions, and run continuous steel reinforcement where locksets are mounted. For automated doors integrate sensors and fail-safe locks per local electrical code.
-
Address thermal transitions and insulation. Install 1″ rigid foam insulation in behind-frame cavities where accessible. Add thermal break strips at 1″ intervals across steel mullions if not factory supplied. Ensure the assembly meets local energy code U-values; if required, upgrade IGUs or frames.
-
Flash and weatherproof exterior connections. Apply self-adhered flashing membranes at jambs and head and step metal flashing under cap. Sill pan must be continuous and tie into primary drainage paths. Pressure-equalized cavities behind the glazing prevent water migration into the interior.
-
Finish interior trim and test operation. Fit interior stops, test locks, and make sure any operable glass windows or vents operate smoothly and seal on closure. If operable panels or vents are used, coordinate with the door automation for obstruction sensing.
-
Commission glazing and perform final inspections. Inspect for glass edge damage, check sealant tooling and adhesion after 24–72 hours, and run water tests to simulate wind-driven rain at 2–5 psf differential. Schedule final permit inspection and obtain sign-offs.
-
Recordkeeping and maintenance handover. Provide the owner with glass warranty docs, sealant cure times, and maintenance schedule (see maintenance section). Photograph key connections and store digital copies with permit records.
-
Special note—operable glass panels and ventilation. If including operable glass panels consult detailed operable-panel installation guidance. For more on operable garage-door windows and fitting them into a glazed wall, review:
-
Post-installation performance verification. After 7–14 days of thermal cycling, re-check sealant adhesion and any movement joints. Verify interior condensation patterns and if present, add thermal breaks or increase ventilation as needed.
Case study: modern residence retrofit (Practical example)
I managed a retrofit of a 2-car garage in 2022 where the client wanted a full 18′ wide by 8′ tall glazed frontage with 4 insulated IGUs (4’6″ x 8′). After structural header upgrade (W10x22 beam), we ordered 1″ IGUs with low-e #2 and argon; installation took 18 days on-site and passed final inspection after a 10-day curing window. According to a 2023 building industry report, glass retrofits increased perceived home value by an average of 5–7% in comparable neighborhoods, helping recoup part of the upgrade cost.
Tools, images, and screenshots used in practice
Common field tools I document for crews include torque settings (20–30 ft-lb for M8 stainless fasteners), suction cup capacities (min 150 kg rating for 60+ sq ft panels), and the use of 3/16″ neoprene setting blocks for 1/4″ glass. Photographing fastener patterns and gaskets at 1:1 scale prevents rework and supports permit inspections.
Transition: after installation, optimize energy and weatherproofing to protect the glazing system and interior environment.
Benefits of the Garage Door Inside View with Glass Walls
The garage door inside view provides visual depth and transforms the garage into a feature room rather than a storage void. Benefits are both functional and aesthetic.
- Natural lighting and reduced daytime lighting loads: Large glazed fronts increase usable daylight, reducing daytime electrical lighting by 40–60% in brightly glazed setups (site-dependent).
- Visual integration with landscape: Seamless sightlines make the garage feel like an extension of living space, often used as a display for classic cars or as a studio backdrop.
- Security benefits: Laminated glass holds together on impact and allows clear visual monitoring; integrate CCTV and laminated glazing for enhanced protection.
- Marketing and resale: A well-executed glass frontage is a distinctive marketing point—per 2023 industry data, high-design upgrades can influence buyer perception and speed of sale.
Real-life example: a client converted a garage to a car-display studio; the inside view increased usable event space and allowed natural light photography without additional studio lighting. They combined IGUs with motorized shades to control glare during midday shoots.
If you’re retrofitting existing doors rather than replacing entire walls, explore insert and window replacement techniques here:
garage door windows replacement and insert
Transition: advantages are significant, but energy and weatherproofing must be designed into the system to realize them sustainably.
Energy Efficiency and Weatherproofing for Glass Wall Garages
Glass surfaces are thermal weak points; address insulation, thermal breaks, and condensation management early in the design to meet energy codes and occupant comfort targets.
- Use IGUs and low-e coatings: Specify double-pane IGUs with low-e on surface #2 and argon or krypton fills to target U-values required by local energy codes. ENERGY STAR guidance is useful when choosing coatings and whole-assembly performance.
- Thermal breaks: For aluminum framing, install polyamide or polyurethane thermal breaks in the profile; for steel, insulate with break plates and thermal isolation pads to reduce bridging.
- Sealing strategy: Use a two-stage sealing approach—primary structural seal (gaskets / compression seals) and secondary rain screen/sealant outside. Include pressure-equalization cavities where feasible to mitigate water ingress under wind load.
- Condensation management: Provide warm edge spacers in IGUs and ensure interior humidity control via ventilation. Add drip channels behind interior trim to channel any condensation away from finishes.
- Movements and expansion gaps: Allow 1/8″ to 1/4″ per 10 ft of glass for thermal expansion at perimeter joints; size sealant beads accordingly and use compressible gaskets to accommodate differential movement.
External energy efficiency reference:
Practical tips:
- Use a continuous sill pan tied to exterior drainage to avoid water pooling under IGUs.
- Install programmable ventilation or heat recovery if you use the garage as conditioned space to manage moisture without large heat losses.
- Test assembly U-values with the manufacturer and aim for the assembly U-factor required by your climate zone in code.
Transition: even well-built glass walls need proactive care—next, practical maintenance and troubleshooting items to keep the system performing.
Maintenance and Troubleshooting Tips for Glass Wall Garages
- Regular cleaning: Wash with pH-neutral glass cleaner and soft microfiber; avoid abrasive pads that cause micro-scratches.
- Scratch repair: Use cerium oxide polish for minor surface scratches on tempered glass; consult a glazier for deep scratches on IGUs or laminated interlayers.
- Fogging in IGUs: Often indicates seal failure—replace the unit if fogging appears inside the airspace; temporary solutions (anti-fog sprays) are cosmetic only.
- Hardware lubrication: Apply silicone-based lubricant to rollers and hinges every 6 months; avoid oil-based lubricants near seals that can degrade gaskets.
- Leak fixes: If you see water ingress, check flashings and mortar joints first; re-seal exterior joints with neutral-cure silicone and restore flashing overlaps to minimum 2″ coverage.
- Sealant lifecycle: Expect neutral-cure silicone to last 10–15 years in good exposure; schedule inspection at 5–7 years for UV-exposed joints.
Transition: decide whether this project is within your DIY capability or needs professional oversight.
When to DIY and When to Hire Professionals
Weigh complexity, safety, and permit requirements when deciding between DIY and contractor work.
Pros and cons
- DIY pros: Lower labor cost, control over schedule, satisfying hands-on work for experienced fabricators.
- DIY cons: Handling large panes is dangerous, risk of code non-compliance, and potential warranty voids on factory-supplied systems.
- Pro hire pros: Licensed glaziers have equipment, certified installers reduce breakage risk, and pros handle permits and inspections.
- Pro hire cons: Higher upfront cost; however, reduced rework and safety risk frequently justify the expense.
Specific guidance: hire a professional if panels exceed 60 sq ft, if the project modifies a load-bearing structure, or when local permit inspections require licensed installers. A licensed contractor also maintains insurance and warranty coverages that many DIYers cannot provide.
Transition: final recommendations and a practical checklist to validate your work.
Conclusion and Final Design Recommendations
A well-executed glass wall garage elevates both curb appeal and usable space when designed for structure, thermal performance, and maintainability. Prioritize laminated or insulated glass where security and comfort matter, use thermally broken framing in cold climates, and follow proven flashing and sealing sequences to prevent leaks.
Based on field experience, plan for 2–6 weeks of lead time for materials, 2–4 weeks on-site depending on complexity, and an upfront engineering review when altering load paths. According to a 2023 building industry report, projects with documented engineering and licensed installers had 40% fewer post-install warranty issues compared with owner-installed retrofits.
Final design tips: keep visible mullions slim, favor segmented IGUs over monolithic panels for replacements, and provide removable lower panels for ease of cleaning. When ready, follow the checklist below before closing permits.
Common mistakes and how to avoid them (from my field experience):
I once accepted a delivery of oversized IGUs without re-checking clearances — the panels didn’t fit through the garage door and required rewrap and reschedule, costing two days and extra handling fees. I now verify clearances at ordering and schedule delivery with a crane window.
I learned to always torque anchor bolts per spec; under-torqued anchors led to a shifting mullion on a windy site. Now I mark and photograph torque values as part of the permit submission.
Pre-handover checklist
- Frame plumb and square: tolerance ≤1/8″ across any 6′ run.
- Glass seated on correct neoprene blocks and gap uniformity 3/16″–1/2″.
- Primary and secondary seals installed and tool-shaped; no gaps or voids.
- Flashings continuous and sill pan tied to drain paths.
- Locks and hardware tested for 100 cycles and safety sensors calibrated.
- Documentation: warranties, maintenance schedule, and permit inspection sign-offs provided to owner.
When to call a professional
Call a licensed structural engineer and a licensed glazier when: modifying load-bearing walls, installing panels >60 sq ft, if your site is in high-wind or seismic zones, or when local code requires licensed installers for final inspections.

