

Garage door windows replacement and insert work completed: by the end you’ll have removed damaged panes, fitted a new pane or insert kit, sealed and tested the panel, and know when to call a pro. Total time: 1–6 hours per panel depending on complexity; assumed skill level: intermediate DIY (basic carpentry, safe glass handling).
Before you start, read the full guide. This Hands-On Guide gives step-by-step procedures, tool lists, safety tips, product comparisons, troubleshooting and maintenance so you can complete most replacements confidently.
Introduction to Garage Door Windows Replacement and Inserts
Replacing a garage door window is like replacing a house window but requires extra care because garage door panels move and are under spring tension. This guide covers both full garage door window replacement and fitting garage door window inserts so you can choose a fast insert kit or a full glass swap depending on damage, budget and desired look.
You’ll learn the differences between glass types (tempered, laminated, insulated), how to remove the old pane without warping the panel, the tools that save time, and the safety checks to complete when reassembling. The step-by-step sections include exact screw sizes, recommended sealants, and fastening torque ranges where applicable.
What you’ll achieve: a weatherproof, secure window or insert, sealed to manufacturer tolerances, with glazing beads or retainers installed correctly and door balance verified.
Before you start
- Confirm door model and panel thickness (measure to 1/16″ accuracy).
- Check your garage door warranty — many warranties void if you drill new holes or alter factory frames.
- Set aside a clean, flat workspace for glass and hardware (at least 6 ft x 4 ft).
Tools & Materials (minimum)
- Safety: safety glasses, cut-resistant gloves (A4 or higher), knee pads.
- Tools: Phillips #2 screwdriver, 1/4″ nut driver, 3/8″ ratchet, utility knife, putty knife, caulking gun, 6″ glass suction cup (for tempered/large panes), trim puller.
- Materials: replacement glass or insert kit, compression or closed-cell foam gasket strips (3/16″–1/4″), 100% silicone sealant (neutral-cure), stainless steel pan-head screws (#8 x 3/4″ typical), glazing bead or retainer (if required).
With the essentials set, move to types and match the right product to your door and skill level.
Next we compare the available types and explain pros and cons so you can match aesthetic, insulation and safety needs.
Types of Garage Door Windows and Inserts
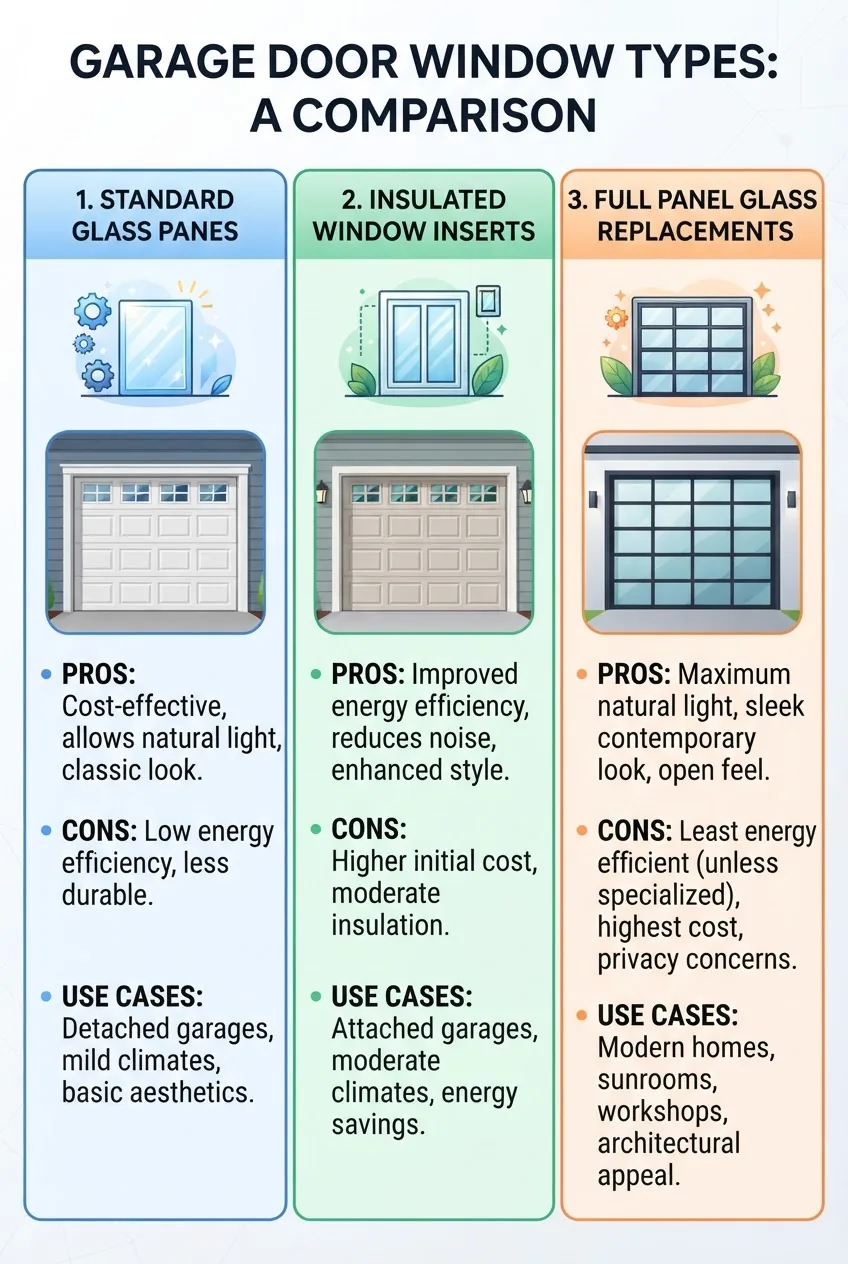
| Type | What it is | Pros / Cons |
|---|---|---|
| Standard Glass Pane | Single tempered glass fitted into a factory frame or gasket. | Pros: low cost, original look. Cons: minimal insulation, breaks on impact. |
| Insulated Insert Kit | Pre-assembled double-pane or acrylic insert fitting into an existing opening. | Pros: improved R-value, easy install. Cons: higher cost than single pane, size limits. |
| Full Panel Glass Replacement | Replacing the full door panel with a glass panel or frameless assembly. | Pros: premium look, uninterrupted light. Cons: high cost, structural changes required. |
Beyond those core types, glass comes in several construction choices:
- Tempered glass — heat-treated, breaks into small granular pieces; required by many codes for door applications.
- Laminated glass — two panes with a PVB interlayer; holds fragments on breakage and improves sound isolation.
- Insulated glass units (IGUs) — two or more panes separated by a spacer with hermetic seal; improved thermal performance.
- Acrylic or polycarbonate — lighter and impact-resistant; scratches more easily and may yellow over time.
Styling choices are worth considering with the options above. If you’re thinking of darker or designer glass, see black glass garage door options and for frameless treatments check frameless glass garage door styles . For designs that integrate large expanses of glass see glass wall garage design ideas .
Code and safety: many jurisdictions require tempered or laminated glass for glazed garage doors. For published standards consult ASTM standards, which define impact safety and testing for glazing in doors.
Now that you know types and their trade-offs, next we cover when replacement is necessary and the common triggers to act.
When and Why to Replace Your Garage Door Windows
Common reasons to replace garage door windows range from obvious damage to performance upgrades. Below are frequent triggers and decision cues.
- Visible damage: cracks, chips, or shattered panes. If tempered glass fractures into many small pieces, replace immediately—remaining fragments can still cut the gasket and hardware.
- Seal failure: condensation between IGU panes indicates seal failure and loss of insulating performance.
- Energy upgrade: replacing single-pane glass with an insulated insert reduces heat transfer and can cut HVAC load in attached garages.
- Security concerns: older single-pane glass is easier to breach; laminated glass or polycarbonate offers better forced-entry resistance.
- Aesthetics: discoloration, scratched acrylic, or mismatched panels after partial repairs justify full replacement for consistent appearance.
- Compatibility with automation: some sensors and door balance setups require uniform panel weight; mismatched glass can cause misalignment and wear.
When deciding, weigh short-term fixes versus long-term reliability:
- Minor chip: repair or replace the single pane if chip under 1/2″ away from edge and not in load path.
- Condensation inside IGU: replace the unit — dehumidifying alone won’t restore R-value.
- Multiple panels damaged or corroded frames: consider full panel replacement or professional service.
For related sliding or patio glass projects that sometimes pair with garage remodels, read patio door and sliding glass options .
Safety note: if glass breakage has damaged torsion springs or cables, stop and call a professional—do not operate the door.
Choosing the right replacement involves measurements, matching panel thickness, and selecting materials. The next section is a practical checklist to guide that choice.
How to Choose the Right Replacement Window or Insert
Choosing correctly reduces callbacks and warranty issues. Follow this step-by-step checklist and record each measurement and decision.
- Measure the opening precisely. Measure glass visible opening and full panel thickness to 1/16″. Record height, width, panel thickness, and bead/recess depths.
- Identify factory frame type. Is the opening framed with a separate metal retainer or is glass set into a routed wood or composite door? Photodocument both sides—this helps when ordering kits or custom glass.
- Decide glass construction. Choose tempered for code compliance, laminated for security/noise control, IGU for insulation, acrylic for impact resistance. Note: laminated and IGUs are heavier—confirm hinge/spring capacity.
- Check weight limits and balance. Measure panel weight before and after replacement; if the new glass adds >3 lbs to a single panel you must rebalance springs (verify spring length and torque specs in manual).
- Select glazing method. Choose between gasket-mounted inserts, screw-retained glazing beads, or full replacement panels. Gasket-mounted inserts are faster; beads provide a factory look.
- Confirm hardware compatibility. If the original used snap-in retainers, confirm dimensions for replacement retainer kits. If drilling new holes, check warranty conditions.
- Pick a reputable supplier. For safety and proper glass cutting tolerances choose vendors that cut to ±1/16″ and provide tempered or laminated certification. For best practices about glazing and energy, see guidance from the National Association of Home Builders.
- Decide DIY or pro. Use this rule: if replacing a single small pane in a composite door and you have a helper, DIY; if replacing multiple panes, IGUs, or altering panel structure, hire a pro.
- Order spares. Order an extra gasket strip and two extra retainer screws per panel to avoid delays on install day.
For operable or opening window options and installation details, see garage door windows that open and installation .
Document all product part numbers and take photos. Keep receipts and any glass certification in case the door manufacturer queries warranty status.
The next section walks you through the actual replacement process with precise, sequential steps. Follow them in order and do the safety checks where indicated.
Step-by-Step Guide to Replacing Garage Door Windows
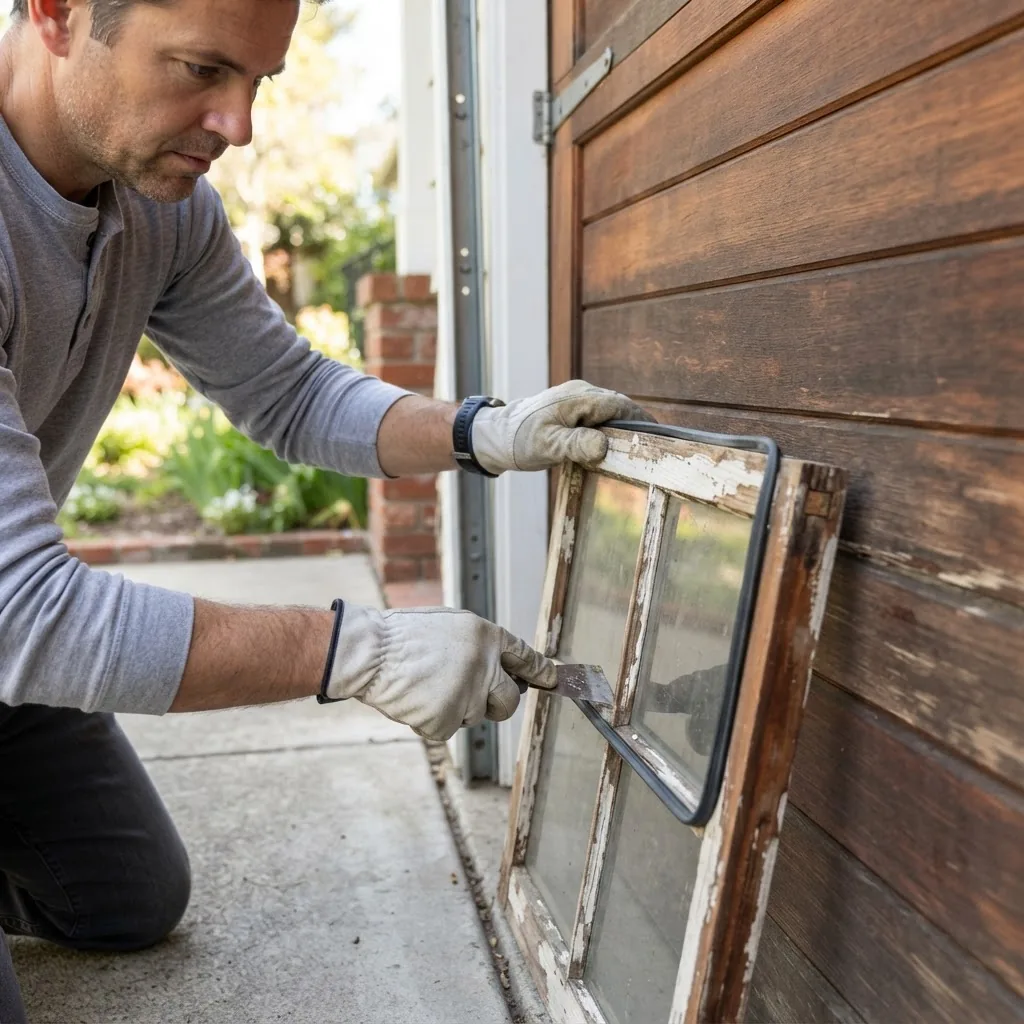
This section assumes you have measured the opening, sourced the correct replacement glass or insert, and set up a helper for safety. Estimated time: 1–3 hours for a single panel replacement; 3–6+ hours for insulated units or panel swaps.
Before you begin
- Disconnect automatic opener from the door (pull release cord).
- Prop the door open securely with locking pliers on track or use a door prop — never trust springs to hold the door during work.
- Wear cut-resistant gloves and safety glasses.
- Isolate and secure the door. Raise the door to waist height and place a 2×4 under the bottom edge on both sides to prevent movement. Confirm the opener is disconnected.
- Remove glazing bead or retainer. Use a trim puller or putty knife to pry off the glazing bead: start at one corner and work in short increments to avoid bending. Keep removed retainers in order for re-installation; label with tape if they differ.
- Cut old sealant and detach glass. Score old silicone or rubber gasket with a utility knife along the interior edge where glass meets frame. For glued beads use a thin-blade putty knife to free the bead. If glass is intact, have a helper support the pane as you remove screws or loosen retainers.
- Lift out the broken or old pane safely. For intact glass, use two suction cups or have a helper hold both sides; slide the pane outward slightly and tip to release from bottom pocket, then lower gently. For broken glass, clear loose shards with gloved hands and a brush; vacuum area thoroughly.
- Prepare the opening. Remove debris, old gasket material, and rust. If metal channels are bent, straighten them with pliers. Wipe with isopropyl alcohol and let dry. Measure opening again after cleanup.
- Fit foam gasket or closed-cell seal. Cut gasket to length with 1/8″ compression allowance; press the foam gasket into the recess. For IGUs use a closed-cell backer rod plus a 3/8″ silicone bead on the exterior face for a weatherproof seal.
- Set the new glass or insert. With two people, lift the pane with suction cups, angle into the bottom channel, then rotate into position so it sits centered and flush. For insert kits, slide the aluminum perimeter into the panel opening and secure per kit instructions.
- Install glazing bead or retainer. Re-install retainers using manufacturer screws (#8 x 3/4″ recommended) at 6–8″ intervals. Do not over-torque — 20 in-lbs is a typical maximum for pan-head stainless screws in thin metal door panels; overtightening will distort the panel.
- Seal external perimeter. Run a continuous 3/16″ bead of neutral-cure silicone along the exterior seam where glass meets panel; tool the bead smooth within 5 minutes to ensure adhesion.
- Check door balance and operation. Remove door props and test manual operation first: open and close the door slowly by hand. The door should remain in any position when lifted halfway—if not, springs need adjustment. Reconnect opener and run a full cycle; check for rubbing, wind noise, and sensor alignment.
- Final inspection and cleanup. Confirm no gaps larger than 1/8″ exist around the glazing; check weather sealing continuity. Clean glass per manufacturer’s instructions and dispose of broken glass safely per local regulations.
Key torque and measurement notes:
- Measure glass thickness to 1/16″ and order to that tolerance.
- Max recommended screw torque into thin metal panels: 20 in-lbs.
- Sealant cure: neutral-cure silicone typically skins in 15–30 minutes and cures in 24–48 hours at 70°F/50% RH.
Tools list (detailed)
- 6″ glass suction cup x2 for 24″–36″ panes; larger panes require 4-cup system.
- Power driver with clutch and a 1/4″ nut driver attachment.
- Trim puller, putty knife, utility knife with 10 blades.
- Measuring tape, digital caliper (for panel thickness), marker, masking tape.
When replacing an insulated unit or full panel, follow the manufacturer panel replacement guide and confirm spring adjustments with a professional if added panel weight exceeds 5% of existing panel weight—this threshold often triggers re-torquing or spring replacement.
Common mistakes and how to avoid them
I once used standard silicone on an acrylic insert and it fogged the edge—use neutral-cure silicone for plastics. I also overtightened retainers once and distorted the metal panel; now I use torque-limited drivers set to 20 in-lbs. Never skip balance testing after installation; I’ve seen doors bind and damage rollers when balance wasn’t checked.
Finish checklist
- Glass installed flush, sealed with continuous bead, retainers secured at 6–8″ spacing.
- Door balance verified: door holds at halfway point and opens smoothly.
- No visible gaps >1/8″; weatherstripping intact.
- All hardware tightened to recommended torque and excess sealant cleaned.
When to call a professional
If the replacement requires altering torsion springs, heavy IGUs (>40 lbs), structural panel changes, or the door fails balance tests after installation, call a certified garage door technician. Springs and counterbalance systems store potentially lethal energy—do not adjust unless trained.
If a simpler approach fits your skillset, installing an insert kit is often faster and lower risk—details follow.
Installing Garage Door Window Inserts: Easy DIY Options
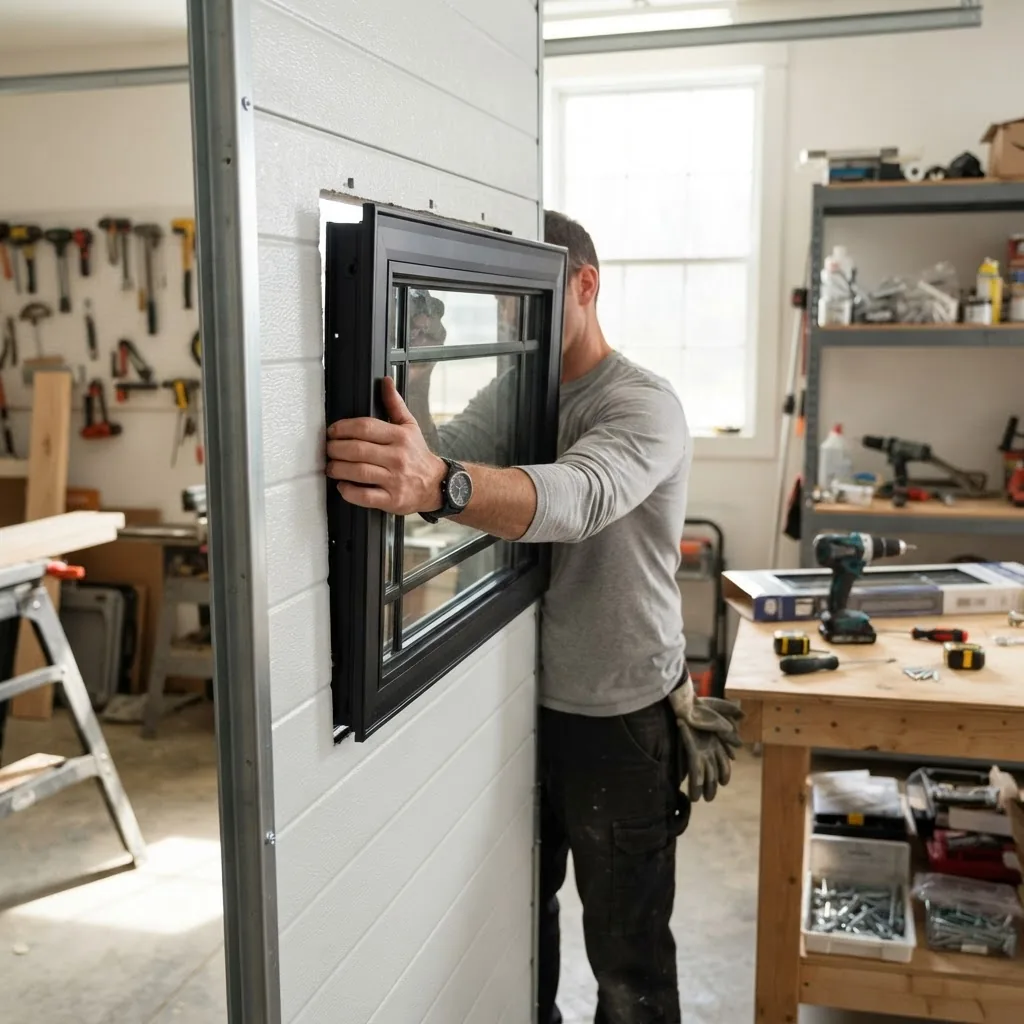
Garage door window insert kits are prefabricated frames with glass or acrylic panels sized to common factory openings. They minimize cutting and reduce risk of panel damage. Typical install time: 30–90 minutes per kit for a single competent DIYer with one helper.
- Confirm kit fit. Compare kit outer frame to opening; the kit should have 1/8″–1/4″ clearance on each side to allow gasket compression.
- Prepare the gasket. Some kits include pre-applied foam gasket; otherwise cut closed-cell foam to length and adhere into the groove using contact tape.
- Dry-fit the insert. Place the insert into the opening to verify alignment and screw hole locations. Mark locations with a felt-tip marker for faster install.
- Apply sealant if recommended. Many kits advise a continuous bead of neutral-cure silicone on the outer face for weatherproofing—apply 3/16″ bead.
- Install and secure. Slide the kit into place, align, and drive supplied screws at the specified interval (commonly 6″–8″). Keep torque low to avoid panel distortion.
- Tool the bead and trim excess gasket. Remove excess sealant and compress gasket for a watertight fit. If the kit includes a snap-on molding, press it onto the perimeter until all clips engage.
- Test and adjust. Run a manual open/close cycle checking for contact or vibration. Tighten screws in small increments if seal gaps appear.
Pro tips:
- For metal doors, pre-drill screw locations with a #21 drill to reduce sheet metal tear-out.
- When using acrylic inserts, cover edges with painter’s tape during install to avoid scratches from tools.
- Store the insert flat and upright—acrylic can warp if stored in heat for days.
Insert kits are an accessible DIY path for many homeowners, but they are sized to common factory openings. If custom sizing is required or frames are rotted, consider a full panel replacement or professional service.
Even a well-executed installation can encounter issues — the next section helps diagnose and fix them quickly.
Troubleshooting Common Issues with Garage Door Windows
Below are common problems and tested solutions drawn from field experience and manufacturer best practices.
Issue: Condensation between IGU panes
Solution: Replace the IGU. Condensation indicates seal failure; desiccant is depleted. According to a 2024 industry report, IGU seal failure is a common cause of service calls within 8–12 years in humid climates (industry report).
Issue: Rattling or wind noise near the window
Solution: Check retainer screw torque (20 in-lbs max) and add a thin closed-cell foam shim under the retainer to damp vibration. Tighten screws incrementally; avoid overtightening which warps panels and increases noise.
Issue: Insert doesn’t fit or gaps remain
Solution: Verify opening dimensions; an oversized insert can be eased by shaving 1/32″ of gasket or replacing with compressible foam up to 1/8″. For gaps >1/4″, reorder or use a custom-cut unit.
Issue: Door out-of-balance after installation
Solution: Re-weight the panel and compare to original. If new weight differs more than 5% per panel, springs need adjustment. Tensioned springs are hazardous—call a pro unless you are trained.
Issue: Scratches on acrylic insert
Solution: Minor surface scratches can be reduced with plastic polish; deep scratches require replacement. Avoid abrasive cleaners; use manufacturer-recommended cleaners.
Issue: Glass cracked shortly after install
Solution: Inspect for sharp metal burrs along the channel, misaligned retainers inducing glass stress, or overtightened screws. Replace glass and correct the source—do not reuse a pane that was stressed.
For structural guidance and glazing standards consult ASTM and the National Association of Home Builders for best practices: ASTM and NAHB.
Costs and purchase choices vary widely; next section outlines buying channels and cost factors plus a short comparison table.
Cost Considerations and Where to Buy Garage Door Windows
Costs depend on glass type, size, whether you buy a kit or custom-cut IGU, and whether installation is DIY or professional. Typical price ranges (installation not included): single tempered pane $35–$150; acrylic insert kit $80–$300; custom IGU $150–$500; full panel glass replacement $300–$1,200 depending on panel finish and mounting.
According to a 2024 industry report, average DIY-compatible insert kits represent approximately 20%–40% of the cost of a full panel glass replacement (industry report).
| Product | Typical Price (materials) | DIY Difficulty |
|---|---|---|
| Single tempered pane | $35–$150 | Low–Medium |
| Acrylic/Polycarbonate insert kit | $80–$300 | Low |
| Custom IGU (double-pane) | $150–$500 | Medium–High |
| Full glass panel replacement | $300–$1,200+ | High |
Where to buy:
- Manufacturer direct — best for exact panel matches and tempered certifications.
- Local glass shops — good for custom IGUs and same-day cutting.
- Big box or online retailers — convenient for common-sized insert kits and acrylic panels.
For a broader discussion of glass garage door costs and modern aesthetics see the pillar page Glass Garage Doors Cost and Modern Design Guide . If you need size-specific data, consider the 10×10 glass garage door prices and insulated options and for comparing with other single-door glass options see single glass exterior door styles and costs .
Warranty and returns: confirm that the supplier provides tempered glass certification and a damage/return policy. Some manufacturers charge a restocking fee of 15%–25% for custom cuts.
For energy and glazing guidance consult the U.S. Department of Energy resources on windows and doors: Energy.gov – Windows & Doors.
Routine care extends window life and avoids early failures—next are practical maintenance steps.
Maintenance Tips to Extend the Life of Your New Garage Door Windows
- Inspect seals annually and replace any closed-cell foam showing compression >25% or cracks wider than 1/16″.
- Clean tempered glass with ammonia-free cleaner; avoid abrasive pads on acrylics.
- Lubricate rollers and hinges quarterly; avoid silicone spray on glazing beads (it can attract dirt and loosen beads).
- Re-torque retainer screws after the first 30 days of installation to account for gasket compression (re-torque to 12–16 in-lbs if previously set at 20 in-lbs).
- Check for condensation in IGUs twice per year; early detection avoids long-term seal failure.
- Touch up any metal panel paint chips within 7 days to prevent rust that can spread under retainers and damage glazing channels.
- Keep gutters and external water runoff clear; roofline splashback can undermine seals and cause premature degradation.
- Record installation date, glass type, and supplier contact info in a maintenance log for warranty claims.
Following these steps typically extends functional life by 30%–50% compared to neglected units, according to aggregation of manufacturer lifecycle guidance (industry sources).
A few final best-practice items to close the guide and next steps for readers.
Conclusion – Best Practices for Garage Door Window Replacement and Inserts
This hands-on guide walked you through identifying the right product, measuring, safe removal, installation, troubleshooting, and maintenance for garage door windows and garage door window inserts. Start with precise measurements, choose the glass construction that fits your goals (tempered for code, laminated for security, IGU for insulation), and use gasket-mounted inserts when possible to reduce risk.
Always test door balance after any weight change, follow torque guidelines for thin metal panels, and keep a record of parts and installation dates for warranty and future repairs. When in doubt about springs, heavy IGUs, or structural work, call a certified technician.
Call to action: If you’re replacing a single pane or fitting an insert kit, gather the measurements and tool list, order the kit with a spare gasket, and follow the Step-by-Step Guide above. For full-panel or weight-sensitive replacements, contact a certified garage door installer.

